1. Important Safety Instructions
Please read all instructions carefully before using the appliance and retain for future reference. Always follow basic safety precautions when using electrical appliances.
- Do not immerse the appliance, cord, or plug in water or other liquid.
- Ensure the voltage indicated on the appliance corresponds to your local mains voltage before connecting.
- Close supervision is necessary when any appliance is used by or near children.
- Unplug from outlet when not in use and before cleaning. Allow to cool before putting on or taking off parts.
- Do not operate any appliance with a damaged cord or plug, or after the appliance malfunctions or has been damaged in any manner.
- Do not place the appliance against a wall or against other appliances. Leave at least 10 cm free space on the back and sides and 10 cm free space above the appliance.
- Do not place anything on top of the appliance.
- Do not use the appliance for any purpose other than described in this manual.
- Extreme caution must be used when moving an appliance containing hot oil or other hot liquids.
- The appliance is for household use only.
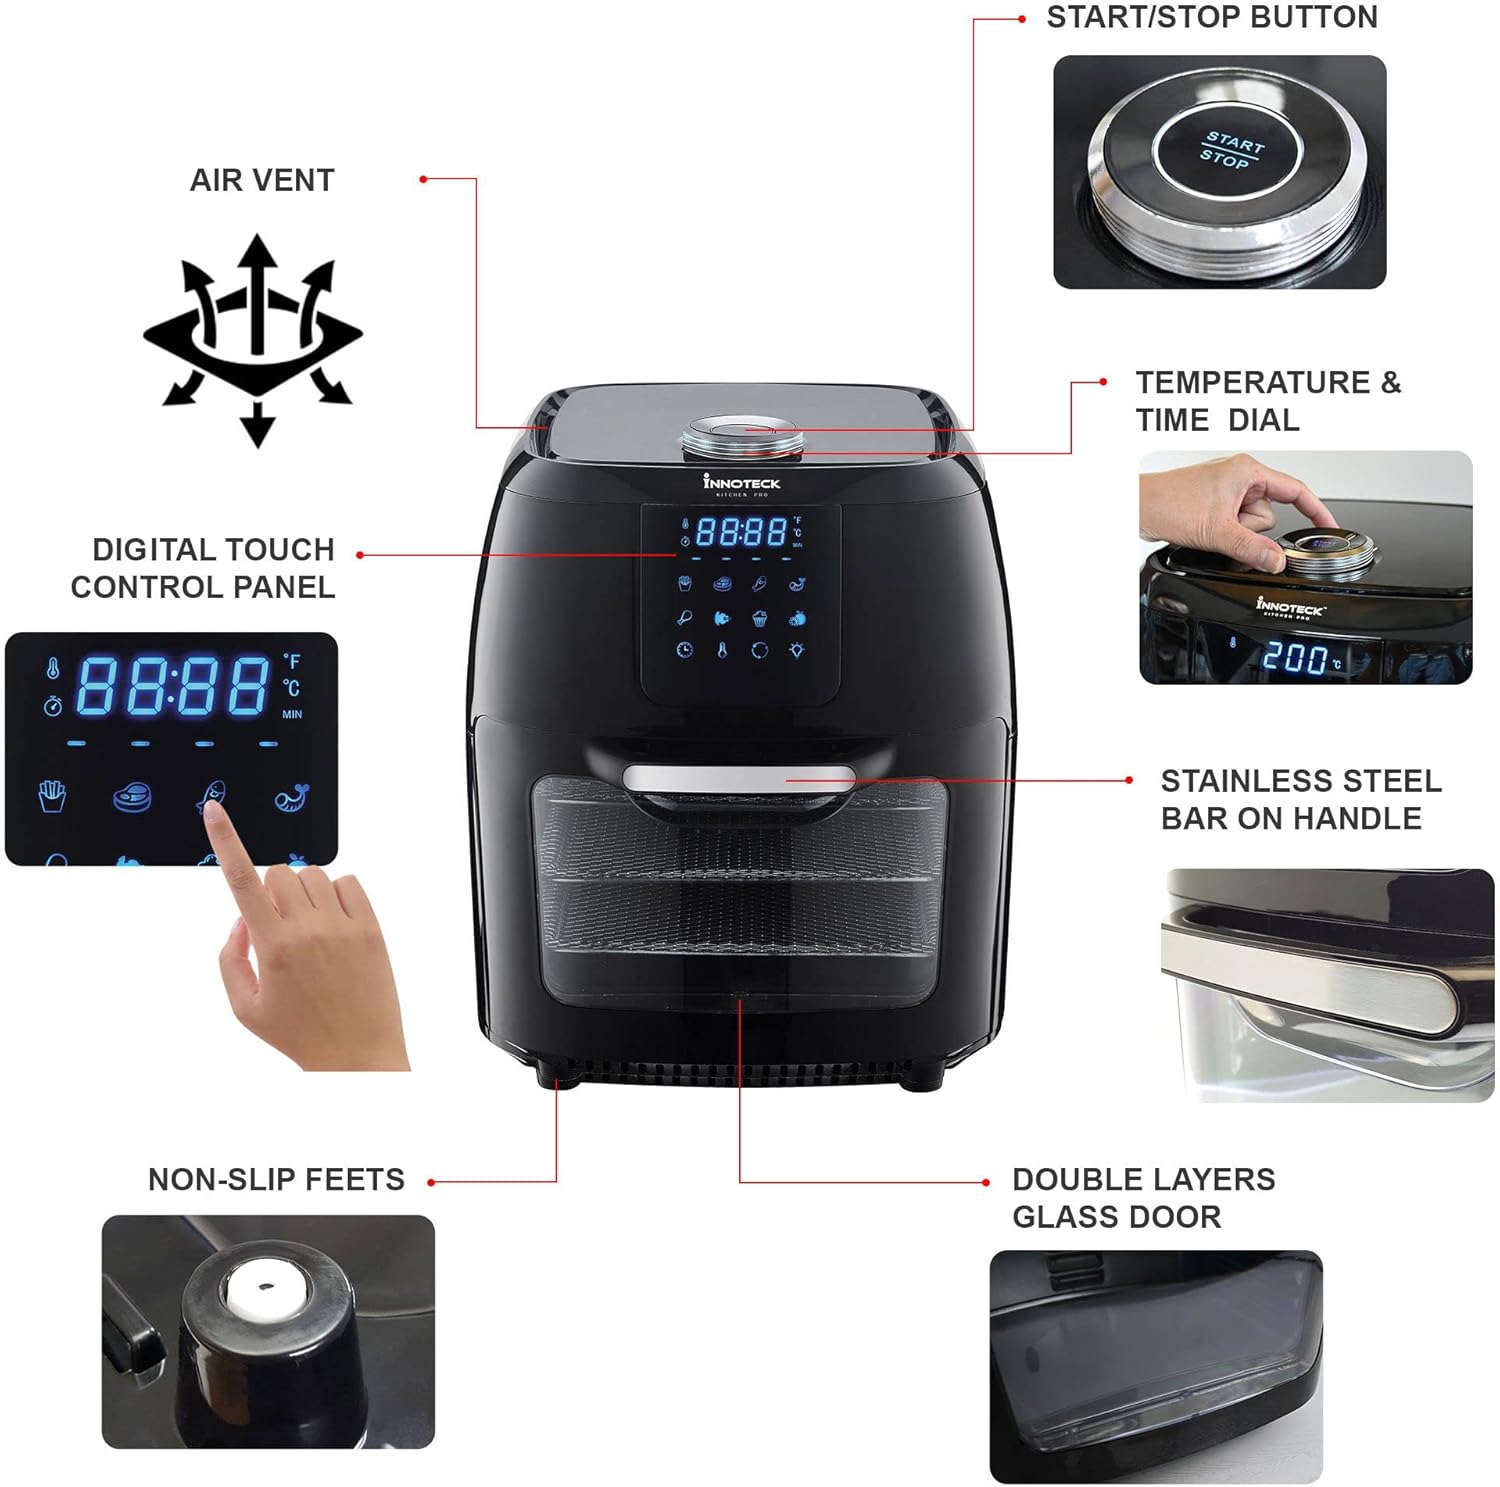
2. Product Overview
2.1 Key Features
- Large digital touch display for instant cooking mode adjustments.
- Smart knob for easy start/stop and precise time/temperature control.
- Powerful 1800W heating element with rapid hot air circulation for perfect cooking.
- Temperature range: 65-200°C for cooking, 30-80°C for dehydration.
- 8 preset cooking settings for various meals including chicken, seafood, and desserts.
- Spacious 12L cooking capacity with 3 rack levels for family-sized portions.
- Interior light to monitor cooking progress.
- Dishwasher-safe accessories for easy cleaning.
- Sleek black body with cool-touch silver handle.
- EU certified, LFGB food-safe material, PFOA and PTFE free.
2.2 Components and Accessories
Familiarize yourself with the main unit and included accessories:


The appliance comes with the following accessories:
- 3 x Removable Air Flow Racks
- 1 x Rotisserie Spit and Forks
- 1 x Rotating Basket
- 1 x Retrieval Tool
- 1 x Removable Drip Tray
3. Setup and First Use
3.1 Unpacking
- Carefully remove all packaging materials and promotional labels from the air fryer.
- Remove all accessories from inside the appliance.
- Keep packaging materials for future storage or disposal.
3.2 Cleaning Before First Use
- Wipe the exterior of the air fryer with a clean, damp cloth.
- Wash all removable accessories (air flow racks, rotisserie spit, rotating basket, drip tray) with warm, soapy water. Rinse thoroughly and dry completely. All accessories are dishwasher safe.
- Do not immerse the main unit in water.
3.3 Placement
- Place the air fryer on a stable, level, heat-resistant surface.
- Ensure there is at least 10 cm of clear space around the back and sides, and 10 cm above the appliance for proper ventilation.
- Do not place the air fryer near flammable materials or heat sources.
4. Operating Instructions
4.1 Digital Control Panel
The air fryer features a large digital touch display and a smart knob for intuitive control. Refer to Figure 2.2 for a visual guide.
- Power Button: Press to turn the unit on/off.
- Preset Icons: Touch an icon to select a pre-programmed cooking mode (e.g., Fries, Meat, Fish, Shrimp, Chicken, Rotisserie, Bake, Dehydrate).
- Temperature/Time Display: Shows current temperature and remaining cooking time.
- Smart Knob: Rotate to adjust temperature or time. Press to confirm selection or to start/pause cooking.
- Internal Light Button: Press to turn the interior light on/off.
- Rotate Button: Activates the rotisserie function for the rotating basket or rotisserie spit.
4.2 Cooking with Presets
The air fryer includes 8 optimized cooking presets for convenience:

- Place food inside the air fryer using the appropriate accessory (rack, basket, or spit).
- Close the appliance door securely.
- Press the Power button to turn on the display.
- Touch the desired preset icon on the digital display. The air fryer will automatically set the optimal temperature and time for that food type.
- If desired, you can adjust the preset time or temperature by rotating the smart knob.
- Press the smart knob or the Start/Stop button to begin cooking.
- The interior light can be turned on/off to check cooking progress.
- When cooking is complete, the air fryer will beep and automatically shut off.
4.3 Manual Cooking
- Place food inside the air fryer and close the door.
- Press the Power button.
- Rotate the smart knob to set the desired temperature (65-200°C). Press the knob to confirm.
- Rotate the smart knob again to set the desired cooking time. Press the knob to confirm and start cooking.
4.4 Using the Rotisserie Function
The rotisserie function is ideal for whole chickens or using the rotating basket for fries or nuts.
- Prepare your food and secure it onto the rotisserie spit or place it inside the rotating basket.
- Insert the rotisserie assembly into the air fryer's internal slots.
- Select a cooking preset or set manual temperature and time.
- Press the 'Rotate' button on the control panel to activate the rotation.
- Monitor cooking through the glass door and interior light.
- Once cooking is complete, use the retrieval tool to safely remove the hot rotisserie assembly.
5. Maintenance and Cleaning
Regular cleaning will ensure the longevity and optimal performance of your air fryer.
- Always unplug the air fryer and allow it to cool completely before cleaning.
- Main Unit: Wipe the exterior with a damp cloth. Do not use abrasive cleaners or immerse in water.
- Interior: Wipe the interior with a damp cloth and mild detergent if necessary. For stubborn food residue, use a non-abrasive sponge.
- Accessories: All removable accessories (air flow racks, rotisserie spit, rotating basket, drip tray) are dishwasher safe. Alternatively, wash them with warm, soapy water, rinse, and dry thoroughly.
- Drip Tray: Empty and clean the drip tray after each use to prevent smoke and odors.
- Ensure all parts are completely dry before storing or using the appliance again.
6. Troubleshooting
If you encounter any issues, please refer to the table below before contacting customer support.
| Problem | Possible Cause | Solution |
|---|---|---|
| Air fryer does not turn on. | Appliance not plugged in; Power outlet not working; Power button not pressed. | Ensure plug is securely in outlet; Test outlet with another appliance; Press the Power button on the control panel. |
| Food is not cooked evenly. | Too much food in the basket/on racks; Food not shaken/rotated during cooking; Incorrect temperature/time. | Cook in smaller batches; Shake/rotate food halfway through cooking; Adjust temperature and time as needed. |
| White smoke coming from the appliance. | Grease residue from previous use; Fatty food being cooked. | Clean the drip tray and interior thoroughly; For fatty foods, add a small amount of water to the drip tray to prevent smoke. |
| Food is not crispy. | Not enough oil (if applicable); Temperature too low; Cooking time too short. | Lightly coat food with oil; Increase temperature or cooking time. |
7. Specifications
Detailed technical specifications for the Innoteck Kitchen Pro 12L Digital Air Fryer.

| Feature | Detail |
|---|---|
| Brand | Innoteck |
| Model Number | DS-5894 |
| Color | Black & Silver |
| Product Dimensions (L x W x H) | 31 x 32 x 39 cm |
| Capacity | 12 Liters |
| Power / Wattage | 1800 Watts |
| Voltage | 230 Volts |
| Material | Aluminum |
| Special Features | Temperature Control |
| Item Weight | 9.1 Kilograms |
| Recommended Uses | Roasting, Dehydrating, Baking |
| First Available Date | May 13, 2022 |
8. Warranty and Support
Your Innoteck Kitchen Pro 12L Digital Air Fryer comes with a standard manufacturer's warranty. Please refer to the warranty card included in your product packaging for specific terms and conditions.
For technical support, troubleshooting assistance, or warranty claims, please contact Innoteck Customer Service:
- Website: Visit the official Innoteck website for FAQs and support resources.
- Email: Refer to your warranty card for the dedicated support email address.
- Phone: Contact numbers may vary by region; please check the product packaging or website for local support lines.
When contacting support, please have your model number (DS-5894) and purchase date ready.