1. Introduction
Thank you for choosing the iKiKin Head Up Display (HUD) for your vehicle. This device is designed to enhance your driving safety and convenience by projecting essential vehicle information directly into your line of sight. Featuring a dual OBD2 and GPS system, it offers versatile compatibility and a wide range of display options. Please read this manual thoroughly before installation and operation to ensure proper use and optimal performance.
2. Safety Information
- Ensure the device is securely mounted and does not obstruct your view of the road or interfere with vehicle controls.
- Do not attempt to disassemble or modify the device. This may cause damage and void the warranty.
- Avoid exposing the device to extreme temperatures, direct sunlight for prolonged periods, or excessive moisture.
- Always prioritize driving safety. Do not adjust settings or interact with the HUD in a way that distracts you from driving.
- If the device malfunctions, disconnect it immediately and contact customer support.
3. Product Overview
3.1 Components and Controls
The iKiKin HUD unit includes the main display, an OBD2 cable, and Velcro for mounting. The device features several buttons for navigation and settings adjustment.

Image: Side view of the iKiKin HUD, highlighting the power on/off button, OBD2 interface, light sensor, and control buttons (M, Left, OK, Right).
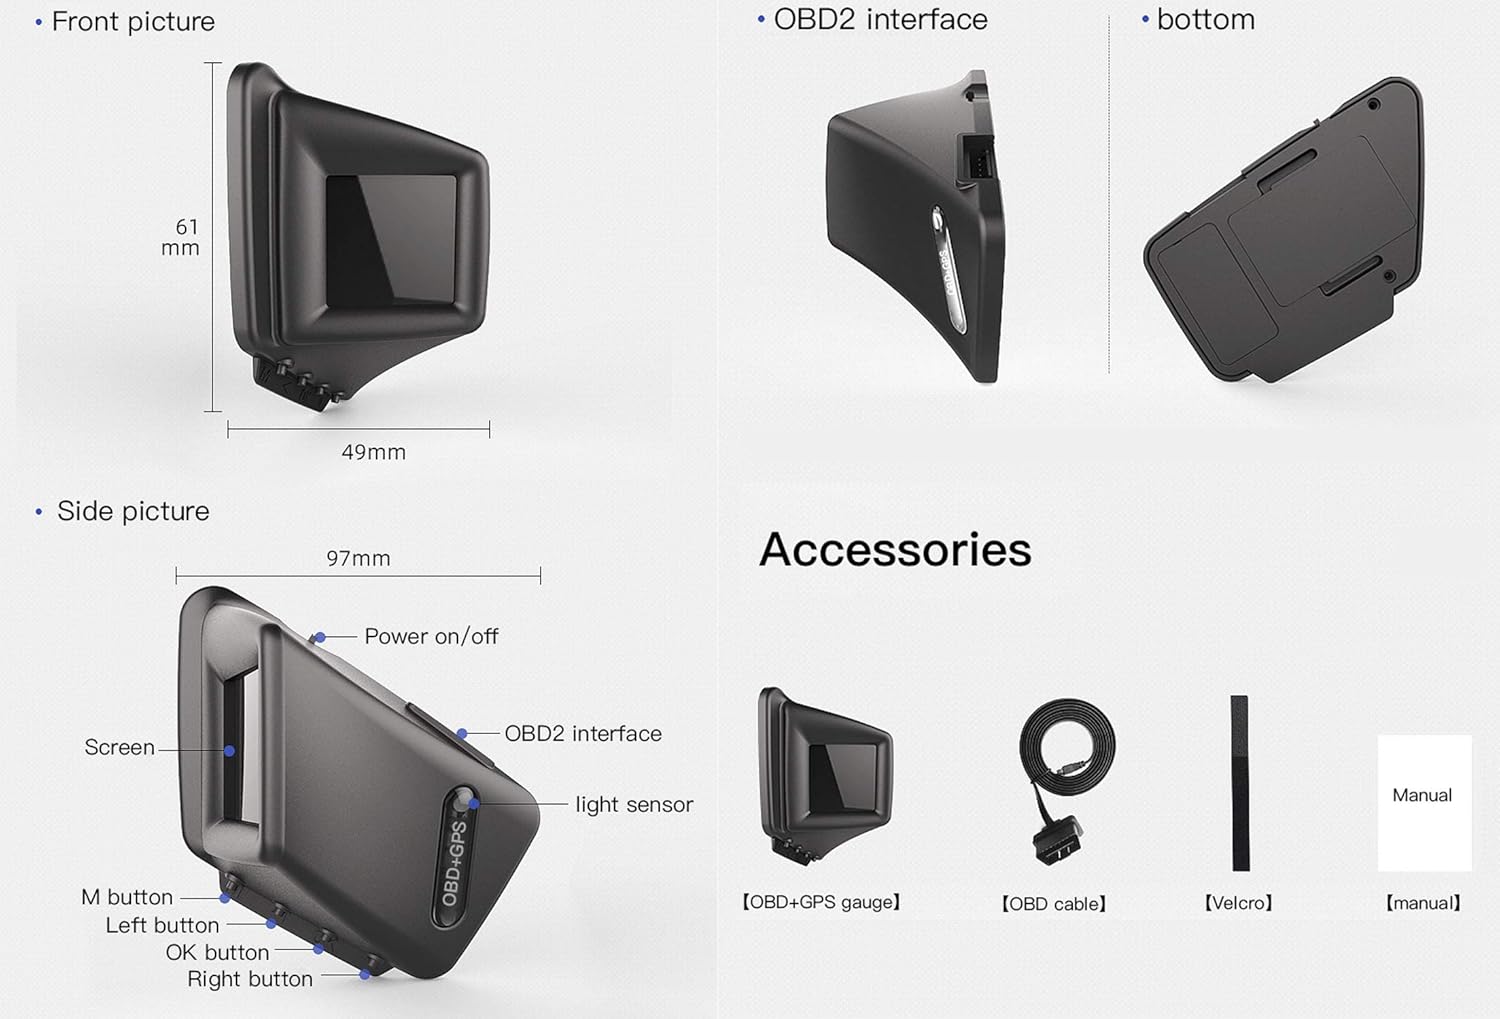
Image: Detailed diagram illustrating the dimensions of the iKiKin HUD (61mm height, 49mm width, 97mm length) and its accessories, including the HUD gauge, OBD cable, Velcro, and manual.
- M Button: Used to enter the setting menu (long press) and switch display interfaces (short press).
- Left/Right Buttons: Used to navigate options within the setting menu.
- OK Button: Used to confirm selections in the setting menu.
- OBD2 Interface: Port for connecting the HUD to your vehicle's OBD2 port.
- Light Sensor: Automatically adjusts display brightness based on ambient light.
3.2 Key Features
- Dual System (OBD2 & GPS): Supports both OBD2 and GPS modes, allowing for broad vehicle compatibility. GPS mode works for all cars.
- Multiple Display UIs: Offers 8 different function UIs to choose from, displaying various driving data such as speed, RPM, voltage, water temperature, fuel consumption, driving time, driving distance, turbo pressure, acceleration test, brake test, and oil temperature.
- A-Pillar Trim Installation: Unique design allows for installation on the A-pillar trim for an optimal viewing angle.
- Alarm Functions: Includes over speed alarm, low voltage alarm, high water temperature alarm, and engine RPM alarm for enhanced safety.
- Clear Fault Code: Ability to clear Diagnostic Trouble Codes (DTCs) directly from the device.
- High-Performance Chip: Ensures smooth operation and quick data processing.
3.3 Specifications
| Specification | Value |
|---|---|
| Item Weight | 5.3 ounces (0.15 Kilograms) |
| Package Dimensions | 4.49 x 4.41 x 2.64 inches |
| Material | Plastic, Metal, Glass, Fabric |
| Manufacturer | iKiKin |
| Date First Available | June 10, 2020 |
4. Setup
4.1 Installation Methods
The iKiKin HUD offers flexible installation options to suit your vehicle's interior and your preference.
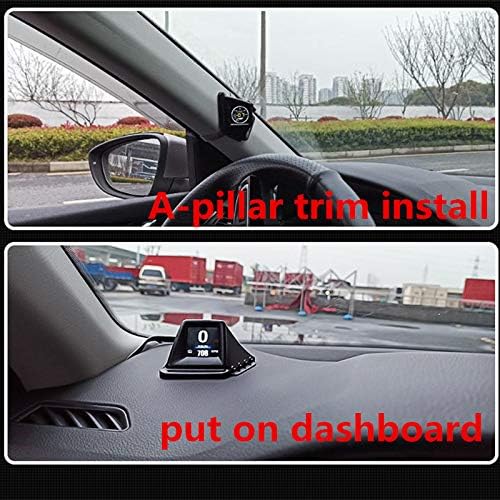
Image: Top panel shows the iKiKin HUD installed on the A-pillar trim. Bottom panel shows the iKiKin HUD placed on the dashboard.
- A-Pillar Trim Installation: Position the HUD on the A-pillar trim for a direct line-of-sight display. Ensure it is securely attached using the provided Velcro and does not obstruct airbags or vision.
- Dashboard Installation: Place the HUD on your vehicle's dashboard. Use the provided Velcro to prevent it from sliding during driving. Choose a location that provides a clear view without obstructing the windshield.
4.2 Connecting the Device
- Locate your vehicle's OBD2 port. This is typically found under the dashboard on the driver's side.
- Connect one end of the provided OBD2 cable to the HUD's OBD2 interface.
- Connect the other end of the OBD2 cable to your vehicle's OBD2 port.
- Once connected, the HUD should power on automatically when the vehicle's ignition is turned on.
Note on OBD2 Compatibility:
- OBD2 Mode Application Range:
- American gasoline cars produced after 2004 that comply with OBD2 protocol.
- Other regions' gasoline cars produced after 2008 that comply with OBD2 protocol.
- Common Car Models Not Compatible with OBD2 Mode:
- American Cars: Dodge, JEEP, SAIL, Chrysler models produced before 2004 and 2004.
- All French and Italian car models.
- Japan Cars: Suzuki, Mazda6, Infiniti (QX50, Q50, Q501), for Avanza 2013, Lexus (is250, ex250, es300h), Honda (Jazz, CRV), and cars produced before 2008.
- Some South Korean KIA and Hyundai models (e.g., Hyundai Sonata 2013, Kia Soul PS 2017).
- Oil-electric hybrid and diesel cars, pickup trucks, trucks, RVs, and cars with modified computer systems.
- If your car is not suitable for OBD2 mode, the device will automatically switch to GPS mode. GPS mode is compatible with all vehicles.
5. Operating Instructions
5.1 Display Modes (OBD & GPS)
The iKiKin HUD supports both OBD2 and GPS modes. The default mode is OBD2. If OBD2 data is not available or compatible, the device will automatically switch to GPS mode.

Image: Icons representing data available in OBD mode (Speed, Clock, RPM, Water temperature, Voltage, Fuel consumption, Driving time, Driving distance, Turbo pressure, Acceleration test, Brake test, Clear fault code, Oil temperature) and GPS mode (Speed, Clock, Driving time, Satellite number, Altitude, Driving distance).
- OBD Mode: Displays real-time data from your vehicle's onboard diagnostic system, including speed, RPM, water temperature, voltage, fuel consumption, driving time, driving distance, turbo pressure, acceleration test, brake test, clear fault code, and oil temperature.
- GPS Mode: Utilizes satellite positioning to display data such as speed, clock, driving time, satellite number, altitude, and driving distance. This mode is suitable for all vehicles, especially those not compatible with OBD2.
5.2 Display Interface and Navigation
The iKiKin HUD offers 8 different function UIs. You can choose to display a single data type (e.g., speed) or multiple data types simultaneously (e.g., speed, voltage, water temperature).

Image: Operational guide showing how to view voltage, switch display interfaces, enter the setting menu, and power off. Various display layouts are also shown.
- View Voltage: Upon power-on, the device may briefly show the current voltage (e.g., 14.3V) for about 3 seconds before switching to the default interface.
- Switch Display Interface: Short press the M button to cycle through the different display interfaces.
- Enter Setting Menu: Long press the M button for 5 seconds to enter the setting menu.
- Navigate Setting Menu: Use the Left or Right buttons to switch between different settings (e.g., Speed Set, RPM Set, Fuel Set, Turbo Set, Clock Set, System Set).
- Confirm Selection: Press the OK button to enter a setting or save changes.
- Power Off: When the vehicle powers off, the HUD will display the trip driving distance (e.g., 10.5 km) before shutting down.
5.3 Alarm Functions
The iKiKin HUD provides critical alerts to help maintain safe driving conditions:
- Over Speed Alarm: Alerts you when your vehicle exceeds a preset speed limit.
- Low Voltage Alarm: Warns you if the vehicle's battery voltage drops below a safe level.
- High Water Temperature Alarm: Notifies you if the engine's coolant temperature becomes too high.
- Engine RPM Alarm: Alerts you if the engine RPM exceeds a specified limit.
These alarm thresholds can be configured within the setting menu.
5.4 Special Functions

Image: Visual representation of the Acceleration Test (0 to 100 km/h time), Turbo Pressure display, and Brake Test (time to stop from 100 km/h).
- Acceleration Test: Measures the time it takes for your vehicle to accelerate from 0 km/h to 100 km/h.
- Brake Test: Measures the time and distance required for your vehicle to come to a complete stop from a certain speed (e.g., 100 km/h).
- Turbo Pressure: Displays real-time turbo pressure. Note: If your car does not have a turbocharger, this function will not display data.
- Clear Fault Code (DTC): The device has a function to clear Diagnostic Trouble Codes (DTCs) from your vehicle's ECU. Refer to the setting menu for this option.
6. Maintenance
- Keep the device clean by wiping it with a soft, dry cloth. Do not use abrasive cleaners or solvents.
- Ensure the OBD2 cable is not pinched or damaged.
- Store the device in a cool, dry place if not in use for an extended period.
7. Troubleshooting
| Problem | Possible Cause / Solution |
|---|---|
| Device does not power on. |
|
| No data displayed in OBD mode. |
|
| Display is dim or unreadable in bright sunlight. |
|
| Inaccurate speed reading in GPS mode. |
|
| Device randomly turns off or restarts. |
|
8. Warranty and Support
iKiKin products are designed for reliability and performance. While specific warranty details may vary by region and purchase point, we stand behind the quality of our products.
- For technical assistance, troubleshooting, or warranty inquiries, please contact iKiKin customer support through the retailer where you purchased the product or visit the official iKiKin website for contact information.
- Please have your product model (AP-1) and purchase details ready when contacting support.


