1. Product Overview
The WishRing HB-6A (3rd Gen) is a Bluetooth wireless adaptor and PTT (Push-to-Talk) headset system designed for two-way radios. It provides wireless communication capabilities, enhancing convenience and mobility for users of compatible K-plug handheld walkie-talkies. The system includes a Bluetooth V4.0 headset and a wireless PTT button.
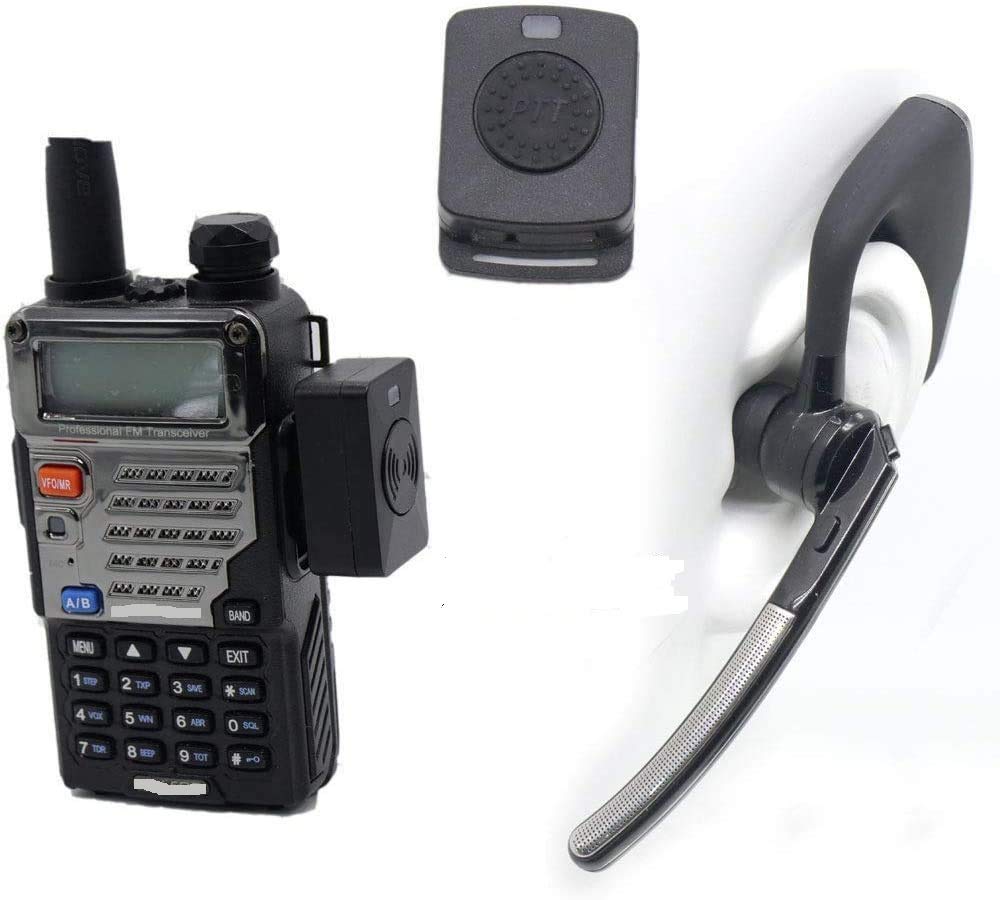
Image: The complete WishRing HB-6A (3rd Gen) system, including the wireless adapter, Bluetooth headset, and wireless PTT button, shown with a hand demonstrating the PTT ring.
Package Contents
Verify that all the following items are included in your package:
- Two-way radio wireless adapter
- Bluetooth headset v4.0
- Wireless PTT button
- USB charging cable
- User Manual
- Earplugs (various sizes)
- Belt (for PTT or adapter)

Image: All components included in the product package: Headset, Manual, Earplug, Belt, USB Charger, Adapter, and PTT.
2. Setup and Pairing
2.1 Charging the Devices
Before initial use, ensure both the Bluetooth headset and the wireless PTT button are fully charged. Use the provided USB charging cable to connect them to a compatible USB power source. The charging time for both devices is approximately 2 hours.
2.2 Connecting the Wireless Adaptor to Your Radio
- Locate the K-plug earphone hole on your two-way radio.
- Insert the wireless adapter's K-plug connector firmly into the radio's earphone hole. Ensure a secure connection.
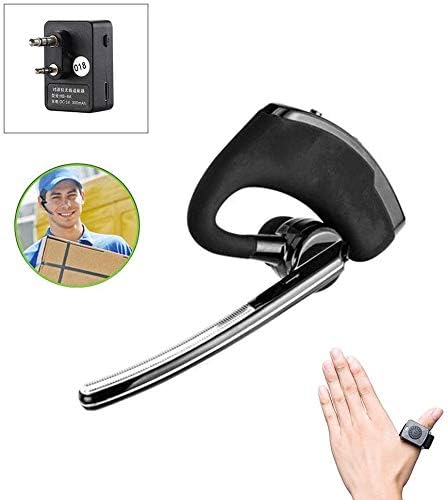
Image: A close-up view of the wireless adapter, showing its K-plug connectors and charging port.

Image: Step 1 illustrates plugging the wireless adapter into the walkie-talkie's earphone hole. Step 2 shows the adapter's LED indicators: flashing red and blue for pairing, blue light flashing for successful pairing, and steady red when the radio is in intercom mode. It also shows pressing the power button on the adapter and its charging port.
2.3 Pairing the Headset and PTT Button
- Power On the Adapter: Press the power button on the wireless adapter. The adapter's indicator light will flash red and blue, indicating it is in pairing mode.
- Power On and Pair Headset: Power on the Bluetooth headset. The headset's indicator light will flash blue, indicating it is searching for a connection. Once paired successfully with the adapter, the blue light will flash steadily.
- Pair Wireless PTT: Press the PTT button on the wireless PTT device. The adapter's indicator light will turn red momentarily, then release the PTT button. The adapter's blue light will flash, confirming successful pairing with the PTT.
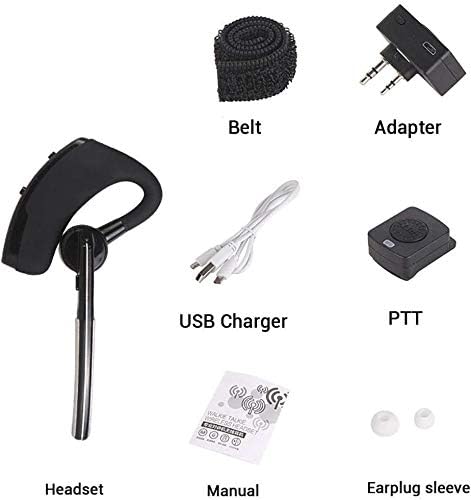
Image: Step 3 shows powering up the headset and its charging interface, with blue flashing red indicating pairing and blue flashes after successful pairing. Step 4 illustrates the headset's volume control and how to press the PTT button to initiate a call.
3. Operating Instructions
3.1 Wearing the Headset
The headset is designed for comfortable wear and can be adjusted for either the left or right ear.

Image: The Bluetooth headset is shown worn on a mannequin head, demonstrating its ergonomic fit.

Image: An illustration highlighting the comfortable design of the headset, emphasizing its 'double points' for stability.

Image: An illustration demonstrating the headset's ability to rotate 180 to 270 degrees, allowing it to be worn comfortably on either the left or right ear. Examples of users wearing the headset are also shown.
3.2 Using the PTT Function
Once the wireless PTT button is paired, simply press and hold it to transmit your voice through the radio. Release the button to stop transmitting and listen for incoming communication.
3.3 Volume Control
Adjust the volume directly on the Bluetooth headset using its integrated volume controls. Refer to the headset's specific buttons for increasing or decreasing audio levels.
4. Compatibility
The WishRing HB-6A (3rd Gen) is compatible with K-plug handheld walkie-talkies, including models from Kenwood, TYT, and Baofeng UV5R series. The Bluetooth headset can also pair with iPhone, Android, and other Bluetooth-enabled devices for general audio use.

Image: A two-way radio (Baofeng UV-5RE) with the wireless adapter attached, alongside the Bluetooth headset and wireless PTT button, demonstrating a complete setup.
5. Maintenance
5.1 Cleaning
Wipe the devices with a soft, dry cloth. Avoid using harsh chemicals or abrasive cleaners. Do not immerse any part of the system in water.
5.2 Battery Care
To prolong battery life, avoid fully discharging the devices frequently. Recharge them when the battery indicator is low. Store the devices in a cool, dry place when not in use for extended periods.
6. Troubleshooting
6.1 Device Not Pairing
- Ensure both the adapter and headset/PTT are powered on and fully charged.
- Confirm the adapter is flashing red and blue, indicating pairing mode.
- Move the devices closer to each other (within 1 meter).
- Restart both the adapter and the headset/PTT and attempt pairing again.
6.2 No Audio or Intermittent Connection
- Check the connection of the wireless adapter to the radio's K-plug port. Ensure it is fully inserted.
- Verify that the headset and adapter are successfully paired (steady blue light on adapter after pairing).
- Ensure the radio's volume is set appropriately.
- Check the headset's volume control.
- Ensure the devices are within the operational range (up to 10 meters). Obstacles can reduce range.
6.3 PTT Button Not Responding
- Ensure the wireless PTT button is charged.
- Re-pair the PTT button with the wireless adapter as described in Section 2.3.
7. Specifications
| Model Name | HB-6A (3rd Gen) |
| Connectivity Technology | Wireless (Bluetooth) |
| Wireless Communication Technology | Bluetooth V4.0 Class 2 |
| Compatible Devices | Two-Way Radios (K-plug), Smartphones, Bluetooth Devices |
| Control Method | Push Button |
| Bluetooth Range | Up to 10 Meters (33 feet) |
| Charging Time | Approximately 2 hours |
| Work Time | 5-8 hours |
| Standby Time | Less than 100 hours |
| Noise Control Features | Noise Cancellation |
| Item Weight | 7.1 ounces |
| Package Dimensions | 3.15 x 1.97 x 1.18 inches |
| Batteries | 1 Lithium Polymer battery (included) |
8. Warranty and Support
For warranty information and technical support, please refer to the documentation provided with your purchase or contact the seller directly. Keep your proof of purchase for any warranty claims.