ASRock B550 PHANTOM GAMING 4
ASRock B550 Phantom Gaming 4 Motherboard User Manual
Model: B550 PHANTOM GAMING 4 | Brand: ASRock
Introduction
The ASRock B550 Phantom Gaming 4 motherboard is engineered for gamers, offering a robust platform for AMD AM4 Socket Ryzen™ processors. It integrates essential features and capabilities to enhance your gaming and computing experience. This manual provides detailed guidance for setting up, operating, and maintaining your motherboard.

Image: The ASRock B550 Phantom Gaming 4 motherboard alongside its retail packaging, highlighting the product's design and branding.
Key Features
- Supports DDR4 4733+ (OC) memory speeds.
- Features an 8 Power Phase Design with Digi Power for stable power delivery.
- Equipped with 1 PCIe 4.0 x16, 1 PCIe 3.0 x16, 2 PCIe 3.0 x1 slots, and 1 M.2 Key E for WiFi.
- Operating System compatibility: Microsoft Windows 10 64-Bit and Windows 11 64-Bit.
Setup Guide
1. Component Installation
Before installing the motherboard into your PC case, it is recommended to install the CPU, CPU cooler (if applicable), and RAM modules.

Image: A detailed view of the motherboard's layout, indicating key components such as the CPU socket, memory slots, and various PCIe slots.
CPU Installation
- Open the CPU socket retention arm.
- Carefully align the CPU with the socket, ensuring the golden triangle on the CPU matches the triangle on the socket.
- Gently place the CPU into the socket. Do not force it.
- Close the retention arm to secure the CPU.
RAM Installation

Image: A user installing RAM modules into the dual-channel DDR4 memory slots on the ASRock B550 Phantom Gaming 4 motherboard.
- Open the clips on both ends of the memory slots.
- Align the notch on the RAM module with the notch in the memory slot.
- Press down firmly on both ends of the RAM module until the clips snap into place.
M.2 SSD Installation
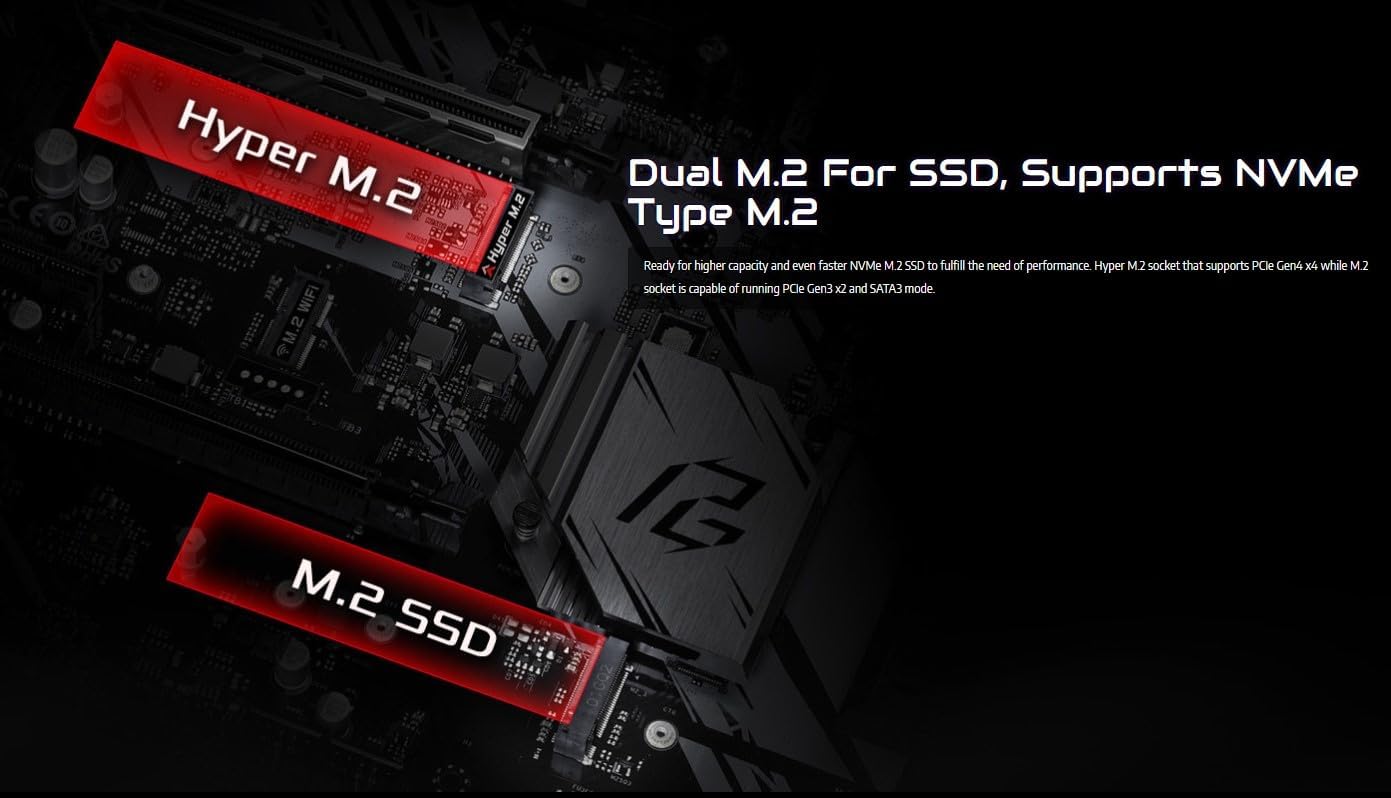
Image: The motherboard features two M.2 slots: one Hyper M.2 for PCIe 4.0 NVMe SSDs and another M.2 slot for PCIe 3.0 SSDs.
- Locate the M.2 slots on the motherboard.
- Insert the M.2 SSD into the slot at an angle.
- Gently push down the SSD and secure it with the provided screw.
2. Connecting Peripherals and Power
After installing the core components, connect the necessary cables and peripherals.

Image: The motherboard includes both 4-pin RGB LED headers and 3-pin Addressable RGB LED headers for customizable lighting.
- Connect the 24-pin ATX power connector and the 8-pin CPU power connector from your power supply to the motherboard.
- Connect SATA data cables to your storage drives (HDDs/SSDs) and the motherboard's SATA connectors. The motherboard offers six SATA 6Gb/s connectors.
- Connect front panel headers (USB 2.0, USB 3.2, audio, power/reset buttons, LED indicators) to their respective pins on the motherboard.
- Install your graphics card into the primary PCIe 4.0 x16 slot.
- Connect case fans to the available fan headers. The motherboard provides four case fan headers.
3. Rear I/O Panel Connections
Image: The rear I/O panel features various connectivity options including PS/2, USB 3.2 Gen 1, HDMI, and RJ-45 Gigabit LAN ports, along with analog audio jacks.
- Connect your monitor to the HDMI port (if using an APU with integrated graphics).
- Connect USB devices (keyboard, mouse, external drives) to the USB 3.2 Gen 1 ports.
- Connect your Ethernet cable to the RJ-45 Gigabit LAN port for network access.
- Connect audio devices (speakers, headphones) to the analog audio ports.
Operating Your Motherboard
BIOS/UEFI Setup
The BIOS (Basic Input/Output System) or UEFI (Unified Extensible Firmware Interface) is the first software that runs when you power on your computer. It initializes hardware components and loads the operating system. To enter the BIOS/UEFI setup, press the Delete or F2 key during system startup.
Operating System Installation
Once the hardware is assembled, you can proceed with installing your preferred operating system (e.g., Microsoft Windows 10 64-bit or Windows 11 64-bit) from a bootable USB drive or DVD.
Maintenance
- Keep Drivers Updated: Regularly download and install the latest drivers for your motherboard, graphics card, and other components from the ASRock official website to ensure optimal performance and stability.
- BIOS Updates: Periodically check for BIOS updates on the ASRock website. BIOS updates can improve compatibility, stability, and add support for new hardware. Follow the instructions carefully when updating the BIOS.
- Dust Removal: Clean dust from inside your PC case and motherboard components regularly using compressed air. Dust buildup can lead to overheating and reduced performance.
- Cable Management: Ensure cables are neatly managed to improve airflow within the case, which helps in maintaining lower temperatures.
Troubleshooting
- No Display: Ensure your monitor is connected to the correct output on your graphics card or motherboard (if using integrated graphics). Check that the graphics card is properly seated in its PCIe slot and that all power cables are connected.
- System Not Booting (DRAM/CPU Red Lights): If your motherboard displays diagnostic LEDs for DRAM or CPU, it indicates an issue with these components. Re-seat your RAM modules and CPU. Ensure your CPU is compatible with the motherboard and that the BIOS is updated to support your CPU model (especially for newer Ryzen 5000 series processors).
- Peripherals Not Detected: Try connecting the peripheral to a different USB port. Ensure the latest drivers for the peripheral are installed. Check front panel header connections if the issue is with front USB ports.
- Overheating: Verify that all case fans and CPU cooler fans are spinning correctly. Ensure proper airflow within the case and clean any dust buildup. Check CPU cooler mounting pressure and thermal paste application.
Specifications
| Feature | Detail |
|---|---|
| Brand | ASRock |
| Model Name | B550 PHANTOM GAMING 4 |
| CPU Socket | Socket AM4 |
| Compatible Processors | AMD Ryzen™ 3000, 3000 G-Series, 4000 G-Series, 5000, and 5000 G-Series Desktop Processors |
| Chipset Type | AMD B550 |
| RAM Memory Technology | DDR4 |
| Memory Clock Speed | Up to 4733+ MHz (OC) |
| PCIe Slots | 1 x PCIe 4.0 x16, 1 x PCIe 3.0 x16, 2 x PCIe 3.0 x1 |
| M.2 Slots | 1 x Hyper M.2 (PCIe 4.0), 1 x M.2 (PCIe 3.0) |
| SATA Ports | 6 x SATA3 6.0 Gb/s |
| USB Ports (Rear I/O) | 6 x USB 3.2 Gen 1 |
| LAN | Gigabit LAN |
| RGB Headers | 1 x 4-pin RGB LED, 1 x 3-pin Addressable RGB LED |
| Operating System | Microsoft Windows 10 64-bit / 11 64-bit |
| Dimensions (LxWxH) | 10.5 x 2.5 x 13.5 inches |
| Item Weight | 2.64 pounds |
What's in the Box

Image: The complete set of items included with the ASRock B550 Phantom Gaming 4 motherboard, such as the manual, support CD, SATA cables, and I/O shield.
The ASRock B550 Phantom Gaming 4 Motherboard package typically includes:
- Quick Installation Guide
- Support CD
- I/O Shield
- 2 x SATA Data Cables
- 3 x Screws for M.2 Socket
Warranty and Support
For detailed warranty information and technical support, please refer to the official ASRock website or the full user manual provided in PDF format. You can access the PDF user manual here.
Related Documents - B550 PHANTOM GAMING 4
 |
ASRock B550 Phantom Gaming 4/ac & B550 Phantom Gaming 4 User Manual Comprehensive user manual for ASRock B550 Phantom Gaming 4/ac and B550 Phantom Gaming 4 motherboards. Covers specifications, installation, software utilities, and UEFI setup for AMD AM4 socket Ryzen processors. |
 |
ASRock B550 Phantom Gaming-ITX/ax Motherboard User Manual - Installation & Features Guide Comprehensive user manual for the ASRock B550 Phantom Gaming-ITX/ax motherboard. Covers installation, specifications, software utilities, BIOS setup, and features for AMD Ryzen processors. |
 |
ASRock B550 Taichi Motherboard User Manual - Installation and Configuration Guide Comprehensive user manual for the ASRock B550 Taichi motherboard, covering installation, specifications, software utilities, UEFI BIOS setup, and regulatory compliance. Essential guide for PC builders and enthusiasts. |
 |
ASRock X670E PG Lightning Motherboard User Manual Get detailed installation guides, specifications, and I/O information for the ASRock X670E PG Lightning motherboard. Optimize your PC build with this comprehensive user manual. |
 |
ASRock B550 PG Velocita User Manual - Installation and Setup Guide Comprehensive user manual for the ASRock B550 PG Velocita motherboard, covering installation, specifications, BIOS configuration, software utilities, and troubleshooting. Learn how to build and optimize your PC with ASRock's advanced features. |
 |
ASRock X600D5-P1 Motherboard User Manual - Installation and Configuration Guide Explore the ASRock X600D5-P1 motherboard with this comprehensive user manual. Learn about installation, specifications, UEFI setup, and hardware configuration for AMD Ryzen 7000/8000 series processors. |
Ask a question about this manual
Ask about setup, troubleshooting, compatibility, parts, safety, or missing instructions. Manuals+ will review the question and use this page’s manual context to help answer it.