CAZON B26
CAZON Blood Pressure Monitor B26 User Manual
Model: B26 | Brand: CAZON
1. Introduction
This manual provides essential information for the safe and effective use of your CAZON Upper Arm Blood Pressure Monitor B26. This device is designed for home use to measure both systolic and diastolic blood pressures, as well as pulse rate, and includes an irregular heartbeat indicator. Please read this manual thoroughly before use and keep it for future reference.

Image: The CAZON Blood Pressure Monitor B26, showing the main unit, arm cuff, and USB charging cables.
2. Important Safety Information
Statements regarding dietary supplements have not been evaluated by the FDA and are not intended to diagnose, treat, cure, or prevent any disease or health condition. This blood pressure monitor is intended for non-invasive measurement and monitoring of arterial blood pressure in adults. It is not intended for use on infants or children.
- Consult your physician before using this device if you have any medical conditions.
- Do not self-diagnose or self-medicate based on measurements from this device. Always consult a healthcare professional.
- Keep the device out of reach of children and pets.
- Do not use the device in a moving vehicle or on an airplane.
- Avoid strong electromagnetic fields (e.g., microwave ovens, mobile phones) near the device during measurement.
3. Package Contents
Verify that all items listed below are present in your package:
- 1 x CAZON Blood Pressure Monitor Unit
- 1 x Upper Arm Cuff (8.7"-15.7" / 22-40cm)
- 1 x USB Cable
- 1 x Instruction Manual (this document)

Image: A visual representation of the items included in the CAZON Blood Pressure Monitor package: the main unit, arm cuff, USB cable, and instruction manual.
4. Product Features
4.1. Accurate Measurement
The CAZON Blood Pressure Monitor is equipped with stable algorithms and a smart chip to ensure reliable and accurate measurements of your blood pressure and pulse rate.

Image: An exploded view of the CAZON Blood Pressure Monitor, highlighting the internal components and smart chip responsible for accurate measurements.
4.2. 2x120 Memory Storage
The device offers storage for 2 users, with 120 measurement records per user. Each record includes a date and time stamp, allowing for effective tracking and monitoring of blood pressure trends over time. The monitor also averages the last 3 values for a more precise measurement.
4.3. Irregular Heartbeat Indicator
The monitor can detect and indicate an irregular heartbeat during measurement, alerting the user to potential cardiac arrhythmia.

Image: Close-up of the monitor's display, illustrating the icons for 2*120 memory storage and the irregular heartbeat indicator.
4.4. Large LCD Digital Screen & WHO Classification
The device features a large, easy-to-read LCD screen with oversized fonts, making the displayed content clear and understandable. It also includes a World Health Organization (WHO) classification indicator, which visually categorizes your blood pressure reading into normal, elevated, or high blood pressure ranges.

Image: The monitor's display with a color-coded bar indicating the WHO blood pressure classification: Green for Normal/Optimal, Yellow for Elevated, and Red for Hypertension.
4.5. Cuff Self-checking and Movement Error Detection
The monitor incorporates intelligent features to ensure accurate readings. It displays a cuff self-checking symbol (a checkmark) if the cuff is applied correctly, or an 'X' symbol if it's incorrect. Additionally, a movement error symbol indicates if body movement occurred during the measurement, prompting a re-measurement.
4.6. Improved D-ring Cuff
The included D-ring cuff is designed for easy self-application and comfort. It accommodates upper arm circumferences from 8.7 inches to 15.7 inches (22-40 cm) and features automatic inflation and deflation for convenient use.

Image: A diagram illustrating how to correctly apply the D-ring arm cuff to the upper arm, along with its size range (XS-XXL, 22-40cm).
4.7. Dual Power Options
The monitor can be powered by either 4 AAA batteries (not included) or via the included USB cable, offering flexibility for home use.
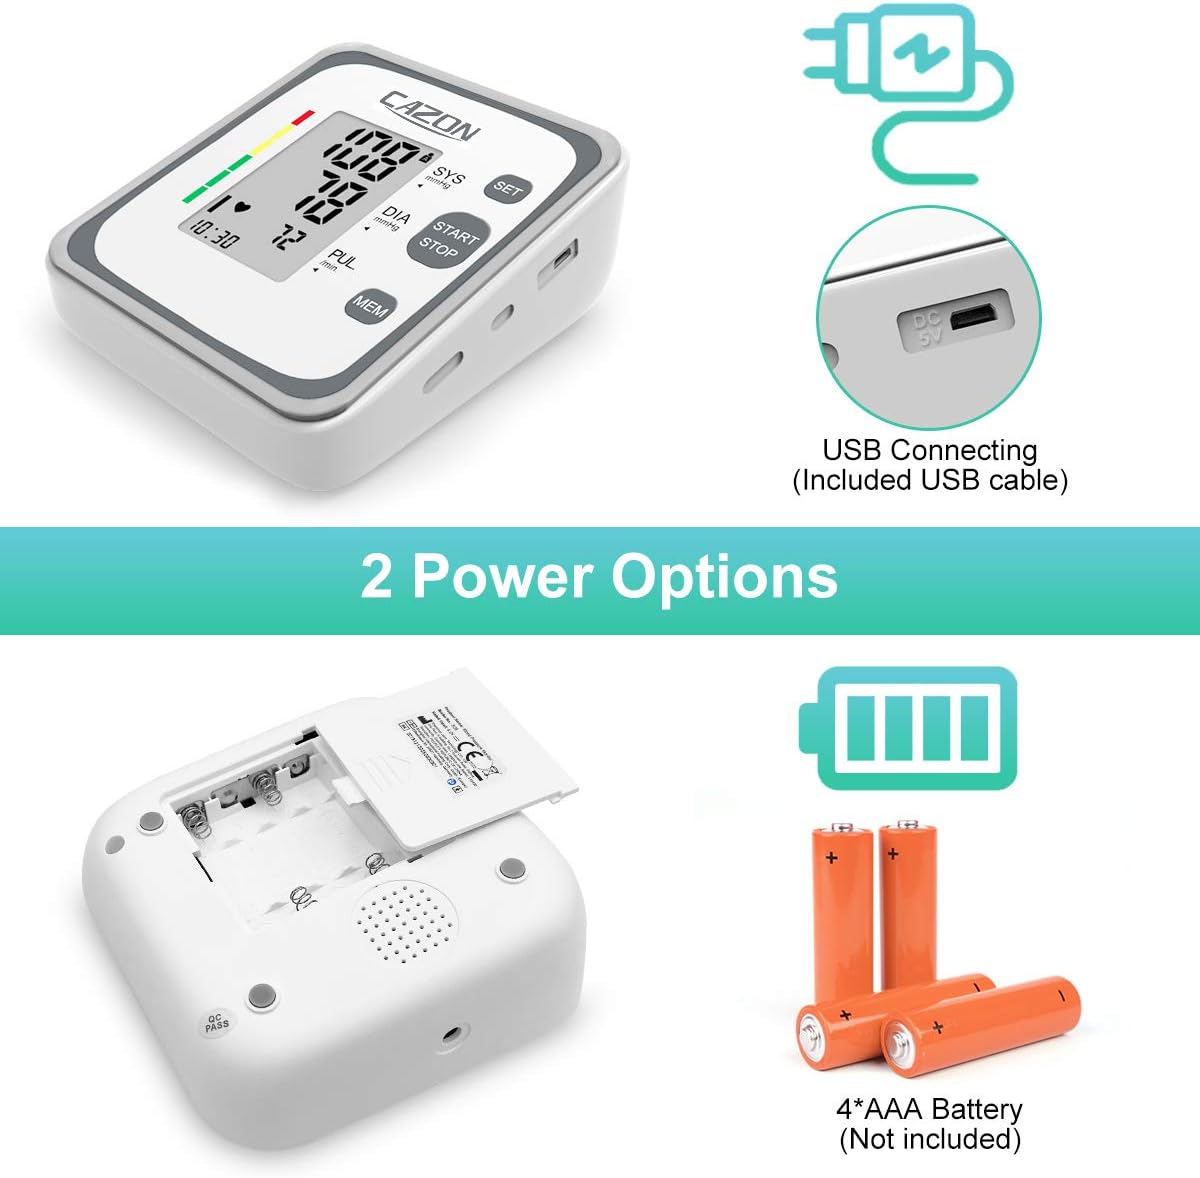
Image: The underside of the monitor showing the battery compartment for 4 AAA batteries, and a side view highlighting the USB connecting port.
5. Setup Guide
5.1. Powering the Device
5.1.1. Battery Installation
- Open the battery compartment cover on the back of the monitor.
- Insert 4 new AAA batteries, ensuring the correct polarity (+/-) as indicated inside the compartment.
- Close the battery compartment cover securely.
5.1.2. USB Power Connection
- Connect the small end of the provided USB cable to the DC 5V port on the side of the monitor.
- Connect the larger end of the USB cable to a USB power adapter (not included) or a computer USB port.
- The device will power on automatically when connected via USB.
5.2. Applying the Cuff
- Ensure you are seated comfortably with your feet flat on the floor and your arm resting on a table.
- Slide the cuff onto your bare upper arm, approximately 1-2 cm (0.4-0.8 inches) above your elbow joint. The air tube should run down the center of your arm in line with your middle finger.
- Wrap the cuff snugly around your arm, ensuring it is not too tight or too loose. The bottom edge of the cuff should be above the elbow.
- Insert the air tube connector firmly into the air jack on the side of the monitor.
6. Operating Instructions
6.1. Taking a Measurement
- Sit quietly for at least 5 minutes before taking a measurement.
- Press the START/STOP button to turn on the monitor. The display will show all symbols briefly, then '00' and the current time.
- The cuff will automatically inflate. Remain still and silent during inflation and deflation.
- Once the measurement is complete, the display will show your systolic pressure (SYS), diastolic pressure (DIA), and pulse rate (PUL). If an irregular heartbeat is detected, the irregular heartbeat symbol will appear.
- Press the START/STOP button again to turn off the monitor, or it will automatically shut off after 1 minute of inactivity.
6.2. Viewing Stored Readings
- With the monitor off, press the MEM button.
- The display will show the average of the last three readings.
- Press the MEM button repeatedly to scroll through individual stored readings, from most recent to oldest.
- To switch between User 1 and User 2 memory, press the SET button while viewing memory.
6.3. Clearing Memory
To clear all stored readings for a specific user:
- Enter memory mode by pressing the MEM button.
- Select the user whose memory you wish to clear using the SET button.
- Press and hold the MEM button for approximately 3 seconds until "CLr" appears on the display, indicating that the memory has been cleared.
7. Understanding Your Readings
7.1. Systolic, Diastolic, and Pulse
- Systolic Blood Pressure (SYS): The top number, indicating the pressure in your arteries when your heart beats.
- Diastolic Blood Pressure (DIA): The bottom number, indicating the pressure in your arteries when your heart rests between beats.
- Pulse (PUL): Your heart rate, measured in beats per minute.
7.2. WHO Blood Pressure Classification
The monitor's display includes a color-coded indicator based on the World Health Organization (WHO) blood pressure classification guidelines:
| Classification | Systolic (mmHg) | Diastolic (mmHg) |
|---|---|---|
| Normal | Below 120 | Below 80 |
| Elevated | 120-129 | Below 80 |
| High Blood Pressure (Hypertension Stage 1) | 130-139 | 80-89 |
| High Blood Pressure (Hypertension Stage 2) | 140-180 | 90-120 |
| Hypertensive Crisis | Higher than 180 | Higher than 120 |
8. Care and Maintenance
8.1. Cleaning
- Wipe the monitor and cuff with a soft, dry cloth.
- If necessary, use a cloth lightly dampened with water or a mild detergent, then wipe dry immediately.
- Do not use abrasive cleaners, alcohol, or organic solvents.
- Do not immerse the monitor or cuff in water.
8.2. Storage
- Store the device in a clean, dry place away from direct sunlight, extreme temperatures, and humidity.
- If not in use for an extended period, remove the batteries to prevent leakage.
- Do not fold the cuff too tightly or twist the air tube excessively.
9. Troubleshooting
If you encounter issues with your blood pressure monitor, refer to the table below for common problems and their solutions.
| Symptom/Error Code | Possible Cause | Solution |
|---|---|---|
| No display when powered on | Batteries are dead or incorrectly inserted; USB cable not connected properly. | Replace batteries, check polarity; ensure USB cable is securely connected. |
Movement Error Symbol  | Body movement during measurement. | Remain still and silent during measurement. Re-measure. |
| Cuff Self-checking Symbol 'X' | Cuff applied incorrectly or too loose. | Re-apply the cuff snugly and correctly as per instructions. Ensure air tube is properly connected. |
| Irregular Heartbeat Symbol appears frequently | Indicates potential irregular heartbeat. | Consult a healthcare professional for diagnosis and advice. |
| Inaccurate readings (compared to doctor's office) | Improper cuff placement, movement, talking, or not resting before measurement. | Ensure proper technique: rest 5 mins, sit still, cuff correctly placed, no talking. Take multiple readings. |
Image: Icons for Movement Error Symbol and Cuff Self-checking Symbol (correct and incorrect) as they appear on the monitor's display.
10. Technical Specifications
| Specification | Detail |
|---|---|
| Model Number | B26 |
| Product Dimensions | 4.72"L x 6.1"W x 3.35"Th (12 x 15.5 x 8.5 cm) |
| Item Weight | 14.39 ounces (408 grams) |
| Cuff Size | 8.7"-15.7" (22-40 cm) upper arm circumference |
| Power Source | 4 x AAA Batteries (not included) or USB DC 5V |
| Display Type | LCD Digital Display |
| Memory Storage | 2 Users x 120 Records (with date/time stamp) |
| Measurement Method | Oscillometric |
| Measurement Range | Blood Pressure: 0-299 mmHg; Pulse: 40-199 beats/minute |
| Accuracy | Pressure: ±3 mmHg; Pulse: ±5% of reading |
| Manufacturer | Shenzhen Jamr Technology CO., Ltd |
| UPC | 792332046480 |
11. Warranty and Support
CAZON products are manufactured with high-quality materials and are thoroughly inspected before shipment. While specific warranty details are not provided in this document, please retain your purchase receipt as proof of purchase for any warranty claims.
For further assistance, technical support, or inquiries regarding your CAZON Blood Pressure Monitor B26, please refer to the official user manual PDF available online or contact CAZON customer service through their official channels.
You can access the full User Manual (PDF) here.
Ask a question about this manual
Ask about setup, troubleshooting, compatibility, parts, safety, or missing instructions. Manuals+ will review the question and use this page’s manual context to help answer it.