CAZON B26
CAZON Automatic Digital Arm Blood Pressure Monitor User Manual
Model: B26
Introduction
Thank you for choosing the CAZON Automatic Digital Arm Blood Pressure Monitor. This device is designed to provide accurate and reliable blood pressure and heart rate measurements for home use. Please read this manual thoroughly before using the device to ensure proper operation and to achieve the most accurate results. Keep this manual for future reference.
Safety Information and Precautions
- Consult your physician before using this device if you have any medical conditions.
- Do not use this device for diagnosis or treatment of any health problem. Always consult a medical professional for interpretation of measurements.
- Do not adjust medication based on measurements from this device without consulting your doctor.
- Keep the device out of reach of children and pets.
- Avoid strong electromagnetic fields (e.g., mobile phones) near the device during measurement.
- Do not disassemble or attempt to repair the device yourself.
- Use only the specified cuff and accessories provided by the manufacturer.
Package Contents
Upon opening the package, please verify that all items listed below are present and in good condition:
- 1 x Blood Pressure Monitor Unit
- 1 x Arm Cuff (22-40cm)
- 1 x USB Cable
- 1 x Instruction Manual (this document)

Figure 1: Contents of the product package, showing the main unit, arm cuff, USB cable, and instruction manual.
Product Overview
Familiarize yourself with the components of your blood pressure monitor:

Figure 2: The CAZON Automatic Digital Arm Blood Pressure Monitor, showing the main unit, the adjustable arm cuff, and the included USB cable.

Figure 3: Exploded view of the blood pressure monitor, highlighting internal components such as the chip with biosensing technology, screen protector, large screen, air connector hole, battery compartment, and battery cover.
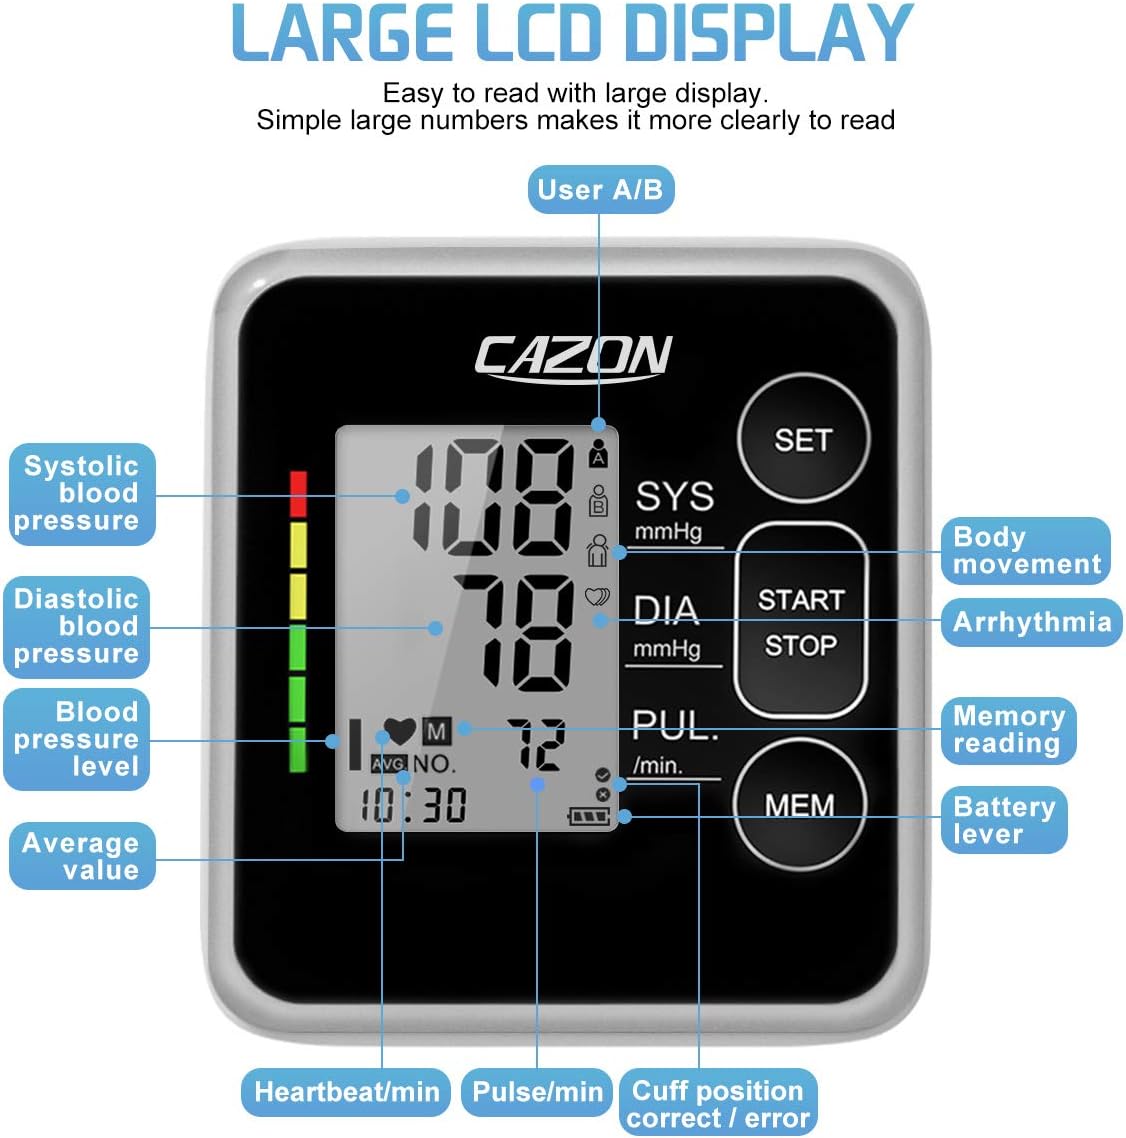
Figure 4: Detailed view of the large LCD display, indicating various measurements and symbols including systolic blood pressure, diastolic blood pressure, blood pressure level, average value, heartbeat/min, pulse/min, cuff position correct/error, battery level, memory reading, arrhythmia, and body movement indicators.
Setup
1. Power Supply
The monitor can be powered by either 4 AAA batteries (not included) or via the included USB cable.
Battery Installation:
- Open the battery cover on the back of the unit.
- Insert 4 AAA batteries, ensuring correct polarity (+/-).
- Close the battery cover securely.
USB Power:
Connect the provided USB cable to the monitor's USB port and to a compatible USB power source (e.g., computer, USB wall adapter). The device can operate without batteries when powered via USB.
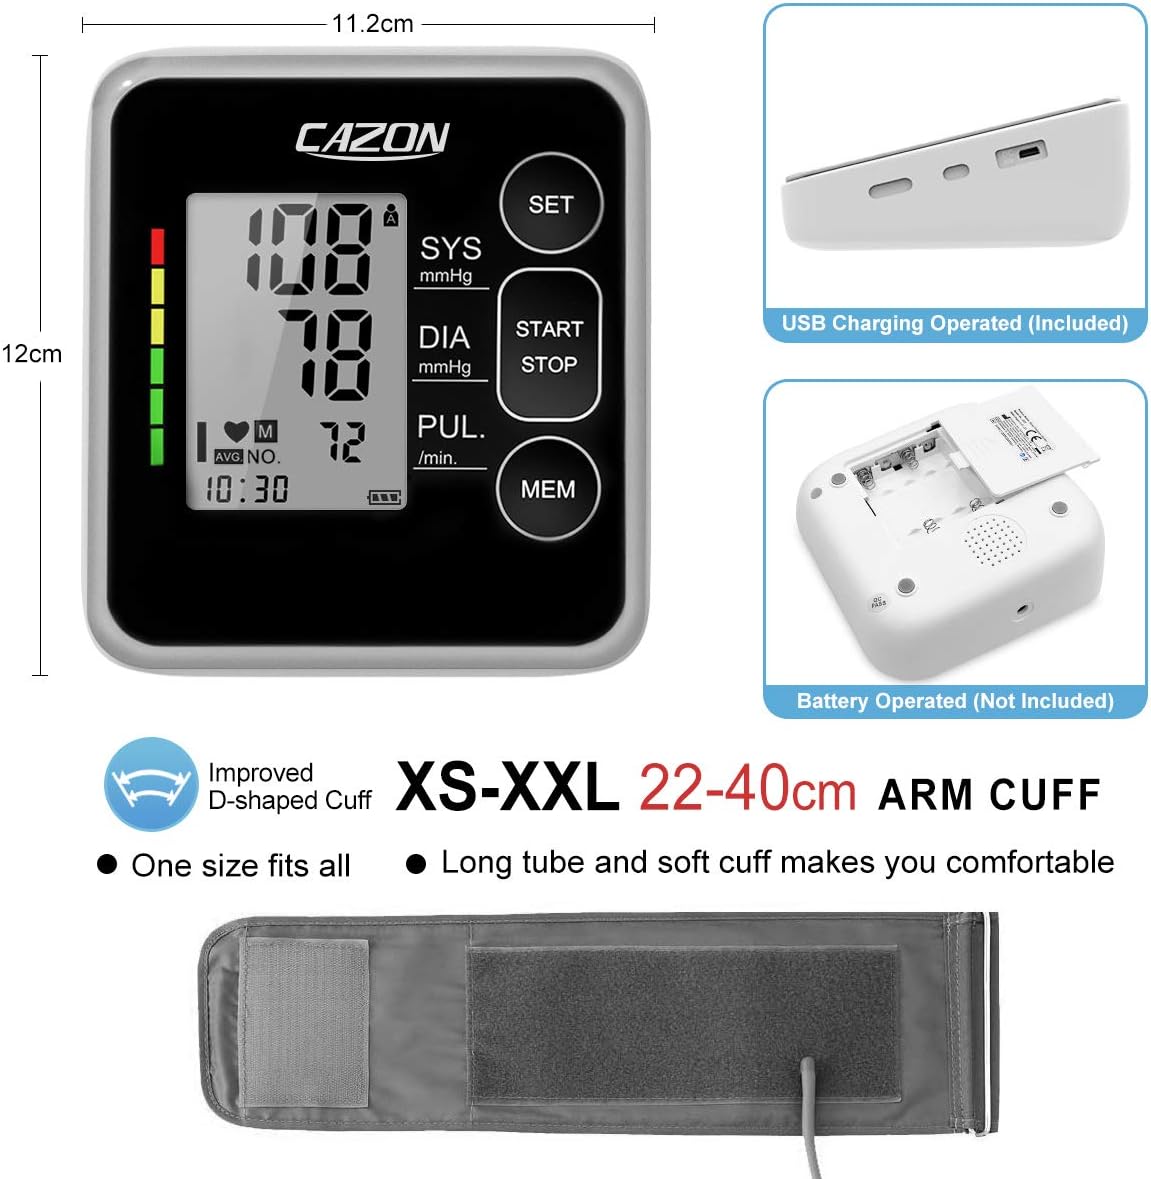
Figure 5: Side view of the monitor showing the USB charging port and the bottom view showing the battery compartment. This image also illustrates the overall dimensions of the device and the adjustable arm cuff.
2. Initial Settings (Date, Time, User)
Before first use, it is recommended to set the date, time, and select the user profile.
- Press the SET button to enter setting mode.
- Use the MEM button to adjust values (e.g., year, month, day, hour, minute).
- Press SET again to confirm each setting and move to the next.
- Select User A or User B by pressing SET when the user icon is blinking. The monitor supports 2 users with 120 memory sets each.
- Press START/STOP to exit setting mode.
Operating Instructions
1. Preparing for Measurement
- Rest: Sit quietly for at least 5 minutes before taking a measurement. Avoid eating, drinking alcohol, smoking, exercising, and bathing for 30 minutes prior.
- Position: Sit upright with your back supported. Place your feet flat on the floor. Rest your arm on a table so the cuff is at heart level.
- Cuff Placement: Ensure the cuff is placed directly on your bare upper arm, approximately 2-3 cm (0.8-1.2 inches) above the elbow joint. The air tube should run down the center of your arm. The cuff is designed for arm circumferences of 22-40cm (8.7-15.7 inches).
2. Taking a Measurement
- Ensure the cuff is correctly applied and the air tube is securely connected to the monitor.
- Press the START/STOP button. The cuff will automatically inflate.
- Remain still and silent during the measurement. Do not talk or move your arm.
- Once the measurement is complete, the cuff will deflate, and your systolic pressure (SYS), diastolic pressure (DIA), and pulse rate (PUL) will be displayed on the screen.
- The measurement will be automatically stored in the selected user's memory.
3. Understanding Your Readings
The monitor displays Systolic (SYS), Diastolic (DIA) blood pressure in mmHg, and Pulse (PUL) in beats per minute. It also features a color-coded indicator based on WHO guidelines for easy interpretation.

Figure 6: A chart illustrating blood pressure classifications according to WHO guidelines, ranging from Normal (green) to Severe Hypertension (red), with corresponding mmHg ranges for systolic and diastolic pressures.
4. Memory Function
The monitor can store up to 120 readings for each of two users (User A and User B), totaling 240 records. Each record includes date and time.
- To view past readings, press the MEM button.
- Press MEM repeatedly to scroll through individual records.
- The monitor can also display the average of the last 3 readings.

Figure 7: The blood pressure monitor displaying the average of the last three readings, with icons for User A and User B, demonstrating its 240-record memory capacity for two distinct users.
5. Special Indicators
Irregular Heartbeat Indicator:
If an irregular heartbeat is detected during measurement, a specific symbol (heart icon with wavy lines) will appear on the display. If this symbol appears frequently, consult your physician.

Figure 8: The blood pressure monitor display showing the irregular heartbeat symbol, indicating the detection of an irregular pulse during measurement.
Cuff Check Indicator:
The monitor automatically checks if the cuff is applied correctly. A checkmark or cross symbol will indicate proper or improper cuff fit.
Arm Movement Indicator:
If significant arm movement is detected during measurement, an arm movement symbol will appear, indicating that the reading might be inaccurate. Remain still during measurement for best results.

Figure 9: Illustrations demonstrating the cuff check indicator (showing correct and incorrect cuff placement) and the arm movement indicator, which alerts the user if movement occurs during measurement.
Maintenance
Cleaning:
- Wipe the monitor and cuff with a soft, dry cloth.
- If necessary, use a cloth lightly dampened with water or a mild detergent, then wipe dry immediately.
- Do not use abrasive cleaners, alcohol, or organic solvents.
- Do not immerse the monitor or cuff in water.
Storage:
- Store the device in a clean, dry place, away from direct sunlight, extreme temperatures, and humidity.
- If not in use for an extended period, remove the batteries to prevent leakage.
Troubleshooting
If you encounter issues with your blood pressure monitor, refer to the table below for common problems and solutions:
| Problem | Possible Cause | Solution |
|---|---|---|
| No display when powered on. | Batteries are dead or incorrectly inserted; USB cable not connected or faulty. | Check battery polarity and replace if necessary. Ensure USB cable is securely connected to a working power source. |
| Inaccurate readings. | Improper cuff placement; arm movement during measurement; not resting before measurement. | Ensure cuff is correctly positioned and snug. Remain still and silent. Rest for 5 minutes before measuring. |
| Cuff does not inflate or inflates too little. | Air tube disconnected; cuff leakage. | Check that the air tube is securely connected to the monitor and the cuff. Inspect cuff for damage. |
| Irregular Heartbeat symbol appears frequently. | Detection of irregular pulse. | This is an indicator, not a malfunction. Consult your physician if this occurs often. |
If the problem persists after trying these solutions, please contact customer support.
Specifications
- Model: B26
- Measurement Method: Oscillometric
- Measurement Range:
- Pressure: 0-299 mmHg
- Pulse: 40-199 beats/minute
- Accuracy:
- Pressure: ±3 mmHg
- Pulse: ±5% of reading
- Cuff Size: 22-40 cm (8.7-15.7 inches)
- Memory: 2 users x 120 sets of readings
- Power Source: 4 x AAA batteries (not included) or USB DC 5V
- Automatic Shut-off: Approximately 60 seconds of inactivity
- Dimensions: Approximately 10 x 12 x 8 cm
- Weight: Approximately 300 grams (excluding batteries)
- Operating Environment: Temperature 5°C-40°C, Humidity 15%-85% RH
- Storage Environment: Temperature -20°C-55°C, Humidity 10%-93% RH
Warranty and Support
CAZON is committed to providing quality medical equipment. While specific warranty details are not provided in this manual, our professional team is ready to assist you with any product-related issues. For support, please refer to the contact information provided with your purchase or visit the official CAZON website.
For more information and assistance, please visit: CAZON Brand Page