Miuzei raspberry pi 4 case
Miuzei Raspberry Pi 4 Case Instruction Manual
Model: raspberry pi 4 case
Brand: Miuzei
Introduction
This manual provides comprehensive instructions for the assembly, operation, and maintenance of your Miuzei Raspberry Pi 4 Case. This product is designed to protect your Raspberry Pi 4 Model B and enhance its cooling performance with an integrated fan and heatsinks, along with a dedicated power supply.
Package Contents
Please verify that all items listed below are included in your package:
- Miuzei Raspberry Pi 4 Case (multi-layer design)
- 35mm Cooling Fan
- 4 x Aluminum Heatsinks
- 5V 3A USB-C Power Supply with 1.5m cable
- Assembly Screws and Nuts
- Small Screwdriver (may be included for assembly)

Image: All components included with the Miuzei Raspberry Pi 4 Case, featuring the case, cooling fan, heatsinks, and 5V 3A USB-C power supply.
Setup Instructions
1. Assembling the Case
The case features a 3-layer structure for easy assembly and access. Begin by separating the top acrylic lid, the middle frame, and the bottom aluminum base.
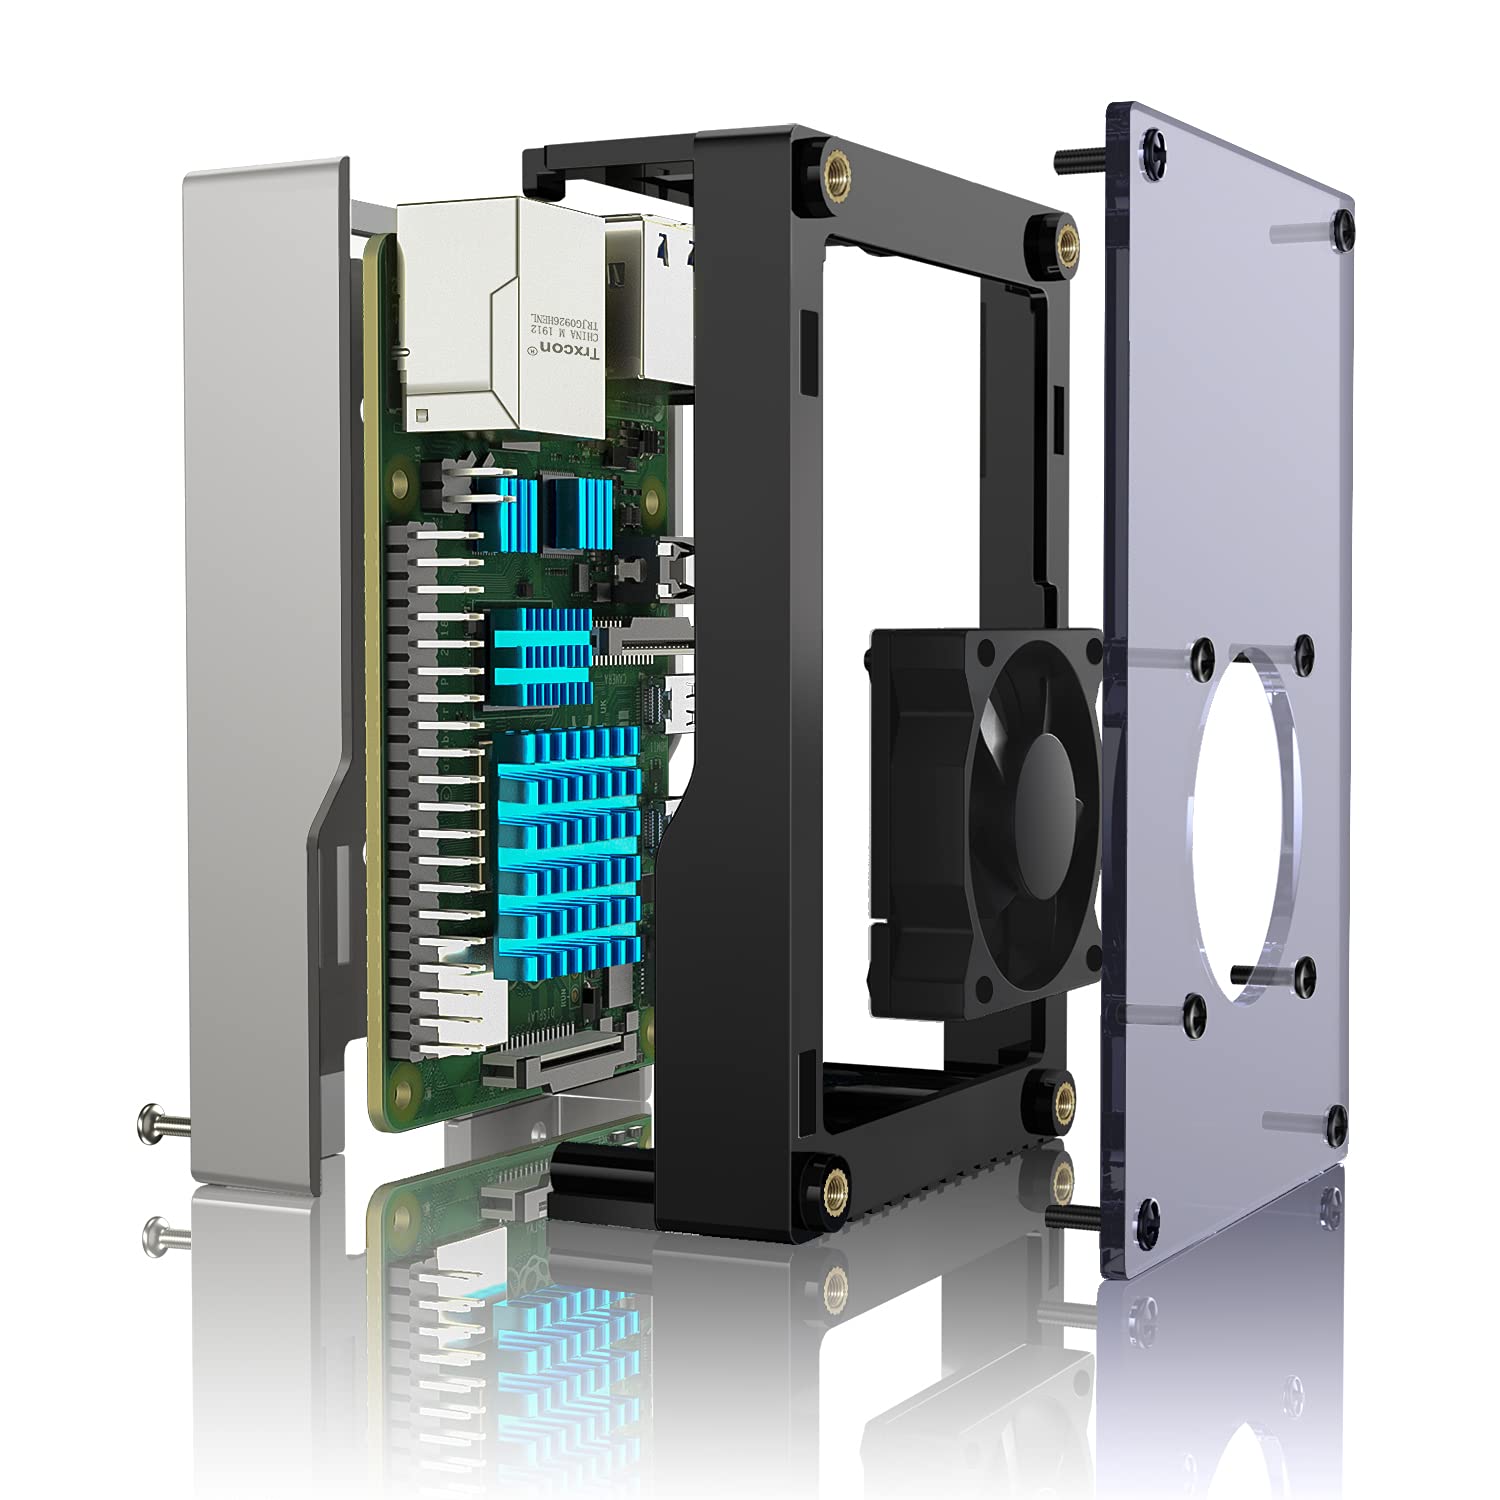
Image: Exploded diagram illustrating the multi-layer design of the Miuzei Raspberry Pi 4 Case, highlighting the separate components for assembly.
2. Applying Heatsinks
Carefully apply the four aluminum heatsinks to the designated chips on your Raspberry Pi 4 board. Ensure proper contact for optimal heat dissipation. Refer to the Raspberry Pi 4 documentation for exact chip locations if unsure.

Image: A Raspberry Pi 4 board with blue heatsinks attached to key components, illustrating the correct application for thermal management.
3. Installing the Cooling Fan
Mount the 35mm cooling fan onto the designated area on the top acrylic lid using the provided screws. Connect the fan's power cable to the appropriate GPIO pins on your Raspberry Pi 4. The fan supports both 3V (silent mode) and 5V (high cooling mode) connections. For 5V operation, connect the red wire to the 5V pin and the black wire to a GND pin. For 3V operation, connect the red wire to the 3.3V pin and the black wire to a GND pin.

Image: Visual guide for connecting the cooling fan to the Raspberry Pi 4, demonstrating both 3V and 5V power options and their effect on cooling performance.
4. Securing the Raspberry Pi in the Case
Carefully place your Raspberry Pi 4 board (with heatsinks applied) into the middle frame of the case. Align the board with the screw holes and ports. Then, place the middle frame onto the bottom aluminum base and secure it with screws. Finally, attach the top acrylic lid (with the fan installed) to the middle frame, securing it with the remaining screws.
5. Connecting the Power Supply
Connect the provided 5V 3A USB-C power supply to the USB-C power input port on your Raspberry Pi 4. Plug the power adapter into a standard wall outlet. The power supply features an inline switch for convenient power control.

Image: The Miuzei Raspberry Pi 4 case connected to its USB-C power supply, illustrating the power connection and the location of various ports.
Operating Instructions
Powering On/Off
Once the power supply is connected to the wall outlet and the Raspberry Pi, use the inline switch on the power cable to turn the device on or off. Always ensure proper shutdown procedures for your Raspberry Pi operating system before cutting power to prevent data corruption.
Accessing Ports and Slots
The Miuzei case is designed to provide full access to all Raspberry Pi 4 ports, including GPIO pins, camera port, display port, USB 2.0, USB 3.0, Ethernet, Micro HDMI, and the audio jack. The split design allows for easy access to GPIO and camera connections without fully disassembling the case.

Image: Illustration of the Miuzei case providing convenient access to the Raspberry Pi's GPIO, display, camera module, and SD card slot.
Maintenance
- Cleaning: Periodically clean the case and fan to prevent dust buildup, which can impede airflow and cooling efficiency. Use a soft, dry cloth for the case and compressed air for the fan.
- Fan Check: Ensure the cooling fan is spinning freely and quietly. If it becomes noisy or stops spinning, check for obstructions or consider replacement.
- Heatsink Adhesion: Verify that the heatsinks remain firmly attached to the chips. If they become loose, reapply them to ensure proper thermal contact.
Troubleshooting
| Problem | Possible Cause | Solution |
|---|---|---|
| Fan not spinning | Incorrect wiring; insufficient power; fan malfunction. | Check fan wiring to GPIO pins (5V/3.3V and GND). Ensure power supply is connected. Replace fan if defective. |
| Raspberry Pi overheating | Heatsinks not properly applied; fan not working; poor airflow. | Ensure heatsinks are firmly attached. Verify fan operation. Clean dust from case and fan. |
| Power supply not working | Cable not fully inserted; wall outlet issue; power supply malfunction. | Check all connections. Try a different wall outlet. Test with another compatible USB-C power supply if available. |
| Difficulty accessing GPIO/Camera | Case not fully disassembled; incorrect alignment. | Utilize the split design by removing the top lid and middle frame for easier access. Ensure Raspberry Pi is correctly seated. |
Specifications
| Feature | Detail |
|---|---|
| Product Dimensions | 6.69 x 4.13 x 1.77 inches |
| Item Weight | 7.37 ounces |
| Model Name | raspberry pi 4 model b case |
| Case Type | Raspberry Pi Enclosure |
| Material | Aluminum (bottom), Acrylic (top) |
| Cooling Method | Active Air Cooling (Fan) + Passive Cooling (Heatsinks) |
| Fan Size | 35mm |
| Power Supply | 5V 3A USB-C (1.5m / 5ft cable length) |
| Power Supply Input | 100-240V~50/60Hz 0.8A |
| Compatibility | Raspberry Pi 4 Model B (2GB, 4GB, 8GB versions) |

Image: Technical specifications of the included 5V 3A USB-C power supply, highlighting its input/output ratings and cable durability.
Warranty and Support
Miuzei products are designed for reliability and performance. For any questions, technical support, or warranty inquiries, please contact Miuzei customer service through the platform where you purchased the product or visit the official Miuzei store for more information.
Visit the Miuzei Store for additional products and support resources.
Related Documents - raspberry pi 4 case
 |
Miuzei 4-Inch HDMI Display for Raspberry Pi - User Guide and Specifications Comprehensive guide for the Miuzei 4-inch HDMI IPS touchscreen display, covering hardware description, installation, system setup for Raspberry Pi, and frequently asked questions. Includes product parameters and technical specifications. |
 |
Miuzei Starter Kit Support Information and Link Contact information and a support link for the Miuzei Starter Kit, compatible with Arduino projects. Find assistance for your electronics projects. |
 |
Miuzei Starter Kit Support Information Thank you for your support of the Miuzei Starter Kit. Find helpful resources, tutorials, and contact the Miuzei Support Team for assistance. |
 |
Miuzei SG90 Motor (MS18-F) Technical Specifications Detailed technical specifications for the Miuzei SG90 Motor (Model MS18-F), including environmental, electrical, mechanical, and control parameters. |
 |
Miuzei DS3218 6V 20kg RC Digital Servo Datasheet Specifications Detailed technical specifications for the Miuzei DS3218 6V 20kg RC Digital Servo, including environmental, mechanical, electrical, and control parameters. |
 |
JOY-IT ARMOR CASE "BLOCK ACTIVE" RB-AlucaseP4+07FAN Assembly Instructions Detailed assembly instructions and information for the JOY-IT ARMOR CASE "BLOCK ACTIVE" (model RB-AlucaseP4+07FAN), a cooling aluminum case for Raspberry Pi 4. |
Ask a question about this manual
Ask about setup, troubleshooting, compatibility, parts, safety, or missing instructions. Manuals+ will review the question and use this page’s manual context to help answer it.