Introduction
This manual provides detailed instructions for setting up and operating the Radiolink Wireless Trainer System. This system is designed to facilitate remote control airplane flight training by connecting a student transmitter to a trainer transmitter, allowing for safe and effective learning.
The system is compatible with Radiolink AT9S, AT9S Pro, AT10, AT10II, T8FB, and T8S RC radio controllers, provided the transmitter has a trainer function and the paired receiver supports PPM signal output.
What's in the Box
- 1x Wireless Trainer Cable
Key Features
- Anti-interference Technology: Radiolink AT9S Pro & AT10II utilize DSSS & FHSS hybrid dual spread spectrum, while T8FB & T8S use FHSS. This enhances control distance and anti-interference capabilities, allowing multiple users to operate simultaneously with reduced interference.
- Safe Wireless Training: The wireless trainer system prevents accidental disconnections that can occur with wired setups, making training safer and more reliable. This allows beginners to practice acrobatic flights with confidence.
- Low Latency: Radiolink transmitters offer a 3ms response time across all channels, ensuring stable and responsive signals without delay, even when transmitted between two controllers. This provides an optimal RC experience and supports control distances up to 1900 feet.
- Low Power Consumption: The wireless trainer system provides a stable 5V output, protecting receivers from high voltage damage. The trainer transmitter's power supply efficiently powers the wireless trainer system.
- Innovative Dual-Mode Trainer Function:
- ALT Mode (TRIGGER): A single toggle of the SWH switch transfers control between the coach and trainee.
- Traditional Hold Mode: The trainer switch (SWH) must be continuously held to allow the trainee to control the model. Releasing the switch returns control to the trainer.
Setup Instructions
Follow these steps to set up your Radiolink Wireless Trainer System:
- Connect the training cable to the student receiver:
Connect the wireless trainer cable to the PPM channel of the student receiver (e.g., R8EF). Ensure the connection is secure.

Image: Detailed diagram of the wireless trainer cable's 4-pin connector and its connection to a receiver, showing signal, positive, and negative pins.
- Connect the student receiver to the trainer transmitter:
Plug the connected trainer cable and student receiver into the trainer port of the trainer transmitter.
- Power on and bind the student receiver:
Power on both the trainer transmitter and the student transmitter. Bind the student receiver (e.g., R8EF) to the student transmitter (e.g., T8FB). Ensure the receiver's signal is switched to PPM mode, indicated by a blue LED light.
- Power on the aircraft and bind the trainer receiver:
Power on the RC airplane and bind its receiver (e.g., R12DS) to the trainer transmitter. A signal tower icon should appear on the trainer transmitter's screen, indicating a successful connection.
- Configure Trainer Function on Trainer Transmitter:
Long press the MODE key on the trainer transmitter to enter the basic menu. Navigate to and select the "TRAINER" function.

Image: Trainer Transmitters (AT9S Pro, AT10II) and their compatible receivers (R12DS, R9DS, R6DS, R12DSM, R6DSM).
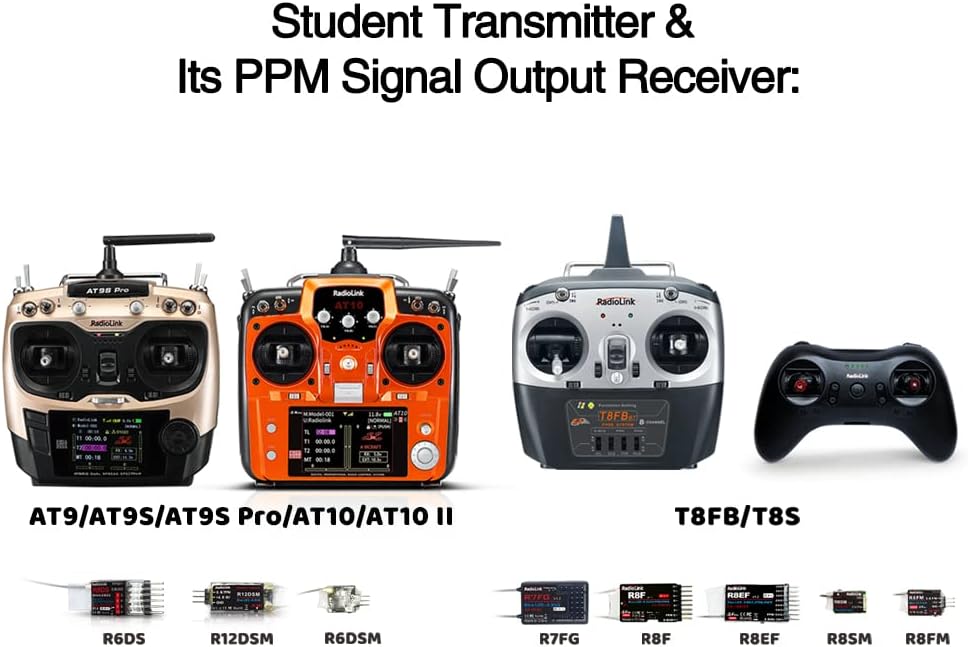
Image: Student Transmitters (AT9S Pro, AT10II, T8FB, T8S) and their compatible PPM signal output receivers (R6DS, R12DSM, R6DSM, R7FG, R8EF, R8FM).

Image: Setup diagram illustrating the connection between a drone, student transmitter, and trainer transmitter using the wireless trainer cable. Note: The wireless trainer cable supports 10 channels of PPM signals. For AT9/AT9S/AT9S Pro/AT10/AT10II, set "CH-SELECT: 12CH" to "CH-SELECT: 10CH" in the SYSTEM menu.
Operating the Trainer Function
The Radiolink Wireless Trainer System offers two modes for the trainer function: TRIGGER and HOLD.
1. Brand New ALT Mode (TRIGGER)
In TRIGGER mode, you only need to push the SWH switch once to activate or deactivate the trainer function. You do not need to continuously hold the switch.
- Push the SWH switch once to turn on the trainer function. The red light on the trainer transmitter will start blinking, and the airplane will be controlled by the student transmitter.
- Push the SWH switch again to turn off the trainer function. The red LED will stay on, and control will return to the trainer transmitter.
2. Traditional Hold Mode
In HOLD mode, the trainer switch (SWH) must be continuously held to transfer control to the student. Releasing the switch returns control to the trainer.
- Keep pushing the trainer switch (SWH) to turn on the trainer function. The airplane will be controlled by the student transmitter.
- Release the SWH switch to turn off the trainer function. The airplane will be controlled by the trainer transmitter.

Image: Visual representation of the "TRIGGER" and "HOLD" modes within the trainer menu, explaining how each mode functions with the SWH switch.
Official Product Video: Wireless Training Function
Video: A detailed demonstration of the wireless training function with Radiolink transmitters, showing connection steps and mode operation.
Troubleshooting
- Q: Is the Radiolink wireless trainer cable compatible with transmitters of other brands?
- A: Yes, if the transmitter has a trainer function and the paired receiver supports PPM signal output, it is compatible.
- Q: What if the trainer function cannot be activated?
- A: After binding all primary and secondary transmitters, set the trainer function from INH (Inhibit) to OFF. Then, toggle the SWH switch to activate or deactivate the trainer function.
- Q: Why does the secondary transmitter fail to control when toggling the SWH switch after the trainer function setting is done?
- A:
- Ensure the binding between the secondary transmitter and the receiver connected to the wireless trainer cable is successful.
- Verify that the signal output is PPM. For Radiolink receivers (R6DS, R6DSM, R12DSM, R8SM, R8EF, R8FM), the PPM signal is indicated by a constantly red LED. Refer to the user manuals for other receiver brands.
- Q: Why do I have to keep holding the SWH switch when activating the trainer function?
- A: Enter the primary transmitter's menu: Basic Menu > Trainer > Mode. Change the mode to TRIGGER. If you are using a Radiolink AT9S and cannot find this option, please update the firmware to V1.7.8 or above.
- Q: Can the wireless trainer cable be connected with other devices?
- A: The output voltage of the wireless trainer cable is limited to 5V with a power of 200mA. It only supports receivers and is not designed for other devices.
Specifications
| Feature | Detail |
|---|---|
| Brand Name | Radiolink |
| Model Name | Radiolink Wireless Trainer System RC Radio Controller PPM Trainer Cord Cable |
| Model Number | Radiolink-Training |
| Included Components | 1* Trainer Cable |
| Material Type | Plastic |
| Item Weight | 0.02 Pounds (approx. 9 grams) |
| Item Dimensions (L x W x H) | 5 x 0.2 x 0.2 inches (approx. 12.7 x 0.5 x 0.5 cm) |
| Power Source | Battery Powered (via transmitter) |
| Operation Mode | Manual |
| Educational Objective | RC Flight Control Training |
| Number of Players | 2 |
| Are Batteries Required | No (powered by transmitter) |
| Is Assembly Required | No |
Warranty and Support
For warranty information, technical support, or further assistance, please refer to the official Radiolink website or contact their customer service directly. Product support resources, including user manuals and FAQs, are often available on the brand's official channels.
You can visit the Radiolink Store on Amazon for additional information and support.