Bestway Power Steel Swim Vista Series 14' x 8'2" x 39.5" Oval Frame Above Ground Swimming Pool
Bestway Power Steel Swim Vista Series Oval Frame Above Ground Swimming Pool User Manual
Model: 14' x 8'2" x 39.5"
Introduction
This manual provides essential instructions for the safe and efficient setup, operation, maintenance, and disassembly of your Bestway Power Steel Swim Vista Series Oval Frame Above Ground Swimming Pool. Please read all instructions carefully before installation and use. Keep this manual for future reference.

Image: The Bestway Power Steel Swim Vista Series Oval Frame Above Ground Swimming Pool, showcasing its complete setup with included accessories like the pump, ladder, and cover.
Safety Information
Always follow basic safety precautions to reduce the risk of injury. This pool is intended for outdoor use only. Adult supervision is required at all times when children are in or near the pool. Ensure the pool is installed on a level surface and all components are securely assembled before filling with water. Do not dive or jump into the pool. Keep all electrical equipment away from the pool area. Refer to local regulations regarding pool fencing and safety barriers.
Included Components
Your Bestway Power Steel Swim Vista Series pool set includes the following items:
- Pool Liner (with Swim Vista windows)
- Steel Frame Components
- Filter Pump
- Safety Ladder
- Pool Cover
- Repair Patch
- Instruction Manual (this document)

Image: A close-up view of the pool's exterior wall, featuring the durable rattan tile print and one of the unique underwater Swim Vista windows.
Setup Instructions
Follow these steps for proper pool setup. It is recommended to have at least two people for assembly.
1. Site Preparation
Choose a flat, level surface free from debris, sharp objects, or uneven ground. The area should be able to support the weight of the filled pool. Avoid placing the pool under overhead power lines or near trees that shed leaves frequently.
Video: Official Bestway Swim Vista Set Up guide. This video demonstrates the entire assembly process, from site preparation to filling the pool.
2. Laying Out the Pool Liner
Unfold the pool liner on the prepared, level surface. Ensure the drain valve is positioned correctly for future drainage. Smooth out any wrinkles on the bottom of the liner.
3. Frame Assembly
Assemble the steel frame components according to the diagrams provided in the separate assembly sheet. Connect the horizontal beams and vertical legs, ensuring all pins snap into place. The Seal & Lock System provides a secure pipe connection for enhanced stability.
4. Filling the Pool
Once the frame is fully assembled and stable, begin filling the pool with water. As the water level rises, smooth out any remaining wrinkles on the bottom of the liner by walking gently on the pool floor. Fill the pool to approximately 90% capacity, or to the recommended fill line indicated on the liner.
Operating the Filter Pump
The included filter pump is crucial for maintaining clean and clear pool water. Connect the pump hoses to the designated inlet and outlet ports on the pool liner. Ensure all connections are tight to prevent leaks. Follow the separate filter pump manual for detailed instructions on installation, operation, and filter cartridge replacement. Operate the pump daily for several hours to ensure proper water circulation and filtration.
Maintenance
Regular maintenance is essential for the longevity and hygiene of your pool.
- Water Chemistry: Test pool water regularly and adjust chemical levels (pH, chlorine, alkalinity) as needed to prevent algae growth and ensure safe swimming conditions.
- Cleaning: Skim debris from the water surface daily. Vacuum the pool floor as necessary. Clean the filter pump cartridge frequently and replace it every two weeks or as recommended by the manufacturer.
- Liner Inspection: Periodically inspect the pool liner for any signs of wear, tears, or punctures. Use the included repair patch for minor damages.
- Frame Inspection: Check the steel frame for any signs of corrosion or damage. Ensure all connections remain secure.
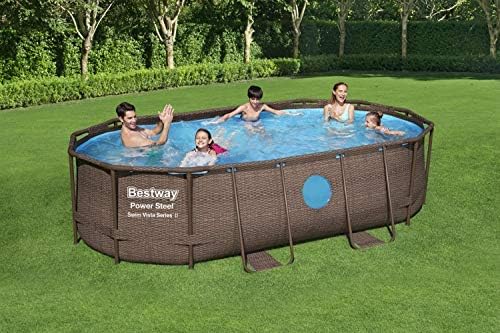
Image: A family enjoying the Bestway Power Steel Swim Vista Series pool, highlighting its capacity and recreational use.
Disassembly and Storage
When the swimming season ends, follow these steps to properly disassemble and store your pool:
- Drain Water: Connect a garden hose to the flow control drain valve and direct the water to a suitable drainage area.
- Clean and Dry: Once drained, thoroughly clean the pool liner and frame components. Ensure all parts are completely dry before storage to prevent mold and mildew.
- Disassemble Frame: Carefully disassemble the steel frame by reversing the assembly steps.
- Fold Liner: Fold the liner neatly to prevent creases and damage.
- Store: Store all components in a dry, cool place, away from direct sunlight and extreme temperatures (above 5°C / 41°F).
Troubleshooting
If you encounter issues with your pool, refer to the following common solutions:
- Leaking: Check all connections for tightness. Inspect the liner for punctures and use the provided repair patch.
- Cloudy Water: Ensure the filter pump is running for adequate hours daily. Clean or replace the filter cartridge. Check and adjust water chemistry.
- Pump Not Working: Verify power connection. Check for blockages in hoses or pump impeller. Refer to the pump's specific manual.
- Uneven Water Level: This indicates the pool is not on a perfectly level surface. Drain the pool, level the ground, and reassemble.
Specifications
| Feature | Detail |
|---|---|
| Brand | Bestway |
| Model | Power Steel Swim Vista Series |
| Dimensions (L x W x H) | 14' x 8'2" x 39.5" (168"L x 98"W x 39.5"H) |
| Shape | Oval |
| Water Capacity (90%) | 1,915 Gal. (7,250 L) |
| Material | Tritech (2 layers heavy-duty PVC with polyester mesh core), Alloy Steel, Metal |
| Color | Brown (Rattan Tile Print) |
| Special Features | Swim Vista Windows, Seal & Lock System |
| Item Weight | 122.7 Pounds |
Warranty and Support
For warranty information, technical support, or to purchase replacement parts, please visit the official Bestway website or contact Bestway customer service. Keep your proof of purchase for warranty claims.
Official Bestway Website: www.bestwaycorp.com
Ask a question about this manual
Ask about setup, troubleshooting, compatibility, parts, safety, or missing instructions. Manuals+ will review the question and use this page’s manual context to help answer it.