GIGABYTE B550I AORUS PRO AX
GIGABYTE B550I AORUS PRO AX Motherboard User Manual
Model: B550I AORUS PRO AX
Brand: GIGABYTE
1. Product Overview
The GIGABYTE B550I AORUS PRO AX is a high-performance Mini-ITX gaming motherboard designed to support 3rd Gen AMD Ryzen Processors. It features a robust power delivery system, advanced thermal design, and comprehensive connectivity options, making it suitable for compact yet powerful PC builds.
Key features include Dual Channel DDR4 memory support, PCIe 4.0 readiness, dual NVMe M.2 slots with Thermal Guard, integrated Intel WiFi 6 and Bluetooth 5, 2.5GbE LAN, and extensive USB 3.2 Gen2 connectivity with DisplayPort and dual HDMI outputs.
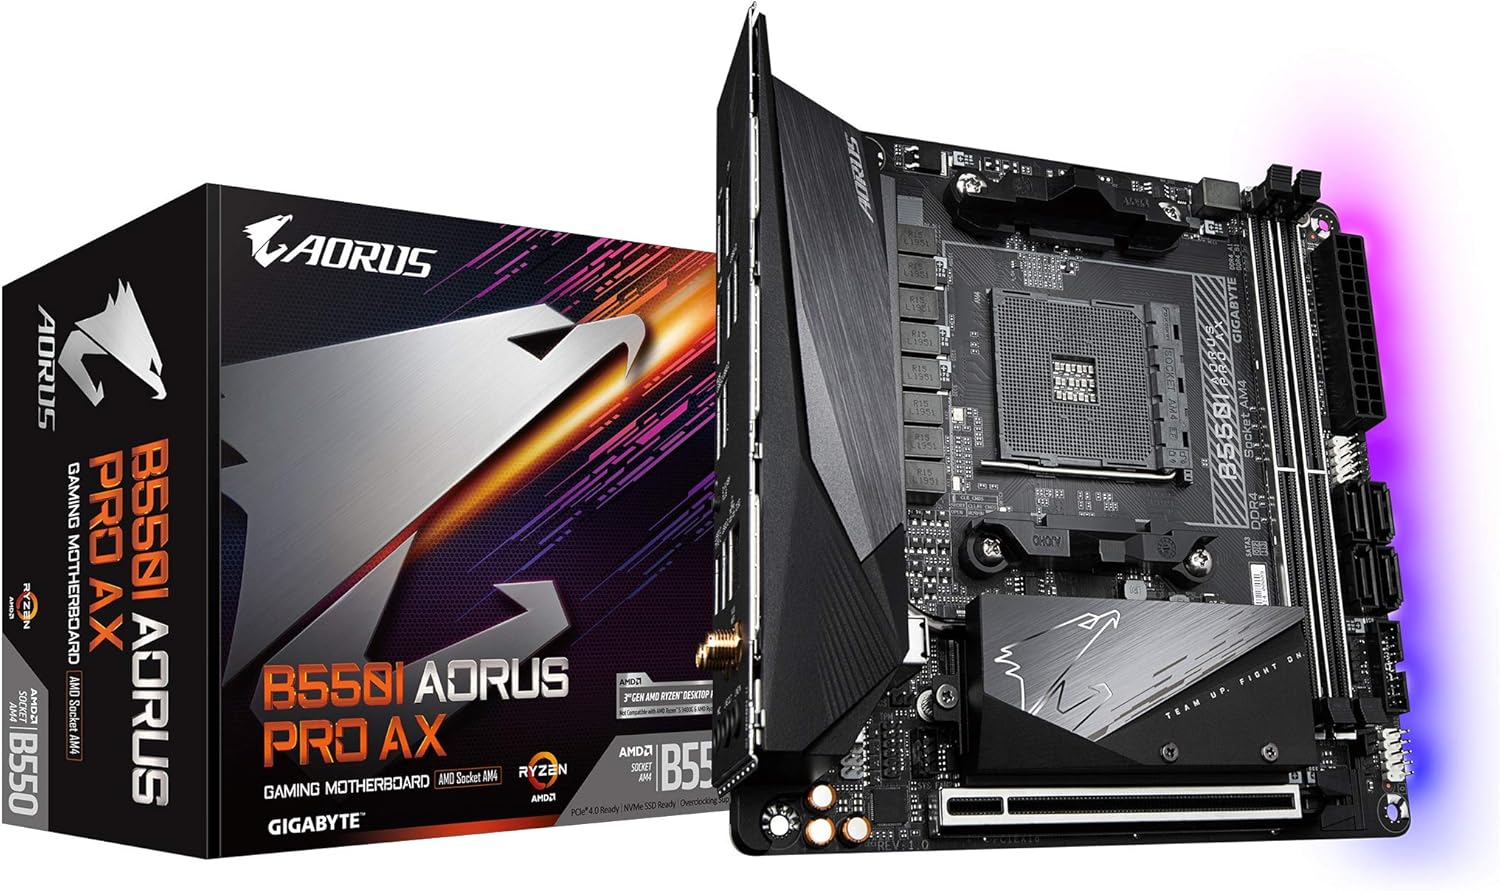
Figure 1.1: GIGABYTE B550I AORUS PRO AX Motherboard and retail packaging.

Figure 1.2: Top-down view of the GIGABYTE B550I AORUS PRO AX Motherboard, showcasing the CPU socket, RAM slots, and M.2 heatsink.
2. Setup and Installation
This section provides instructions for installing your GIGABYTE B550I AORUS PRO AX motherboard and its components.
2.1 Component Compatibility
Ensure all components, including the CPU, RAM, and storage devices, are compatible with the B550 chipset and AM4 socket. This motherboard supports 3rd Gen AMD Ryzen processors. For optimal performance and compatibility with newer Ryzen 5000 series processors, a BIOS update may be required.
2.2 BIOS Update (Q-Flash Plus)
The Q-Flash Plus feature allows you to update the BIOS without installing the CPU, memory, or graphics card. This is particularly useful for ensuring compatibility with newer processors.
- Download the latest compressed BIOS update file for your motherboard model from the official GIGABYTE website.
- Uncompress the downloaded BIOS file and save it to a USB flash drive. Rename the file to GIGABYTE.bin. Ensure the USB flash drive uses the FAT32/16 file system.
- Insert the USB flash drive into the designated white USB port or BIOS Q-Flash port on the motherboard's rear panel. Refer to the motherboard diagram for the exact location.
- Connect the 8-pin CPU power connector (if applicable) and the 24-pin mainboard power connector.
- Press the Q-Flash Plus button on the rear panel. The system will automatically detect and flash the BIOS file. The QFLED and Q-Flash Plus button will flash during the process. Wait for 2-3 minutes until the QFLED stops flashing, indicating the update is complete.

Figure 2.1: Visual guide for using the Q-Flash Plus feature to update the BIOS.
2.3 Component Installation
- CPU Installation: Carefully align your AMD Ryzen processor with the AM4 socket and gently lower it into place. Secure the CPU retention lever.
- Memory Installation: Install DDR4 RAM modules into the two DIMM slots. Ensure they are fully seated by pressing down until the clips on both ends lock into place.
- M.2 SSD Installation: The motherboard features dual NVMe PCIe 4.0/3.0 x4 M.2 slots, equipped with Thermal Guard heatsinks. Install your M.2 SSDs and secure them, then reattach the heatsinks for optimal thermal performance.
- Graphics Card Installation: Insert your graphics card into the Ultra Durable PCIe 4.0 Ready x16 slot. Ensure it clicks securely into place.
- Power Connections: Connect the 24-pin ATX power connector and the 8-pin CPU power connector from your power supply to the motherboard.
- Storage and Peripherals: Connect SATA drives to the available SATA 6Gb/s ports. Connect front panel headers, USB headers, and other peripheral cables as per your case and component requirements.

Figure 2.2: Detailed view of the motherboard highlighting key component areas such as the CPU socket, RAM slots, and M.2 slots.
3. Operating Features
The GIGABYTE B550I AORUS PRO AX motherboard offers a range of features to enhance your computing experience.
3.1 Connectivity
- Wireless Connectivity: Features onboard Intel WiFi 6 802.11ax 2T2R and Bluetooth 5 for high-speed wireless networking and peripheral connections.
- Wired Networking: Equipped with a Blazing Fast 2.5GbE LAN port for high-bandwidth wired network connections.
- USB Ports: Includes USB 3.2 Gen2 Type-C and other USB 3.2 Gen 1 ports for fast data transfer and device connectivity.
- Video Outputs: Supports DisplayPort 1.4 and Dual HDMI 2.0B for multiple display setups.

Figure 3.1: Rear I/O panel showing various ports including USB, DisplayPort, HDMI, LAN, and Wi-Fi antenna connectors.
3.2 Audio
The motherboard features AMP-UP Audio with Realtek ALC1220-VB and Nichicon Audio Capacitors, providing high-quality audio output with a Rear 120dB SNR for an immersive sound experience.
3.3 Thermal Management
An Advanced Thermal Design with Extended & Multi-Layered Heatsink and Thermal Baseplate ensures efficient heat dissipation. Smart Fan 5 features multiple temperature sensors and hybrid fan headers with FAN STOP functionality, allowing precise control over cooling and noise levels.
3.4 RGB Fusion 2.0
Customize your system's aesthetics with RGB FUSION 2.0, supporting multi-zone addressable LED light shows and compatibility with addressable LED and RGB LED strips.

Figure 3.2: Labeled diagram of the motherboard highlighting key features and components.
4. Maintenance
Proper maintenance ensures the longevity and optimal performance of your motherboard.
- Dust Removal: Regularly clean dust from the motherboard and case interior using compressed air. Ensure the system is powered off and unplugged before cleaning.
- Cable Management: Ensure cables are neatly routed to promote good airflow and prevent interference with components.
- Driver Updates: Keep your motherboard drivers, including chipset, audio, LAN, and Wi-Fi drivers, updated to the latest versions available on the GIGABYTE support website.
- BIOS Updates: Periodically check the GIGABYTE website for new BIOS versions, which may offer improved stability, compatibility, or new features.
5. Troubleshooting
This section addresses common issues you might encounter with your GIGABYTE B550I AORUS PRO AX motherboard.
| Problem | Possible Cause | Solution |
|---|---|---|
| System does not boot with new CPU. | BIOS version does not support the CPU. | Update the BIOS using the Q-Flash Plus feature (refer to Section 2.2). |
| RAM modules not detected or system unstable. | Improper RAM installation or compatibility issues with CPU cooler. | Ensure RAM modules are fully seated. Check for clearance issues with large CPU coolers that might obstruct RAM slots. Re-seat RAM modules. |
| Wi-Fi or Bluetooth connectivity is intermittent. | Outdated drivers or antenna issues. | Ensure the Wi-Fi antenna is securely connected. Update Wi-Fi and Bluetooth drivers from the GIGABYTE website. |
| SATA ports are blocked by the graphics card. | Physical obstruction due to large graphics card. | Consider using SATA cables with 90-degree connectors if available. Adjust cable routing or consider alternative GPU mounting solutions if space is extremely limited. |
| M.2 SSD screws are overtightened or stripped. | Manufacturing issue or improper tool usage. | Use appropriate tools and apply gentle force. If stripped, contact GIGABYTE support for assistance. |
For further assistance, refer to the comprehensive user manual available on the GIGABYTE official website or contact GIGABYTE technical support.
6. Technical Specifications
| Feature | Specification |
|---|---|
| Brand | GIGABYTE |
| Model Name | B550I AORUS PRO AX |
| CPU Socket | Socket AM4 |
| Compatible Processors | AMD Ryzen 3rd Gen, AMD Ryzen 5000 Series (with BIOS update) |
| Chipset Type | AMD B550 |
| RAM Memory Technology | DDR4 (Dual Channel ECC/Non-ECC Unbuffered) |
| Memory Slots | 2 DIMMs |
| Memory Speed | Up to 2133 MHz (Base), higher with XMP/OC |
| PCIe Slot | 1 x PCIe 4.0 x16 Slot |
| M.2 Slots | 2 x Ultra-Fast NVMe PCIe 4.0/3.0 x4 M.2 with Thermal Guard |
| SATA Ports | 4 x SATA 6Gb/s |
| Wireless Type | Intel WiFi 6 802.11ax 2T2R & BT5 |
| LAN | 2.5GbE LAN |
| USB Ports | USB 3.2 Gen2 Type-C, USB 3.2 Gen 1, USB 2.0 |
| Video Outputs | DisplayPort 1.4, 2 x HDMI 2.0B |
| Audio | Realtek ALC1220-VB, Nichicon Audio Capacitors (Rear 120dB SNR) |
| Form Factor | Mini-ITX |
| Dimensions (LxWxH) | 8.74 x 7.44 x 3.07 inches |
| Item Weight | 2.2 pounds |
7. Warranty and Support
For detailed warranty information, please refer to the warranty card included with your product or visit the official GIGABYTE website. GIGABYTE offers various support resources, including driver downloads, BIOS updates, FAQs, and technical assistance.
You can find additional support and resources on the official GIGABYTE website: www.gigabyte.com
Optional protection plans may be available for purchase to extend coverage beyond the standard manufacturer's warranty. Please check with your retailer for details on available protection plans.
Ask a question about this manual
Ask about setup, troubleshooting, compatibility, parts, safety, or missing instructions. Manuals+ will review the question and use this page’s manual context to help answer it.