1. Introduction
This manual provides detailed instructions for the assembly, operation, and maintenance of your Henf L-Shaped Computer Corner Desk. Please read this manual thoroughly before beginning assembly and retain it for future reference. This desk is designed to provide a spacious and functional workspace for various activities, including computing, gaming, and studying.
2. Safety Information
- Keep small parts away from children: Small components can be a choking hazard.
- Assemble on a soft, clean surface: This prevents scratching the desk components during assembly.
- Do not overtighten screws: Overtightening can damage the material. Tighten until snug.
- Ensure all connections are secure: Before using the desk, verify that all screws and fasteners are properly tightened.
- Distribute weight evenly: Avoid placing excessive weight on one section of the desk to maintain stability.
- Use adjustable leg pads: Adjust the leg pads to ensure the desk is level on uneven floors, preventing wobbling.
3. Package Contents
Before assembly, please verify that all components listed below are present and undamaged. If any parts are missing or damaged, contact customer support.
- L-Shaped Desktop Panels (2 sections)
- Metal Frame Legs and Support Bars
- CPU Stand (with wheels)
- Assembly Hardware (screws, bolts, Allen wrench)
- Adjustable Leg Pads

Image 3.1: Components of the desk frame. This image displays the metal frame legs and support bars, which form the base structure of the L-shaped desk, prior to the attachment of the desktop panels.
4. Assembly Instructions
Follow these steps carefully to assemble your L-Shaped Computer Corner Desk. It is recommended to have two people for easier assembly.
- Unpack and Identify Parts: Lay out all components on a clean, soft surface. Refer to the parts list to ensure everything is present.
- Assemble the Main Frame: Connect the metal frame legs and support bars using the provided screws and Allen wrench. The desk features an M-style buckle design for secure and straightforward connections. Do not fully tighten all screws until the entire frame is assembled.
- Attach Desktop Panels: Carefully place the L-shaped desktop panels onto the assembled metal frame. Align the pre-drilled holes in the desktop with the holes in the frame. Secure the desktop panels using the appropriate screws. The bevel edge angle design ensures a flush fit.
- Install Adjustable Leg Pads: Screw the adjustable leg pads into the bottom of each desk leg. These can be adjusted later to level the desk.
- Assemble CPU Stand: Attach the wheels to the CPU stand. This stand is designed to be movable for convenience.
- Final Tightening: Once all parts are assembled, go back and securely tighten all screws. Do not overtighten.

Image 4.1: Partial assembly of the desk frame. This image illustrates the metal frame components being connected, showcasing the initial stages of the desk's construction before the desktop surfaces are attached.
5. Usage and Operation
Your Henf L-Shaped Computer Corner Desk is designed for versatility and comfort. Here are some guidelines for optimal use:
- Workspace Utilization: The 90° L-shaped design provides ample surface area for multiple monitors, laptops, keyboards, and other office or gaming equipment.
- CPU Stand: Utilize the included CPU stand to keep your computer tower off the floor, protecting it from dust and allowing for better airflow. Its wheeled design allows for easy repositioning.
- Adjustable Leg Pads: If your floor is uneven, adjust the leg pads by twisting them to stabilize the desk and prevent wobbling.
- Cable Management: Plan your cable routing to maintain a tidy workspace. While not explicitly included, cable ties or clips can be used with the desk's frame.
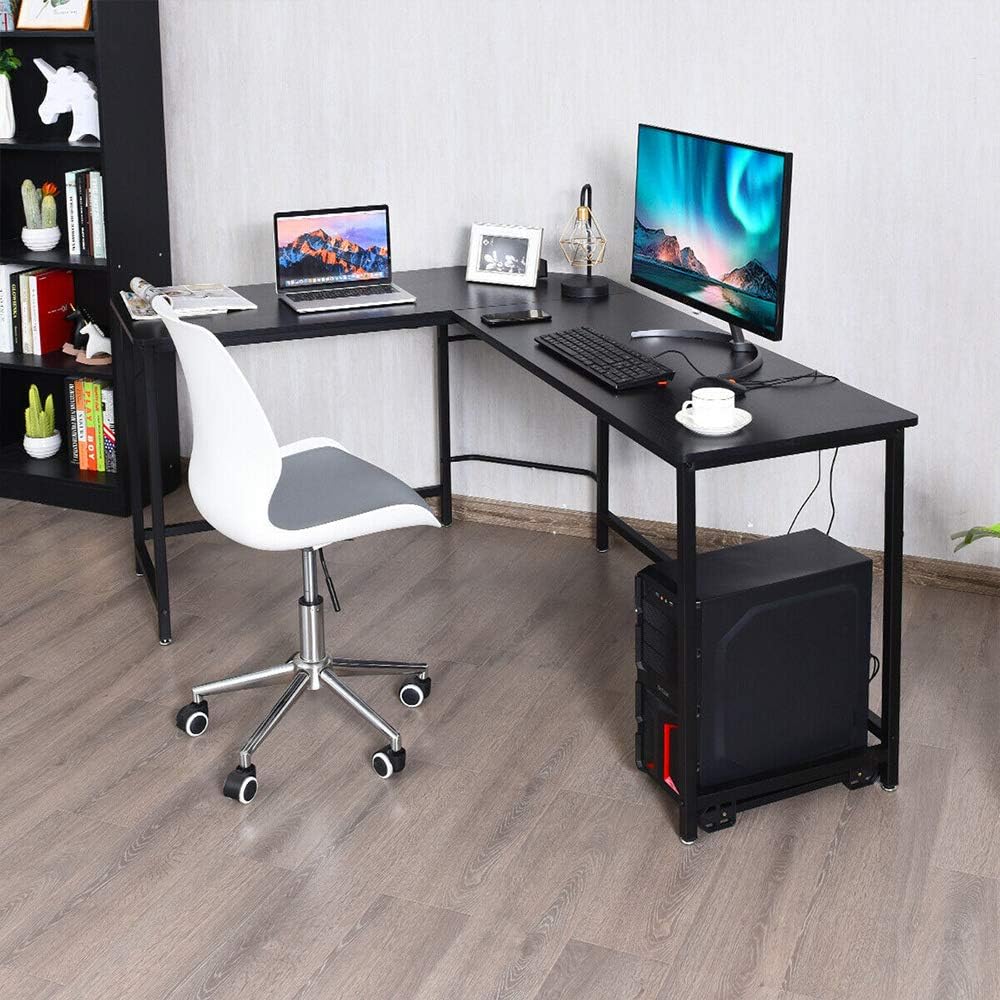
Image 5.1: Example of desk usage. This image shows the L-shaped desk fully set up with a laptop, an external monitor, a keyboard, and the CPU stand, demonstrating a typical home office or gaming configuration.

Image 5.2: Alternative desk setup. This image presents the L-shaped desk with a gaming chair, a single monitor, and a laptop, highlighting its suitability for gaming or a more compact workstation.
6. Maintenance
Proper care will extend the life and appearance of your desk.
- Cleaning: Wipe surfaces with a soft, damp cloth. Avoid harsh chemicals or abrasive cleaners, which can damage the finish.
- Spills: Clean up spills immediately to prevent staining or damage to the MDF surface.
- Hardware Check: Periodically check all screws and fasteners to ensure they remain tight. Retighten if necessary.
- Avoid Extreme Conditions: Do not expose the desk to extreme temperatures or humidity, as this can affect the wood and metal components.
7. Troubleshooting
- Desk is wobbly:
- Ensure all screws are fully tightened.
- Adjust the leg pads on the bottom of each leg to level the desk on uneven surfaces.
- Parts do not fit:
- Double-check the assembly instructions to ensure you are using the correct parts for each step.
- Ensure components are oriented correctly. Some parts may only fit one way.
- Missing hardware:
- Carefully check all packaging materials. Small parts can sometimes be overlooked.
- Contact customer support for replacement parts.
8. Specifications
| Feature | Detail |
|---|---|
| Material | MDF (Medium-Density Fiberboard) & Iron |
| Overall Dimensions (L x W x H) | 66.14" x 47.24" x 29.53" (168 x 120 x 72 cm) |
| Desk Width | 18.9" (48 cm) |
| Corner Length | 16.53" (42 cm) |
| CPU Stand Dimensions (L x W) | 15.75" x 9.45" (40 x 24 cm) |
| Thicken Board | 0.59" (1.5 cm) |
| Weight Capacity | Approximately 176 lbs (80 kg) |
| Product Weight | 46 lbs (21 kg) |
| Color | Black |
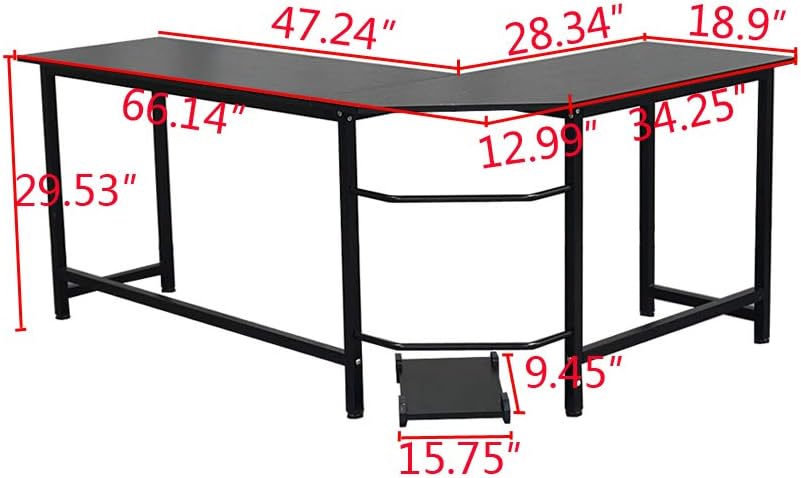
Image 8.1: Desk dimensions diagram. This illustration provides a detailed view of the L-shaped desk's measurements, including length, width, height, and specific dimensions for the corner section and CPU stand.
9. Warranty and Support
For any questions, missing parts, or issues not covered in this manual, please contact Henf customer support. Please have your model number (B0899V7BMP) and purchase information ready when contacting support.
While specific warranty details are not provided in this manual, standard consumer rights apply. Please refer to your purchase documentation or retailer for warranty information.