LUXCEO Q508A
LUXCEO Q508A LED Video Light Instruction Manual
Model: Q508A | Brand: LUXCEO
1. Introduction
This manual provides comprehensive instructions for the safe and effective use of your LUXCEO Q508A LED Video Light. Please read this manual thoroughly before operation and retain it for future reference.
The LUXCEO Q508A is a versatile LED photographic light designed for various lighting needs, offering adjustable color temperature, brightness, and a wide range of RGB colors and scene modes.
2. Safety Information
WARNING: To prevent fire, electric shock, or injury, always follow these safety precautions:
- Do not look directly into the light when it is on.
- Keep the device away from water and other liquids. Do not operate with wet hands.
- Do not disassemble, repair, or modify the product. Contact qualified service personnel for repairs.
- Use only the specified charging cable and power adapter.
- Keep out of reach of children.
- Avoid extreme temperatures and direct sunlight.
3. Package Contents
Please check the package contents upon opening. If any items are missing or damaged, contact your retailer.
- 1 x LUXCEO Q508A LED Video Light
- 1 x Remote Control
- 1 x USB Charging Cable
- 1 x User Manual
Note: Some product kits may include additional accessories such as light stands, ball heads, or lanyards. Refer to your specific product packaging for details.
4. Product Overview
Familiarize yourself with the components of your LUXCEO Q508A LED Video Light.

Figure 4.1: LUXCEO Q508A LED Video Light and Remote Control.
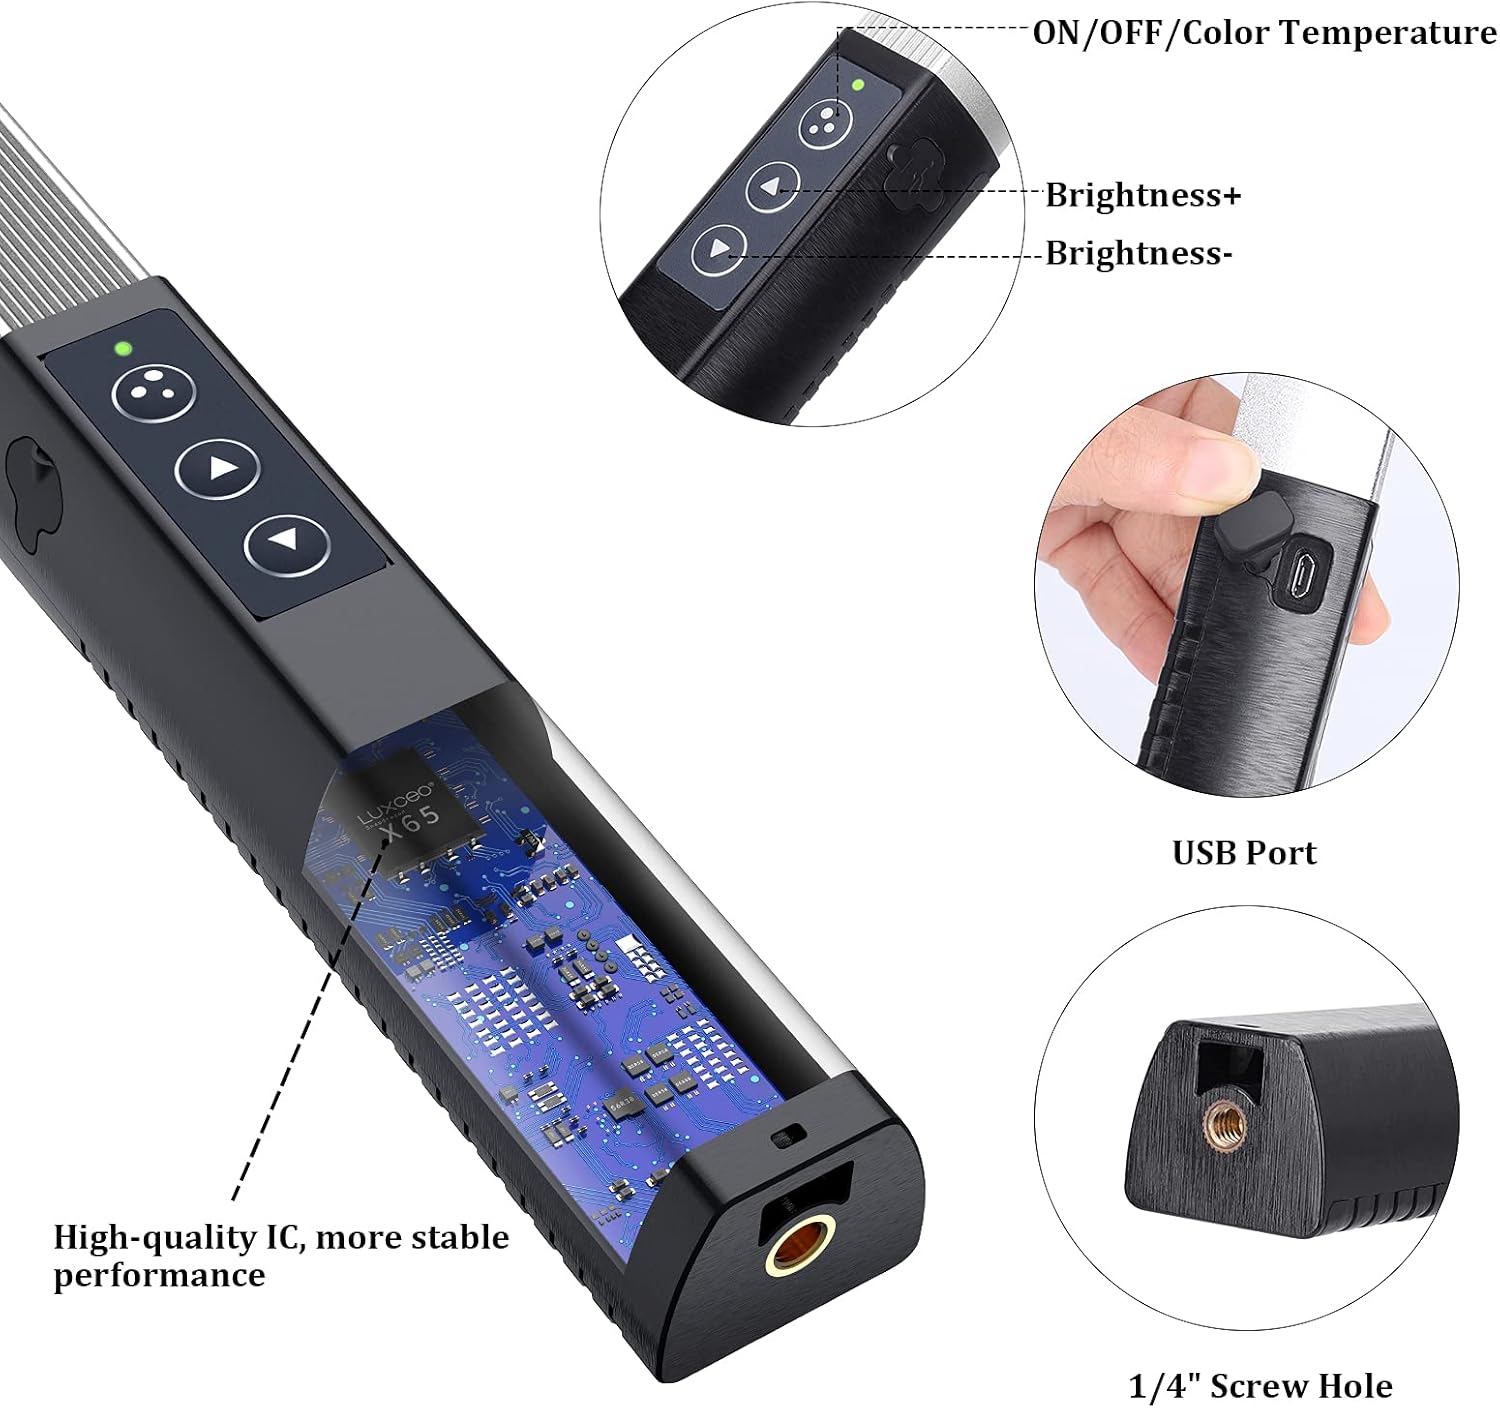
Figure 4.2: Detailed view of the light's control buttons, USB port, and 1/4" screw hole.

Figure 4.3: Close-up of the 1/4" Standard Nut for mounting.

Figure 4.4: USB Charging Port location.

Figure 4.5: Aluminum fins design for heat dissipation.

Figure 4.6: Handheld handle with battery and charging indicator.
Components:
- Control Buttons: Located on the handle for power, brightness, and color temperature adjustments.
- USB Charging Port: For recharging the built-in battery.
- 1/4" Screw Hole: Standard mounting point for tripods, light stands, and other accessories.
- High-quality IC: Internal integrated circuit for stable performance.
- Aluminum Fins: Designed for efficient heat dissipation.
- Battery & Charging Indicator: Provides status of the internal battery.
5. Setup
5.1 Charging the Light
Before first use, fully charge the LUXCEO Q508A LED Video Light.
- Connect the provided USB charging cable to the light's USB port.
- Connect the other end of the USB cable to a compatible USB power adapter (not included) or a computer USB port.
- The charging indicator light will show the charging status. Once fully charged, the indicator will change (refer to indicator behavior in specifications or quick start guide).
5.2 Remote Control Battery Installation
The remote control comes with pre-installed batteries. If replacement is needed:
- Locate the battery compartment on the back of the remote control.
- Open the compartment and insert the correct type and number of batteries, observing polarity (+/-).
- Close the battery compartment securely.
5.3 Mounting Options
The Q508A features a standard 1/4" screw hole at its base, allowing for versatile mounting.

Figure 5.1: Mounting options including lanyard, mini tripod, and full-size tripod.
- Handheld Use: The ergonomic design allows for comfortable handheld operation.
- Tripod/Light Stand: Attach the light to any standard tripod or light stand using the 1/4" screw.
- Lanyard: If included, attach a lanyard for secure carrying or hanging.
6. Operating Instructions
The LUXCEO Q508A can be operated using the control buttons on the light itself or via the included remote control.
6.1 Power On/Off
- On Light: Press the ON/OFF button on the light's handle to turn it on or off.
- Remote Control: Press the ON or OFF button on the remote.
Important Note:

Figure 6.1: Remote control usage tips.
If you turn off the light using the button on the light itself, you cannot turn it back on with the remote control. You must press the button on the light to turn it back on.
6.2 Adjusting Brightness
- On Light: Use the Brightness+ and Brightness- buttons.
- Remote Control: Press the + or - buttons under "Brightness".

Figure 6.2: Remote control button layout and functions.
6.3 Adjusting Color Temperature (CCT Mode)
The light offers 30 levels of color temperature adjustment from 3000K (Warm Light) to 6000K (White Light).
- On Light: Press the ON/OFF/Color Temperature button to cycle through modes, then use brightness buttons to adjust CCT.
- Remote Control: Press CCT+ or CCT- buttons. Quick access buttons for 3000K, 4500K, and 6000K are also available.

Figure 6.3: Visual guide to color temperature and brightness adjustments.
6.4 Adjusting RGB Colors (RGB Mode)
Access 36 different RGB colors for creative lighting effects.
- Remote Control: Press RGB+ or RGB- buttons to cycle through colors.
- Quick Access: Red, Green, and Blue buttons on the remote provide direct access to primary colors.
6.5 Scene Modes (FX Mode)
The Q508A offers 12 pre-programmed scene modes to simulate various lighting environments.
- Remote Control: Press FX+ or FX- buttons to cycle through the 12 scene modes.

Figure 6.4: Overview of the 12 scene simulation modes.
Available Scene Modes:
- Lightning
- Candlelight
- Red light SOS
- Paparazzi flash
- RGB slow loop
- RGB fast loop
- Quiet 1
- Quiet 2
- Police car
- Ambulance
- Fire truck
- Disco
6.6 Remote Control Range
The remote control operates effectively within a range of up to 7 meters (23 feet) from the light. Ensure a clear line of sight between the remote and the light for optimal performance.
7. Maintenance
7.1 Cleaning
- Wipe the light and remote control with a soft, dry cloth.
- Do not use abrasive cleaners, solvents, or strong chemicals, as they may damage the surface.
7.2 Storage
- Store the device in a cool, dry place, away from direct sunlight and extreme temperatures.
- If storing for an extended period, ensure the battery is partially charged (around 50%) to prolong its lifespan. Recharge every 3-6 months.
7.3 Battery Care
- Avoid fully discharging the battery frequently.
- Do not expose the battery to high temperatures.
- Dispose of batteries according to local regulations.
8. Troubleshooting
| Problem | Possible Cause | Solution |
|---|---|---|
| Light does not turn on. | Battery is depleted. | Charge the light using the USB cable. |
| Light was turned off by the device button, but attempting to turn on with remote. | Press the ON/OFF button on the light itself to turn it on. | |
| Remote control not working. | Remote control batteries are depleted or incorrectly installed. | Replace remote control batteries, ensuring correct polarity. |
| Obstruction between remote and light, or out of range. | Ensure clear line of sight and operate within 7 meters. | |
| Light output is dim or inconsistent. | Low battery level. | Recharge the light. |
| Incorrect mode or setting selected. | Verify brightness, color temperature, or scene mode settings. |
If the problem persists after trying these solutions, please contact customer support.
9. Specifications
| Feature | Detail |
|---|---|
| Brand | LUXCEO (uyled) |
| Model | Q508A |
| Dimensions (L x W x H) | 55 x 3.5 x 2.9 cm (21.6 x 1.4 x 1.1 inches) |
| Weight | 340 Grams (0.75 lbs) |
| Color Temperature Range | 3000K - 6000K (30 levels adjustable) |
| Brightness | Max 1000 Lumens |
| Color Rendering Index (CRI) | >95 |
| RGB Colors | 36 colors |
| Scene Modes | 12 modes |
| Battery Type | Built-in 7.4V 2600mAh Lithium-ion |
| Operating Time | 2-32 hours (depending on brightness/mode) |
| Charging Port | USB (Type-C) |
| Connectivity | USB |
| Remote Control Range | Up to 7 meters (23 feet) |
| Mounting | 1/4" Standard Screw Hole |
| Expected Lifespan (LEDs) | 50,000 hours |
| Waterproof Level | Waterproof (as per specifications, generally implies splash-proof) |
10. Warranty and Support
Your LUXCEO Q508A LED Video Light comes with a manufacturer's warranty to ensure your satisfaction and product reliability.
- Warranty Period: One-year warranty from the date of purchase.
- Money-Back Guarantee: 30-day money-back guarantee from the date of purchase.
This warranty covers manufacturing defects and issues arising from normal use. It does not cover damage caused by misuse, accidents, unauthorized modifications, or improper maintenance.
Customer Support
If you encounter any problems with your photography light or have questions not covered in this manual, please do not hesitate to contact our customer support team.
For assistance, please reach out to the seller or manufacturer through the platform where you purchased the product. Provide your order number and a detailed description of the issue for prompt service.
Ask a question about this manual
Ask about setup, troubleshooting, compatibility, parts, safety, or missing instructions. Manuals+ will review the question and use this page’s manual context to help answer it.