1. Introduction
Thank you for choosing the MAXXMEE Cordless Handheld Vacuum Cleaner. This powerful and compact device is designed for efficient cleaning of various surfaces in your home and car. Featuring a strong BLDC motor and a HEPA filter, it ensures thorough cleaning and improved air quality. Please read this manual carefully before first use to ensure safe and optimal operation.
2. Safety Instructions
- Always ensure the vacuum cleaner is switched off before cleaning or performing maintenance.
- Do not use the appliance to vacuum water or other liquids, hot ashes, or sharp objects.
- Keep hair, loose clothing, fingers, and all parts of the body away from openings and moving parts.
- Do not operate the vacuum cleaner if it is damaged or malfunctioning. Contact customer support.
- Use only the original charging adapter provided with the device.
- This appliance is for household use only. Do not use outdoors or on wet surfaces.
- Keep out of reach of children.
3. Package Contents
Please check the package contents upon unpacking to ensure all parts are present and undamaged:
- 1x MAXXMEE Cordless Handheld Vacuum Cleaner
- 1x Charging Station
- 1x Power Adapter with Cable
- 1x Crevice Nozzle
- 1x Brush Nozzle
- 1x Flexible Extension Nozzle

Image: All components included in the package, labeled for easy identification.
4. Setup
4.1 Initial Charging
- Place the charging station on a stable, flat surface.
- Connect the power adapter cable to the charging station.
- Plug the power adapter into a suitable wall outlet.
- Place the handheld vacuum cleaner onto the charging station. Ensure it is properly seated. The charging indicator light will illuminate.
- Charge the vacuum cleaner completely before first use. This may take several hours.
4.2 Attaching Accessories
To attach an accessory (crevice nozzle, brush nozzle, or flexible extension nozzle), simply align the accessory with the suction opening of the vacuum cleaner and push it firmly until it clicks into place. To remove, pull the accessory off.

Image: Overview of the vacuum cleaner's main components and how accessories attach.
5. Operating Instructions
5.1 Powering On/Off
Press the power button located on the handle to turn the vacuum cleaner on. Press it again to turn it off.
5.2 Using the Vacuum Cleaner
- Ensure the dust container is empty and the filter is clean before use.
- Select the appropriate nozzle for the cleaning task:
- Crevice Nozzle: Ideal for narrow gaps, corners, and hard-to-reach areas like car interiors or between sofa cushions.
- Brush Nozzle: Effective for cleaning upholstered furniture, curtains, and removing pet hair.
- Flexible Extension Nozzle: Perfect for reaching high places, behind radiators, or under furniture.
- Turn on the vacuum cleaner and move the nozzle slowly over the surface to be cleaned.
- After use, turn off the vacuum cleaner and return it to the charging station.

Image: The vacuum cleaner with the flexible extension nozzle, demonstrating its reach for high areas.

Image: Demonstrations of the crevice nozzle for tight spaces, the brush nozzle for upholstery and pet hair, and the flexible extension nozzle for radiators.
6. Maintenance
Regular maintenance ensures the longevity and optimal performance of your vacuum cleaner.
6.1 Emptying the Dust Container
Empty the dust container after each use or when it reaches its maximum fill line.
- Ensure the vacuum cleaner is switched off.
- Locate the release button or latch for the dust container.
- Press the button/latch and carefully detach the dust container from the main unit.
- Hold the dust container over a waste bin and open its bottom flap to release the collected dirt.
- Close the flap and reattach the dust container to the vacuum cleaner until it clicks securely.
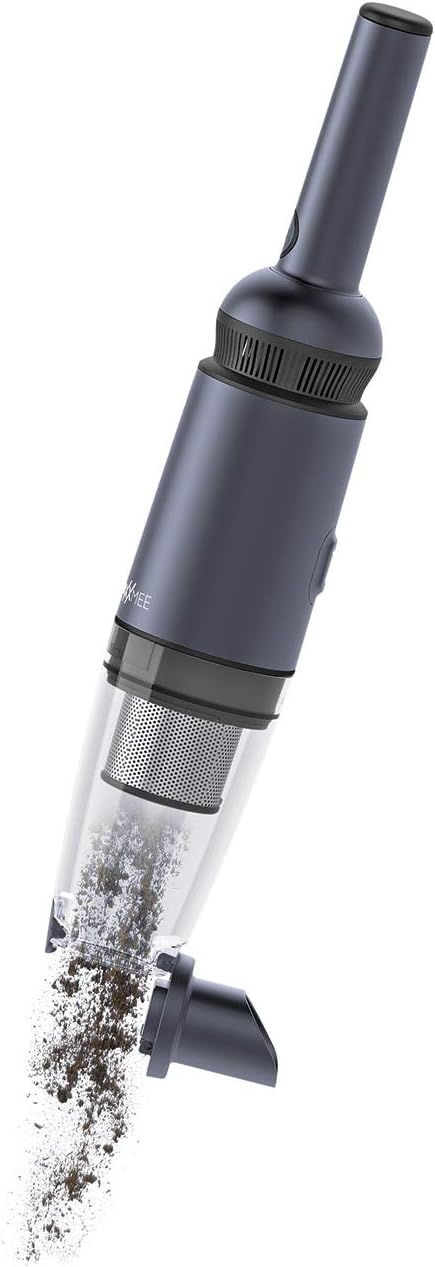
Image: The dust container being detached and emptied of collected debris.
6.2 Cleaning the HEPA Filter
The HEPA filter and the permanent stainless steel filter should be cleaned regularly to maintain suction power. It is recommended to clean them after every few uses, depending on the amount of dirt.
- Remove the dust container as described above.
- Carefully remove the HEPA filter and the stainless steel filter from the dust container.
- Tap the filters gently over a waste bin to remove loose dust.
- If necessary, rinse the filters under running water. Ensure they are completely dry before reinserting them. Do not use detergents.
- Once completely dry, reinsert the filters into the dust container and reattach the container to the vacuum cleaner.
7. Troubleshooting
| Problem | Possible Cause | Solution |
|---|---|---|
| Vacuum cleaner does not turn on. | Battery is depleted. | Charge the vacuum cleaner fully. |
| Low suction power. | Dust container is full. | Empty the dust container. |
| Low suction power. | Filter is clogged. | Clean or replace the HEPA filter. |
| Low suction power. | Nozzle or hose is blocked. | Remove any blockages from the nozzle or suction opening. |
| Charging indicator not lighting up. | Power adapter not connected properly. | Check power adapter and charging station connections. |
8. Specifications
| Feature | Specification |
|---|---|
| Brand | MAXXMEE |
| Model Number | 2378 |
| Color | Anthracite |
| Package Dimensions | 58.93 x 19.3 x 18.8 cm |
| Item Weight | 520 grams |
| Capacity | 90 Milliliters |
| Power | 90 Watts |
| Voltage | 11.1 Volts |
| Number of Speeds | 2 |
| Sound Level | 80 dB |
| Battery Life | 15 minutes |
| Features | Bagless |
| Filter Type | HEPA Filter |
| Surface Recommendation | Upholstery |
| Power Source | Battery Powered |
| Included Components | Charging station, telescopic tube (flexible extension nozzle) |
| Cordless? | Yes |
| Manufacturer | DS Produkte GmbH |
| Date First Available on Amazon.com.be | June 1, 2022 |
9. Warranty and Support
This product comes with a standard manufacturer's warranty. Please refer to your purchase documentation or contact your retailer for specific warranty terms and conditions. For technical support, spare parts, or any other inquiries, please contact MAXXMEE customer service or visit their official website.
Keep your proof of purchase for warranty claims.


