1. Introduction
Thank you for choosing the Lexsen LMX16 USB 16-Channel Mixer. This manual provides essential information for the safe and efficient operation of your new audio mixer. Please read it thoroughly before use and retain it for future reference.
2. Safety Information
- Power Supply: Use only the specified power adapter. Ensure the voltage matches your local power supply.
- Moisture: Do not expose the unit to rain, moisture, or excessive humidity. Avoid placing liquid-filled objects on the mixer.
- Ventilation: Ensure adequate ventilation around the unit. Do not block ventilation openings.
- Heat: Keep the unit away from heat sources such as radiators, heat registers, stoves, or other heat-producing apparatus.
- Servicing: Do not attempt to service this product yourself. Refer all servicing to qualified service personnel.
- Cleaning: Disconnect power before cleaning. Use a dry, soft cloth.
3. Product Overview
The Lexsen LMX16 USB is a versatile 16-channel audio mixer designed for various sound reinforcement and recording applications. It features multiple input options, a built-in digital MP3 player with USB connectivity, Bluetooth, a graphic equalizer, and digital effects.
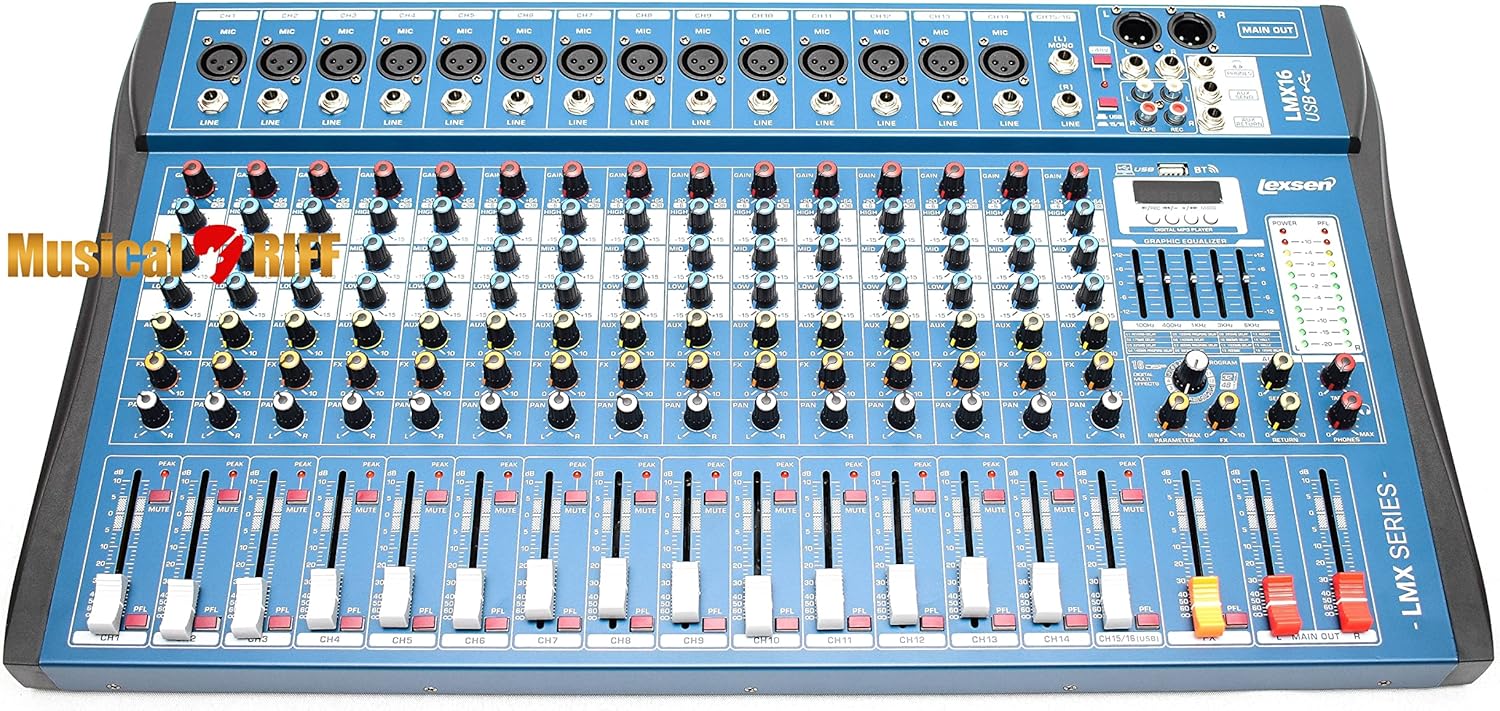
Figure 3.1: Front view of the Lexsen LMX16 USB mixer, showing all input channels, controls, and main output section.
4. Setup
4.1. Power Connection
- Ensure the mixer's power switch is in the OFF position.
- Connect the power cable to the AC INPUT on the rear panel of the mixer.
- Plug the other end of the power cable into a suitable AC power outlet.
- Turn the power switch to the ON position. The power indicator will illuminate.

Figure 4.1: Close-up of the rear panel showing the AC power input, power switch, and main XLR outputs.
4.2. Audio Input Connections
The LMX16 USB features 14 Combo XLR/P10 inputs and 1 stereo P10 L/R input (channels 15/16).
- XLR Inputs (Channels 1-14): Connect microphones or other low-impedance devices using XLR cables.
- P10 (1/4") Inputs (Channels 1-14): Connect line-level instruments or devices using 1/4" TS or TRS cables.
- P10 L/R Stereo Input (Channels 15/16): Connect stereo line-level sources.
- +48V Phantom Power: For condenser microphones, activate the +48V phantom power switch. Ensure all microphones are connected before engaging phantom power to prevent damage.
4.3. Audio Output Connections
The mixer provides various output options:
- MAIN OUT (XLR L/R): Connect to your main PA system or power amplifier.
- AUX SEND (P10): For sending signals to external effects processors or monitor systems.
- PHONES (P10): Connect headphones for monitoring.
- REC OUT (RCA L/R): For connecting to a recording device.
4.4. USB Connection
Connect the mixer to a computer using a USB cable for audio playback and recording. The mixer will function as an audio interface.
4.5. Bluetooth Connection
To connect a Bluetooth device:
- Ensure the digital MP3 player is in Bluetooth mode.
- On your device, search for available Bluetooth devices and select "LMX16 USB".
- Once paired, audio from your device will play through the mixer.
5. Operating Instructions
5.1. Channel Controls (Channels 1-16)
- GAIN: Adjusts the input sensitivity for each channel. Set this to achieve a healthy signal level without clipping.
- HIGH/MID/LOW EQ: Three-band equalizer for shaping the tone of each channel.
- AUX: Controls the amount of signal sent to the AUX SEND output.
- PAN: Adjusts the stereo position of the channel signal (left to right).
- PFL (Pre-Fader Listen): Engages solo monitoring of the channel through headphones without affecting the main mix.
- MUTE: Mutes the channel output to the main mix.
- CHANNEL FADER: Controls the output level of the individual channel to the main mix.
5.2. Main Output Section

Figure 5.1: Close-up of the digital MP3 player, graphic equalizer, and main output level meters.
- MAIN FADER (L/R): Controls the overall output level of the main stereo mix.
- PHONES Level: Adjusts the volume for the headphone output.
- LEVEL METERS: Provide visual indication of the main output signal level. Aim for levels around 0dB to avoid clipping.
5.3. Digital MP3 Player / USB Interface
This section allows for playback of audio files from a USB drive or via Bluetooth, and also functions as a USB audio interface for computer connection.
- MODE Button: Switches between USB, Bluetooth, and PC (USB audio interface) modes.
- PLAY/PAUSE, PREVIOUS, NEXT Buttons: Standard playback controls.
- REC Button: Initiates recording to a connected USB drive (if supported).
5.4. Graphic Equalizer
The 7-band graphic equalizer allows for fine-tuning the overall frequency response of the main mix. Adjust the sliders for specific frequency bands (e.g., 100Hz, 400Hz, 1KHz, 3KHz, 6KHz) to shape the sound.
5.5. Digital Effects (FX)
The built-in digital effects processor offers various programs (e.g., Reverb, Delay, Room). Use the PROGRAM knob to select an effect and the FX LEVEL control to adjust the amount of effect applied to the main mix.
6. Maintenance
6.1. Cleaning
Regular cleaning helps maintain the mixer's appearance and functionality.
- Always disconnect the power cable before cleaning.
- Use a soft, dry cloth to wipe down the surface of the mixer.
- For stubborn dirt, a slightly damp cloth with mild soap can be used, followed by a dry cloth.
- Avoid using abrasive cleaners, solvents, or waxes, as these can damage the finish.
6.2. Storage
When not in use for extended periods, store the mixer in a cool, dry place, away from direct sunlight and extreme temperatures. Consider using a dust cover to protect the controls and connectors.
7. Troubleshooting
- No Power:
- Check if the power cable is securely connected to both the mixer and the power outlet.
- Ensure the power switch is in the ON position.
- Verify the power outlet is functional. - No Sound Output:
- Check all cable connections to speakers/amplifiers.
- Ensure MAIN FADER and channel faders are raised.
- Verify that channels are not muted or PFL is not engaged on all channels.
- Check the gain settings on individual channels and the main output. - Distorted Sound:
- Reduce GAIN levels on input channels.
- Lower channel faders or MAIN FADER.
- Check for damaged cables or faulty microphones/instruments. - No Bluetooth Connection:
- Ensure the mixer's digital player is in Bluetooth mode.
- Make sure your device's Bluetooth is enabled and within range.
- Try unpairing and re-pairing the device. - USB Playback/Recording Issues:
- Ensure the USB drive is properly inserted and contains compatible audio files.
- Check if the mixer is in the correct USB mode (playback or PC interface).
- For PC connection, ensure correct drivers are installed (if required by your operating system) and the mixer is selected as the audio device.
8. Specifications
| Feature | Description |
|---|---|
| Model Number | LMX16 USB |
| Manufacturer | Lexsen |
| Number of Channels | 16 |
| Input Connections | 14x Combo XLR/P10, 1x P10 L/R (Stereo) |
| Output Connections | L/R Stereo (Main Output), P2 (Headphone) |
| Connectivity Technology | Bluetooth, USB |
| Product Dimensions | 66 x 40 x 9 cm (26 x 15.7 x 3.5 inches) |
| Product Weight | 5.9 kg (13 lbs) |
9. Warranty and Support
9.1. Warranty Information
This Lexsen LMX16 USB mixer is covered by a manufacturer's warranty. Please refer to the warranty card included with your product or contact your retailer for specific terms and conditions regarding warranty coverage and duration.
9.2. Customer Support
For technical assistance, troubleshooting not covered in this manual, or service inquiries, please contact your authorized Lexsen dealer or the customer support channels provided by Lexsen in your region. Keep your purchase receipt as proof of purchase.