1. Introduction
Thank you for choosing the HORIGEN Double Electric Breast Pump Model XN/MS-2224A. This manual provides essential information for the safe and efficient operation, maintenance, and troubleshooting of your breast pump. Please read this manual thoroughly before first use and keep it for future reference.
The HORIGEN Double Electric Breast Pump is designed to help mothers express breast milk comfortably and efficiently. Its portable design and multiple suction modes offer flexibility for various pumping needs.
2. What's Included
Carefully unpack all components and check against the list below. If any items are missing or damaged, please contact customer support.
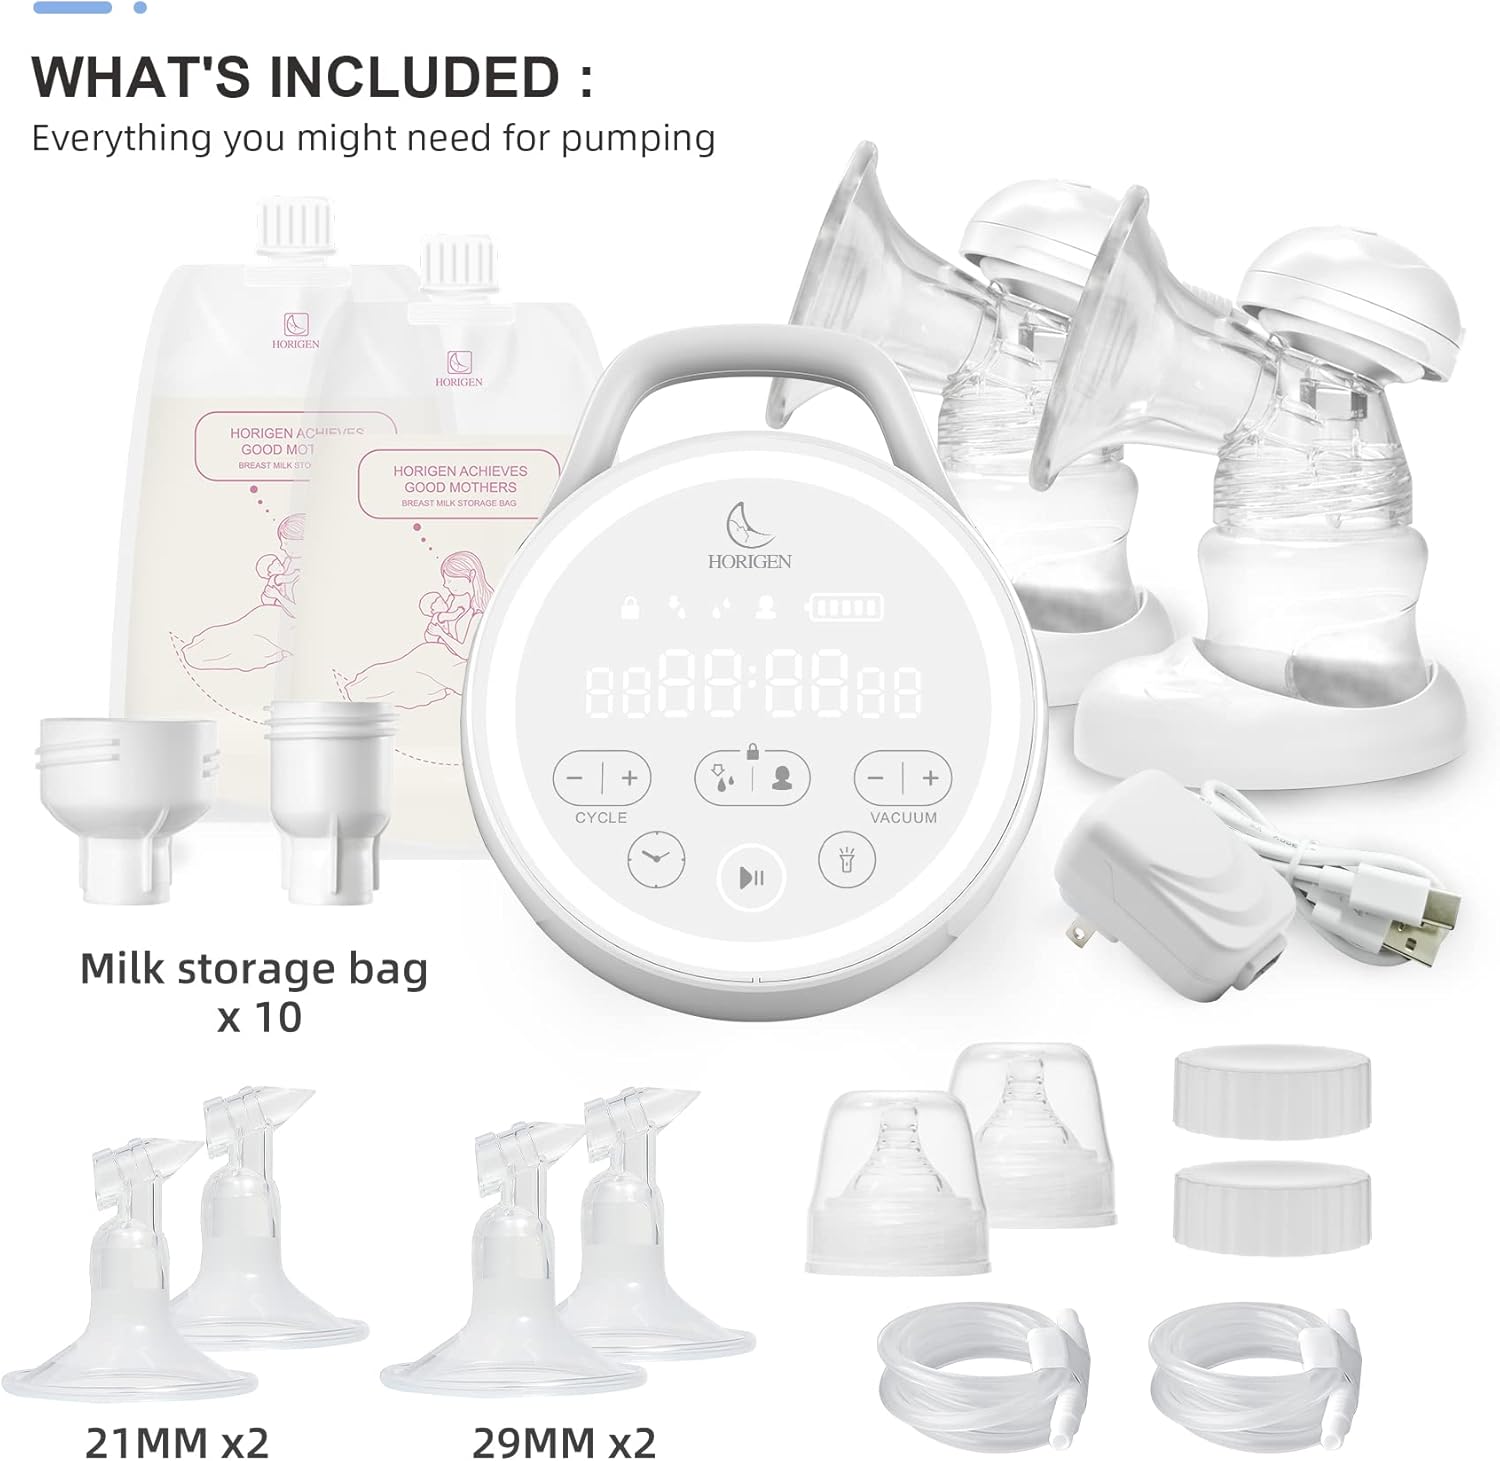
Figure 2.1: Included components of the HORIGEN Double Electric Breast Pump. This image displays the central pump unit, two sets of breast flanges (21mm and 29mm), ten milk storage bags, and the power adapter. Other accessories like bottles, valves, and tubing are also visible.
- 1 x HORIGEN Double Electric Breast Pump Main Unit
- 2 x Breast Flange Set (21mm)
- 2 x Breast Flange Set (29mm)
- 10 x Milk Storage Bags
- 1 x Power Adapter
- Other essential pump accessories (e.g., bottles, valves, membranes, tubing)
3. Product Features and Controls
The HORIGEN Double Electric Breast Pump offers advanced features for a personalized pumping experience. Familiarize yourself with the control panel and its functions.
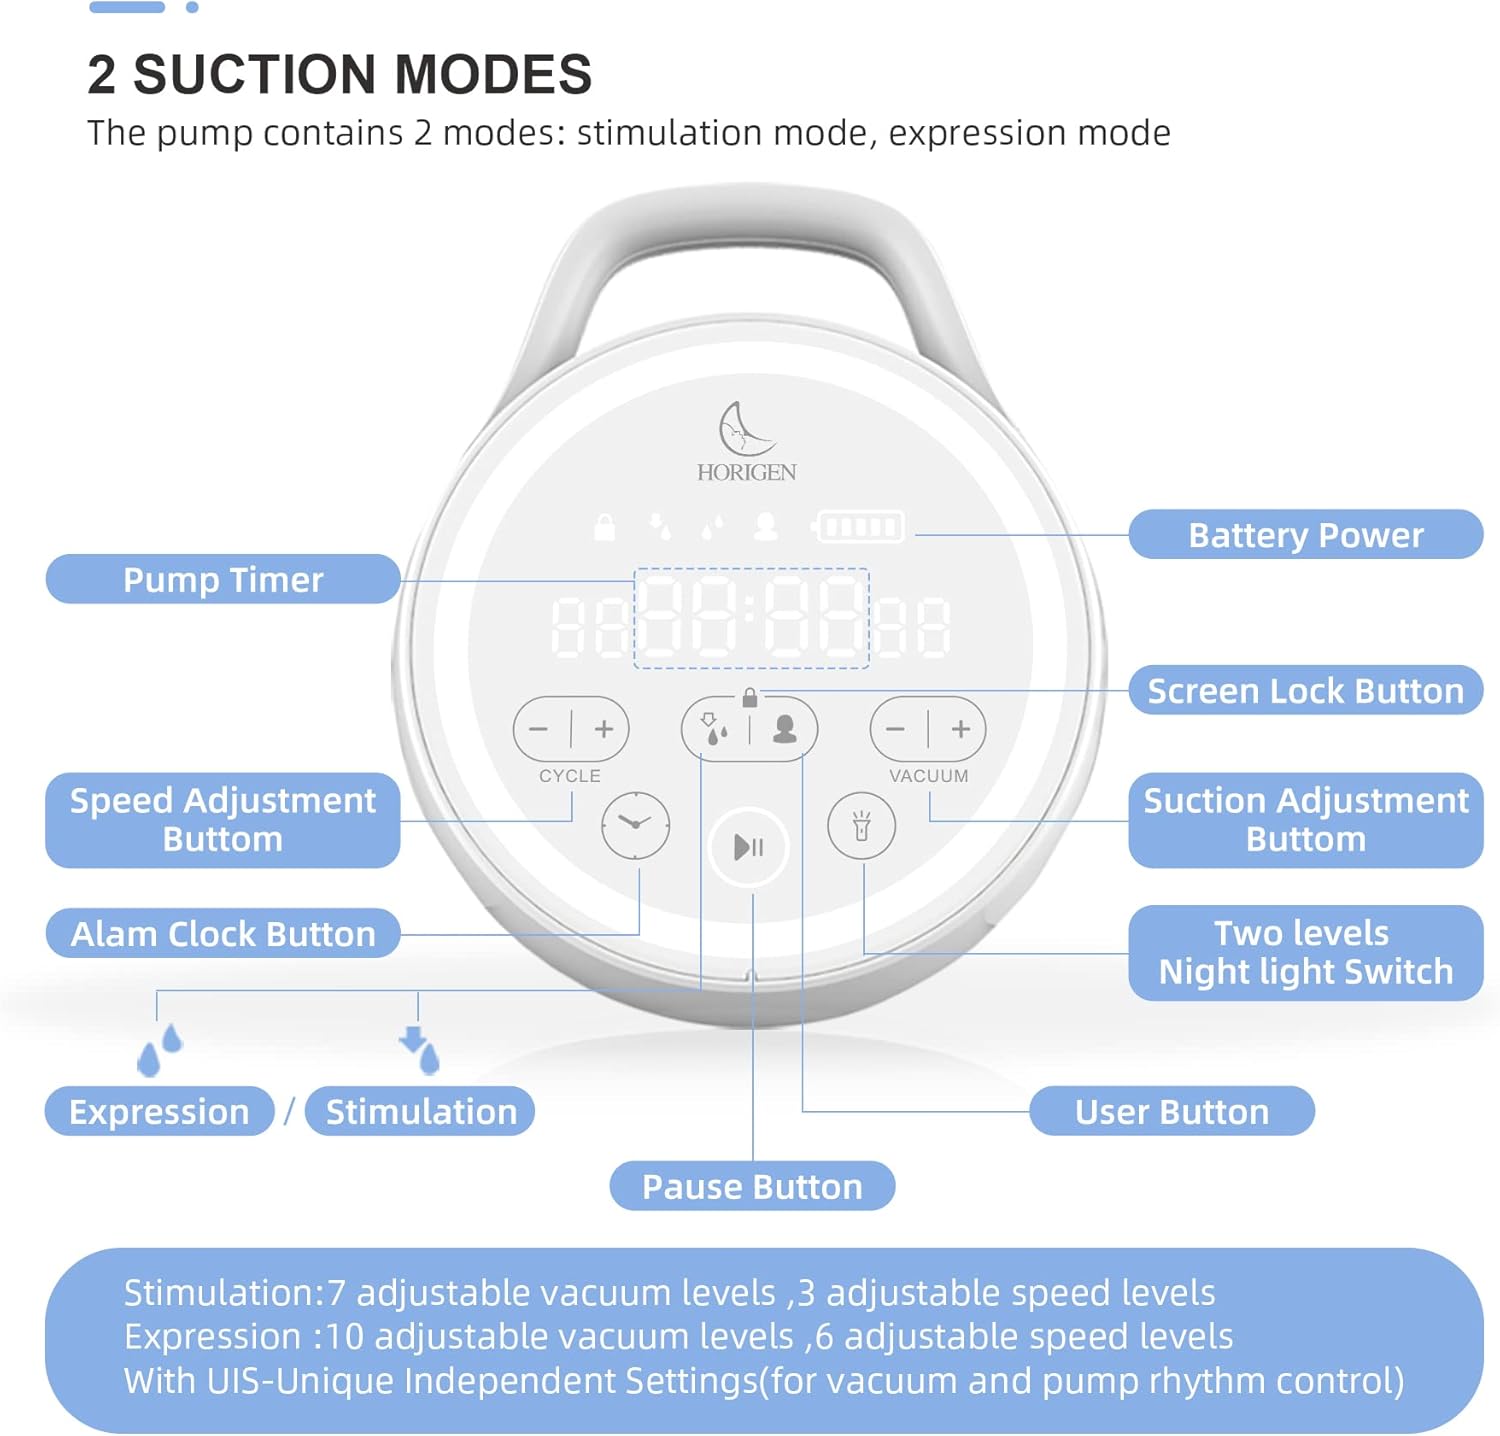
Figure 3.1: Overview of the pump's control panel and features. The central display shows pump timer and battery level. Buttons are labeled for various functions including mode selection, suction and speed adjustment, screen lock, alarm, night light, and pause.
Key Features:
- Two Suction Modes:
- Stimulation Mode: Designed to initiate milk flow, with 7 adjustable vacuum levels and 3 adjustable speed levels.
- Expression Mode: For efficient milk expression, with 10 adjustable vacuum levels and 6 adjustable speed levels.
- UIS (Unique Independent Settings): Allows for individual vacuum and pump rhythm control for each breast.
- Control Panel Functions:
- Pump Timer: Displays current pumping duration.
- Battery Power Indicator: Shows remaining battery life.
- Screen Lock Button: Prevents accidental changes during pumping.
- Speed Adjustment Button (+/-): Adjusts the pumping speed.
- Suction Adjustment Button (+/-): Adjusts the vacuum level.
- Alarm Clock Button: Sets reminders for pumping sessions.
- Night Light Switch: Two levels of illumination for low-light conditions.
- Pause Button: Temporarily stops pumping.
- User Button: For personalized settings or quick access to a favorite mode.
- Portability: Compact design for easy transport and use on the go.
4. Setup
4.1. Cleaning Before First Use
Before using your breast pump for the first time, and after each subsequent use, all parts that come into contact with breast milk must be cleaned and sterilized. The breast flanges are dishwasher-safe.
- Disassemble all parts that come into contact with breast milk (e.g., breast flanges, valves, bottles).
- Wash these parts in warm, soapy water using a mild dish soap. Use a dedicated brush for breast pump parts.
- Rinse thoroughly with clean water.
- Sterilize by boiling in water for 5 minutes, using a steam sterilizer, or a dishwasher (if applicable for specific parts).
- Allow parts to air dry completely on a clean surface or use a clean cloth.
- The main pump unit and tubing should not be washed or sterilized. Wipe the main unit with a clean, damp cloth.
4.2. Assembling the Pump
Follow these steps to assemble the breast pump for use:
- Ensure all parts are clean and dry.
- Attach the valve to the bottom of the breast flange.
- Screw the milk collection bottle onto the breast flange.
- Connect the tubing to the breast flange connector and the main pump unit. Ensure a secure fit.
- Repeat for the second breast flange assembly if using in double pumping mode.
4.3. Powering the Pump
The pump can be powered via the included power adapter.
- Connect the power adapter to the main pump unit and plug it into a wall outlet.
- The pump also has an internal rechargeable battery for portable use. Ensure the battery is charged before use if not connected to a power outlet. The battery indicator on the display will show the charge level.
5. Operating Instructions
5.1. Getting Started
- Find a comfortable position.
- Center the breast flange over your nipple, ensuring a good seal around your breast.
- Press the power button on the main unit to turn on the pump.
5.2. Selecting a Mode
The pump defaults to Stimulation Mode upon startup. You can switch between modes using the dedicated mode button (often indicated by a droplet icon or "Expression / Stimulation" label).
- Stimulation Mode: Use this mode first to stimulate milk let-down. Adjust vacuum levels (1-7) and speed levels (1-3) to find a comfortable setting.
- Expression Mode: Once milk flow begins, switch to Expression Mode. Adjust vacuum levels (1-10) and speed levels (1-6) for efficient milk expression.
5.3. Adjusting Suction and Speed
Use the '+' and '-' buttons for both "Speed Adjustment" and "Suction Adjustment" to customize your pumping experience. Start with lower settings and gradually increase to a comfortable, effective level. Pumping should never be painful.
5.4. Using UIS (Unique Independent Settings)
The UIS feature allows you to set different vacuum and rhythm controls for each breast when double pumping. Consult the on-screen indicators and specific buttons (if available) to adjust each side independently.
5.5. Other Functions
- Pause Button: Press to temporarily stop pumping. Press again to resume.
- Screen Lock Button: Press to lock the screen and prevent accidental changes. Press again to unlock.
- Alarm Clock Button: Use to set reminders for your next pumping session. Refer to the display for setting instructions.
- Night Light Switch: Toggle to activate the night light. There are two brightness levels.
- User Button: This button may be programmable for quick access to a preferred setting. Refer to the on-screen menu for customization options.

Figure 5.1: Example of pump usage in a comfortable setting. The image shows the main pump unit placed on a desk while the user is expressing milk, highlighting its portability and discreet design.
6. Cleaning and Maintenance
Proper cleaning and maintenance are crucial for hygiene and the longevity of your breast pump.
6.1. Daily Cleaning
After each pumping session, disassemble and clean all parts that come into contact with breast milk as described in Section 4.1. Ensure all parts are completely dry before reassembly or storage to prevent mold and bacterial growth.
6.2. Main Unit Care
- Never immerse the main pump unit in water or other liquids.
- Wipe the exterior of the main unit with a clean, damp cloth.
- Do not use abrasive cleaners or solvents.
- Keep the main unit away from direct sunlight and heat sources.
6.3. Tubing Care
- The tubing should not be washed unless milk or condensation enters it. If this occurs, wash with warm soapy water, rinse, and hang to air dry completely.
- Ensure tubing is completely dry before reattaching to the pump unit to prevent moisture from entering the motor.
6.4. Storage
Store the clean and dry pump and its accessories in a clean, dry place when not in use. Keep out of reach of children.
7. Troubleshooting
If you encounter issues with your HORIGEN breast pump, refer to the following common problems and solutions:
| Problem | Possible Cause | Solution |
|---|---|---|
| No suction or weak suction |
|
|
| Pump not turning on |
|
|
| Pain during pumping |
|
|
If the problem persists after trying these solutions, please contact HORIGEN customer support for further assistance.
8. Specifications
| Model Number | XN/MS-2224A |
| Brand | HORIGEN |
| Power Source | Corded Electric (with rechargeable battery) |
| Special Features | Portable, Two Suction Modes (Stimulation, Expression), UIS (Unique Independent Settings), Night Light, Alarm Clock |
| Stimulation Mode Levels | 7 Vacuum Levels, 3 Speed Levels |
| Expression Mode Levels | 10 Vacuum Levels, 6 Speed Levels |
| Included Breast Flange Sizes | 21mm, 29mm |
| Dishwasher Safe Parts | Yes (Breast Flanges and other milk-contact parts, refer to specific instructions) |
| Package Dimensions | 30.51 x 29.59 x 20.09 cm |
| Package Weight | 2.52 kg |
9. Warranty and Support
HORIGEN products are manufactured to high-quality standards. For warranty information, product registration, or technical support, please refer to the warranty card included in your product packaging or visit the official HORIGEN website. Please retain your proof of purchase for warranty claims.
For customer service inquiries, please contact your retailer or HORIGEN customer support directly.


