1. Introduction
This manual provides essential information for the proper setup, operation, and maintenance of your GreenTouch 18.5-inch Industrial Open-Frame Capacitive Touch Monitor. Please read this manual thoroughly before using the product and keep it for future reference.
Key Features
- Advanced Touch Technology: Features projected capacitive (G+G) 10-point multi-touch for excellent optical clarity and durability.
- Robust Design: Equipped with 3mm thick reinforced cover glass, offering front IK08 impact resistance and front IP65 waterproof sealing against dirt, dust, and liquids.
- Versatile Connectivity: Includes HDMI, VGA, DVI, and Audio interfaces to support a wide range of professional display applications.
- Commercial Grade Reliability: Engineered for quality and reliability, with an integrated touch solution designed, built, and supported by GreenTouch.
- Enhanced Stability: Proprietary touch screen and technology are designed to work seamlessly together, undergoing over 20 strict reliability tests to achieve 50,000 MTBF (Mean Time Between Failures).
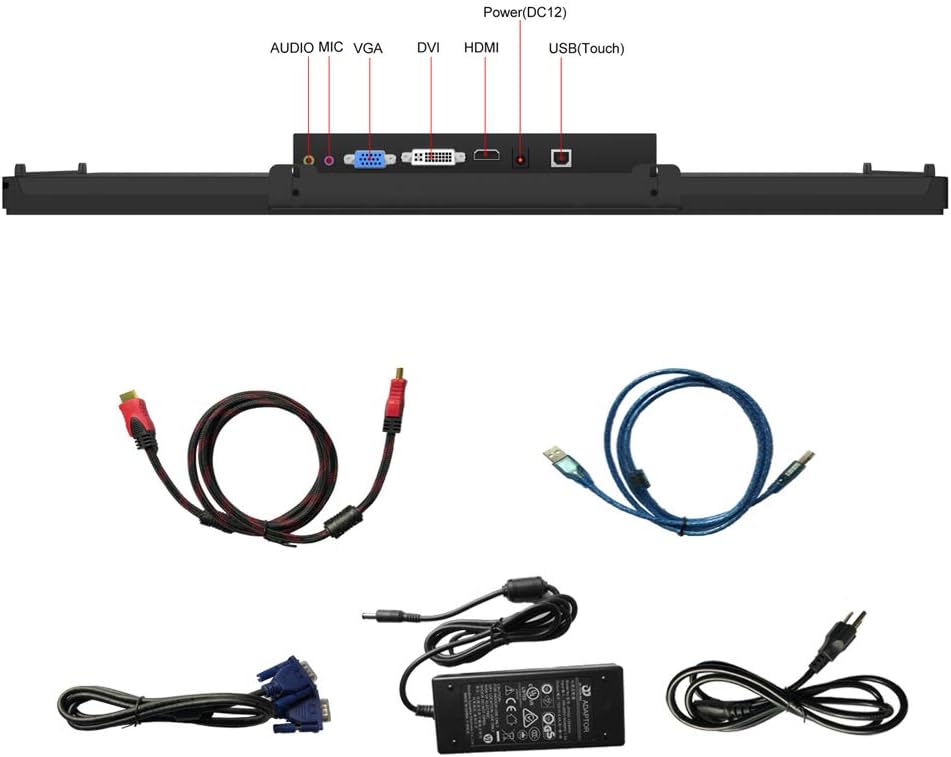
2. What's in the Box
Upon unpacking, please verify that all the following items are included and in good condition:
- GreenTouch 18.5-inch Touch Monitor
- Power Adapter (DC 12V)
- HDMI Cable
- USB-C Cable (for touch functionality and signal/power for compatible devices)
- VGA Cable
- DVI Cable
- Mounting Screws for VESA
- User Manual (this document)
3. Setup
3.1 Connecting the Monitor
- Power Connection: Connect the provided power adapter to the DC12V port on the monitor and then to a power outlet.
- Video Connection: Choose one of the following options:
- HDMI: Connect the HDMI cable from your source device to the HDMI port on the monitor.
- VGA: Connect the VGA cable from your source device to the VGA port on the monitor.
- DVI: Connect the DVI cable from your source device to the DVI port on the monitor.
- USB-C (Full Function): For compatible devices (supporting DisplayPort Alternate Mode and power delivery), connect a full-function USB-C cable from your device to the designated USB-C port on the monitor. This single cable can transmit video, touch signals, and power.
- Touch Functionality: If using HDMI, VGA, or DVI for video, connect the USB(Touch) port on the monitor to a USB port on your source device using the appropriate USB cable to enable touch input.
- Audio Connection: If your source device supports audio output via the selected video connection, the monitor's built-in speakers will function. For external audio, connect speakers or headphones to the audio output port.
3.2 Mounting Options
The monitor supports both flush mounting and VESA mounting for flexible installation.

3.2.1 VESA Mounting
The monitor is equipped with VESA mounting holes, allowing it to be attached to a VESA-compatible stand or wall mount (not always included). The VESA pattern is 75x75mm and 100x100mm.

- Align the VESA mount bracket with the screw holes on the back of the monitor.
- Secure the bracket using the provided VESA mounting screws.
- Attach the monitor to your VESA-compatible stand or wall mount.
3.2.2 Integrated Stand
The monitor features an integrated adjustable stand that allows for angle adjustments up to 45 degrees for optimal viewing.
4. Operating Instructions
4.1 Powering On/Off
Press the power button located on the side of the monitor to turn it on or off. The LED indicator will show the power status.
4.2 Touch Functionality
The 10-point capacitive touch screen allows for intuitive interaction. Use gestures such as tap, drag, pinch-to-zoom, and swipe for navigation and control, similar to a smartphone or tablet.
4.3 Display Modes
The monitor supports various display modes when connected to a compatible device, catering to different needs for work, gaming, or video editing:
- Duplicate Mode: Mirrors the content of your primary display.
- Extend Mode: Extends your desktop workspace, allowing for multi-tasking across two screens.
- Second Screen Only Mode: Displays content only on the monitor, turning off the primary display.
4.4 On-Screen Display (OSD) Menu
Use the control buttons on the side of the monitor to navigate and adjust settings via the OSD menu. These controls typically include:
- Power On/Off
- Volume Up/Down
- Menu Navigation (Up/Down/Select)
- Brightness and Contrast Adjustment
- Input Source Selection
- Color Settings
5. Maintenance
To ensure the longevity and optimal performance of your GreenTouch monitor, follow these maintenance guidelines:
- Cleaning the Screen: Use a soft, lint-free cloth lightly dampened with water or a non-abrasive screen cleaner. Avoid harsh chemicals, alcohol, or ammonia-based cleaners.
- Cleaning the Casing: Wipe the monitor casing with a soft, dry cloth.
- Ventilation: Ensure proper ventilation around the monitor. Do not block any ventilation openings.
- Storage: When not in use for extended periods, store the monitor in a cool, dry place, away from direct sunlight and extreme temperatures.
- Handling: Handle the monitor with care. Avoid dropping or subjecting it to strong impacts.
6. Troubleshooting
If you encounter issues with your monitor, please refer to the following common troubleshooting steps:
| Problem | Possible Cause | Solution |
|---|---|---|
| No display/Power LED off | No power supply | Check if the power adapter is securely connected to the monitor and a working power outlet. Press the power button. |
| No signal | Incorrect input source or loose cable | Verify video cable connections (HDMI, VGA, DVI, USB-C). Select the correct input source via the OSD menu. |
| Touch function not working | USB touch cable not connected or driver issue | Ensure the USB(Touch) cable is connected from the monitor to your device. For Windows, check device manager for touch screen drivers. For USB-C, ensure it's a full-function cable and your device supports touch over USB-C. |
| Flickering or distorted image | Faulty cable or resolution mismatch | Try a different video cable. Adjust the display resolution on your source device to match the monitor's native resolution (1366x768). |
| Monitor is unstable on a surface | Stand not properly deployed or surface is uneven | Ensure the integrated stand is fully extended and locked into position, or that the VESA mount is securely fastened. Place the monitor on a flat, stable surface. |
If the problem persists after trying these steps, please contact GreenTouch customer support.
7. Specifications
| Feature | Detail |
|---|---|
| Brand | GreenTouch |
| Model Number | GT-TM-1852C-CTW-HD |
| Screen Size | 18.5 inches |
| Resolution | 1366 x 768 pixels (XGA Wide) |
| Aspect Ratio | 16:9 |
| Screen Surface | Glossy |
| Contrast Ratio | 1000:1 |
| Refresh Rate | 60 Hz |
| Display Type | LCD, LED |
| Brightness | 250 candela |
| Response Time | 10 ms |
| Touch Technology | Projected Capacitive (G+G) 10-point touch |
| Impact Resistance | Front IK08 |
| Waterproof Rating | Front IP65 |
| Video Inputs | HDMI, VGA, DVI, USB-C (Full Function) |
| Audio | Built-in Speakers, Audio Output |
| Voltage | 12 V (DC) |
| Item Dimensions (D x W x H) | 4.7 x 45.7 x 28.2 cm |
| Item Weight | 4.5 kg |
| VESA Mount | 75x75mm, 100x100mm |
8. Warranty and Support
8.1 Warranty Information
This GreenTouch monitor comes with a 2-year manufacturer's warranty from the date of purchase. This warranty covers defects in materials and workmanship under normal use. It does not cover damage caused by misuse, accidents, unauthorized modifications, or external factors.
Please retain your proof of purchase for warranty claims.
8.2 Customer Support
For technical assistance, troubleshooting beyond this manual, or warranty inquiries, please contact GreenTouch customer support through the official website or your retailer. Provide your product model number (GT-TM-1852C-CTW-HD) and purchase details when contacting support.