Introduction
The Flysky FS-A3 is a compact and reliable 3-channel receiver designed for use with RC cars and boats. It operates on the 2.4GHz AFHDS2A signal protocol, ensuring stable and interference-free communication with compatible Flysky transmitters such as the GT2E and GT2G. This manual provides essential information for the proper setup, operation, and maintenance of your FS-A3 receiver.

Figure 1: Two Flysky FS-A3 AFHDS2A 2.4G 3CH Receivers.
Safety Information
- Always ensure the receiver is securely mounted in your RC model to prevent damage from vibrations or impacts.
- Verify all connections are correct and secure before powering on your RC model. Incorrect wiring can cause damage to the receiver or other components.
- Operate your RC model in a safe environment, away from people, animals, and obstacles.
- Do not expose the receiver to moisture or extreme temperatures.
- Disconnect the power source from the receiver when not in use or during maintenance.
Package Contents
Upon opening the package, you should find the following items:
- 2 x Flysky FS-A3 Receivers
- 2 x Antenna Tubes
- 2 x Bind Plugs

Figure 2: Contents of the Flysky FS-A3 package.
Product Overview
The FS-A3 receiver features a compact design with clearly labeled channels and indicators.

Figure 3: Detailed view of the FS-A3 receiver.
Key components include:
- Antenna: For receiving 2.4GHz signals from the transmitter. Ensure it is extended and positioned correctly for optimal range.
- Channel Ports (CH1, CH2, CH3): Used to connect servos, ESCs, and other components.
- Bind/VCC Port: Used for binding the receiver to the transmitter and for power input.
- Signal LED: Indicates the receiver's status (e.g., solid for bound, flashing for binding mode).
Setup
Binding the Receiver
Binding is the process of linking the receiver to your Flysky transmitter. This needs to be done once for each new receiver.
- Ensure your transmitter is turned off.
- Insert the bind plug into the "Bind/VCC" port on the FS-A3 receiver.
- Connect power to the receiver (e.g., via an ESC or a separate battery connected to any channel port, ensuring correct polarity). The receiver's LED should start flashing rapidly, indicating it is in binding mode.
- Turn on your Flysky GT2E or GT2G transmitter while holding down its bind button (refer to your transmitter's manual for the exact location of the bind button).
- The receiver's LED should turn solid, indicating a successful bind.
- Release the bind button on the transmitter, then turn off both the transmitter and the receiver.
- Remove the bind plug from the receiver.
- Turn on the transmitter first, then power on the receiver. The receiver's LED should be solid, confirming the connection.

Figure 4: Receiver ports and bind plug connection.
Connecting Components
Connect your Electronic Speed Controller (ESC) and servos to the appropriate channels on the receiver. Refer to your ESC and servo manuals for specific wiring diagrams.
- CH1: Typically for Steering Servo (or Aileron/Elevator on aircraft).
- CH2: Typically for Throttle/ESC (or Rudder on aircraft).
- CH3: Auxiliary channel for additional functions (e.g., lights, gear).

Figure 5: FS-A3 receiver with compatible transmitter and applications.
Operating
Once bound and connected, the FS-A3 receiver provides reliable control for your RC model.
- Always turn on your transmitter before powering on the receiver.
- Always turn off the receiver's power before turning off the transmitter.
- Maintain a clear line of sight between the transmitter and the receiver's antenna for optimal signal strength and range.
- The AFHDS2A system provides reliable, interference-free 2.4GHz signal operation.
Maintenance
- Cleaning: Gently wipe the receiver with a dry, soft cloth to remove dust or debris. Do not use liquids or solvents.
- Storage: Store the receiver in a cool, dry place away from direct sunlight and extreme temperatures.
- Antenna Care: Ensure the antenna is not kinked or damaged. A damaged antenna can significantly reduce range.
Troubleshooting
| Problem | Possible Cause | Solution |
|---|---|---|
| Receiver LED not solid after binding. | Binding process failed or interrupted. | Repeat the binding procedure carefully. Ensure the bind plug is correctly inserted and the transmitter is in bind mode. |
| No response from model. | Receiver not powered, not bound, or incorrect connections. | Check power supply to receiver. Verify receiver is bound (solid LED). Check all cable connections to ESC and servos. |
| Limited range or intermittent signal. | Damaged antenna, interference, or improper antenna placement. | Inspect antenna for damage. Ensure antenna is fully extended and not shielded by carbon fiber or metal. Avoid operating near strong interference sources. |
| Servos twitching or erratic behavior. | Low battery voltage or signal interference. | Check battery voltage of both transmitter and receiver. Ensure no strong electrical interference nearby. |
Specifications
Detailed technical specifications for the Flysky FS-A3 receiver:
- Channels: 3 Channels
- Model Type: Car/Boat
- Frequency Range: 2.4055 - 2.475 GHz
- Bandwidth: 500 KHz
- Bandwidth Number: 140
- RF Receiver Sensitivity: -105 dBm
- Modulation: GFSK
- System Type: AFHDS2A
- Channel Definition: 4096 Grade
- Input Power: 4.0-6.5V DC
- Antenna Length: 26mm
- Weight: 6g
- Dimensions: 35 x 22 x 12 mm
- Color: Black
Compatibility
The FS-A3 receiver is compatible with various Flysky transmitters utilizing the AFHDS2A system, including the GT2E and GT2G. Refer to the compatibility chart below for a comprehensive list.
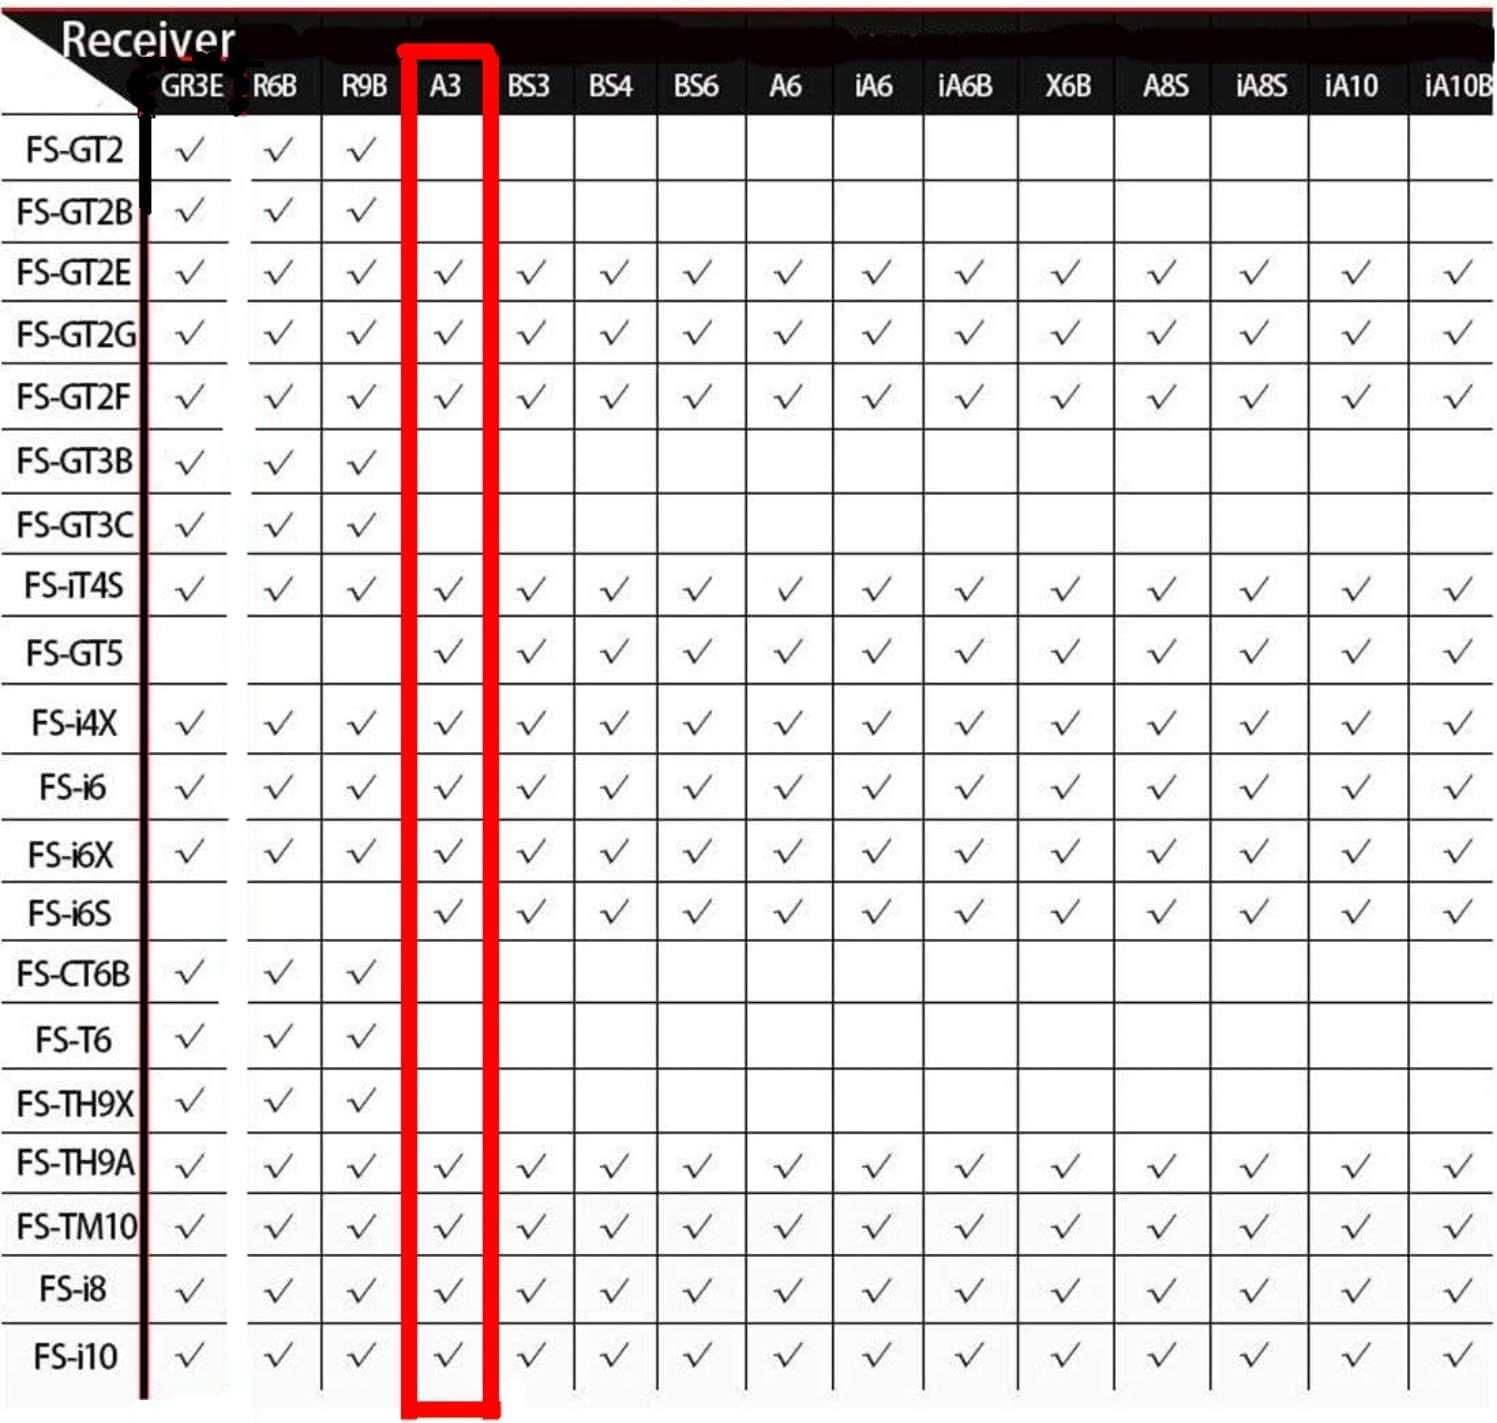
Figure 6: Flysky Receiver Compatibility Chart, with FS-A3 column highlighted.
Warranty and Support
For warranty information or technical support, please refer to the official Flysky website or contact your local distributor. Keep your purchase receipt as proof of purchase.
Flysky is a globally renowned brand specializing in radio remote control technology, offering high-quality remote controllers, receivers, and related accessories for various RC models.

Figure 7: Flysky Brand Logo.


