1. Introduction
The Ycozy Navi-EV Automatic Fish Feeder is designed to provide convenient and reliable feeding for your fish or aquatic pets in aquariums and fish tanks. Featuring a USB rechargeable battery, moisture-proof design, and intelligent timer settings, this feeder ensures your pets are fed consistently, even when you are away.

Figure 1: Ycozy Navi-EV Automatic Fish Feeder
2. Safety Information
- Ensure the feeder is securely installed to prevent it from falling into the water.
- Do not immerse the main unit of the feeder in water. It is not waterproof.
- Keep out of reach of children and pets.
- Use only the provided USB cable for charging.
- Do not attempt to disassemble or repair the feeder yourself. Contact customer support if issues arise.
- Ensure the food hopper is dry before adding fish food to maintain its moisture-proof function.
3. Package Contents
Please check the package to ensure all items are present:
- Ycozy Navi-EV Fish Feeder x 1
- Mounting Clamp x 1
- USB Charging Cable x 1
- Acrylic Double-Sided Adhesive x 1
- User Manual x 1
4. Product Overview
Familiarize yourself with the components of your Ycozy Navi-EV Automatic Fish Feeder:

Figure 2: Feeder Components
- Moisture-proof Flap: Helps keep food dry and prevents jamming.
- Food Inlet: Top opening for easy food replenishment.
- 210ml Container: Transparent hopper for storing fish food.
- Container Lid: Secures the food in the hopper.
- Vent Hole: For air circulation.
- Display Light: Indicates operational status and battery level.
- Manual Button: For instant feeding.
- Time Setting Buttons (12h, 24h, 48h): To set automatic feeding intervals.
- Type-C Port: For USB charging.
- Power On/Off Button: To turn the device on or off.
- Rotatable Holder: Allows 360° adjustment of the feeder's position.
5. Setup
5.1 Charging the Feeder
The Navi-EV feeder is USB rechargeable. Before first use, fully charge the device. A full charge takes approximately 3-4 hours and can last 3-6 months depending on usage.
- Connect the provided USB cable to the Type-C port on the feeder and to a standard USB power adapter (not included).
- The LED indicator will show charging status. A green light indicates a full charge. A red light flashing indicates low battery.
- The feeder can be used while charging.
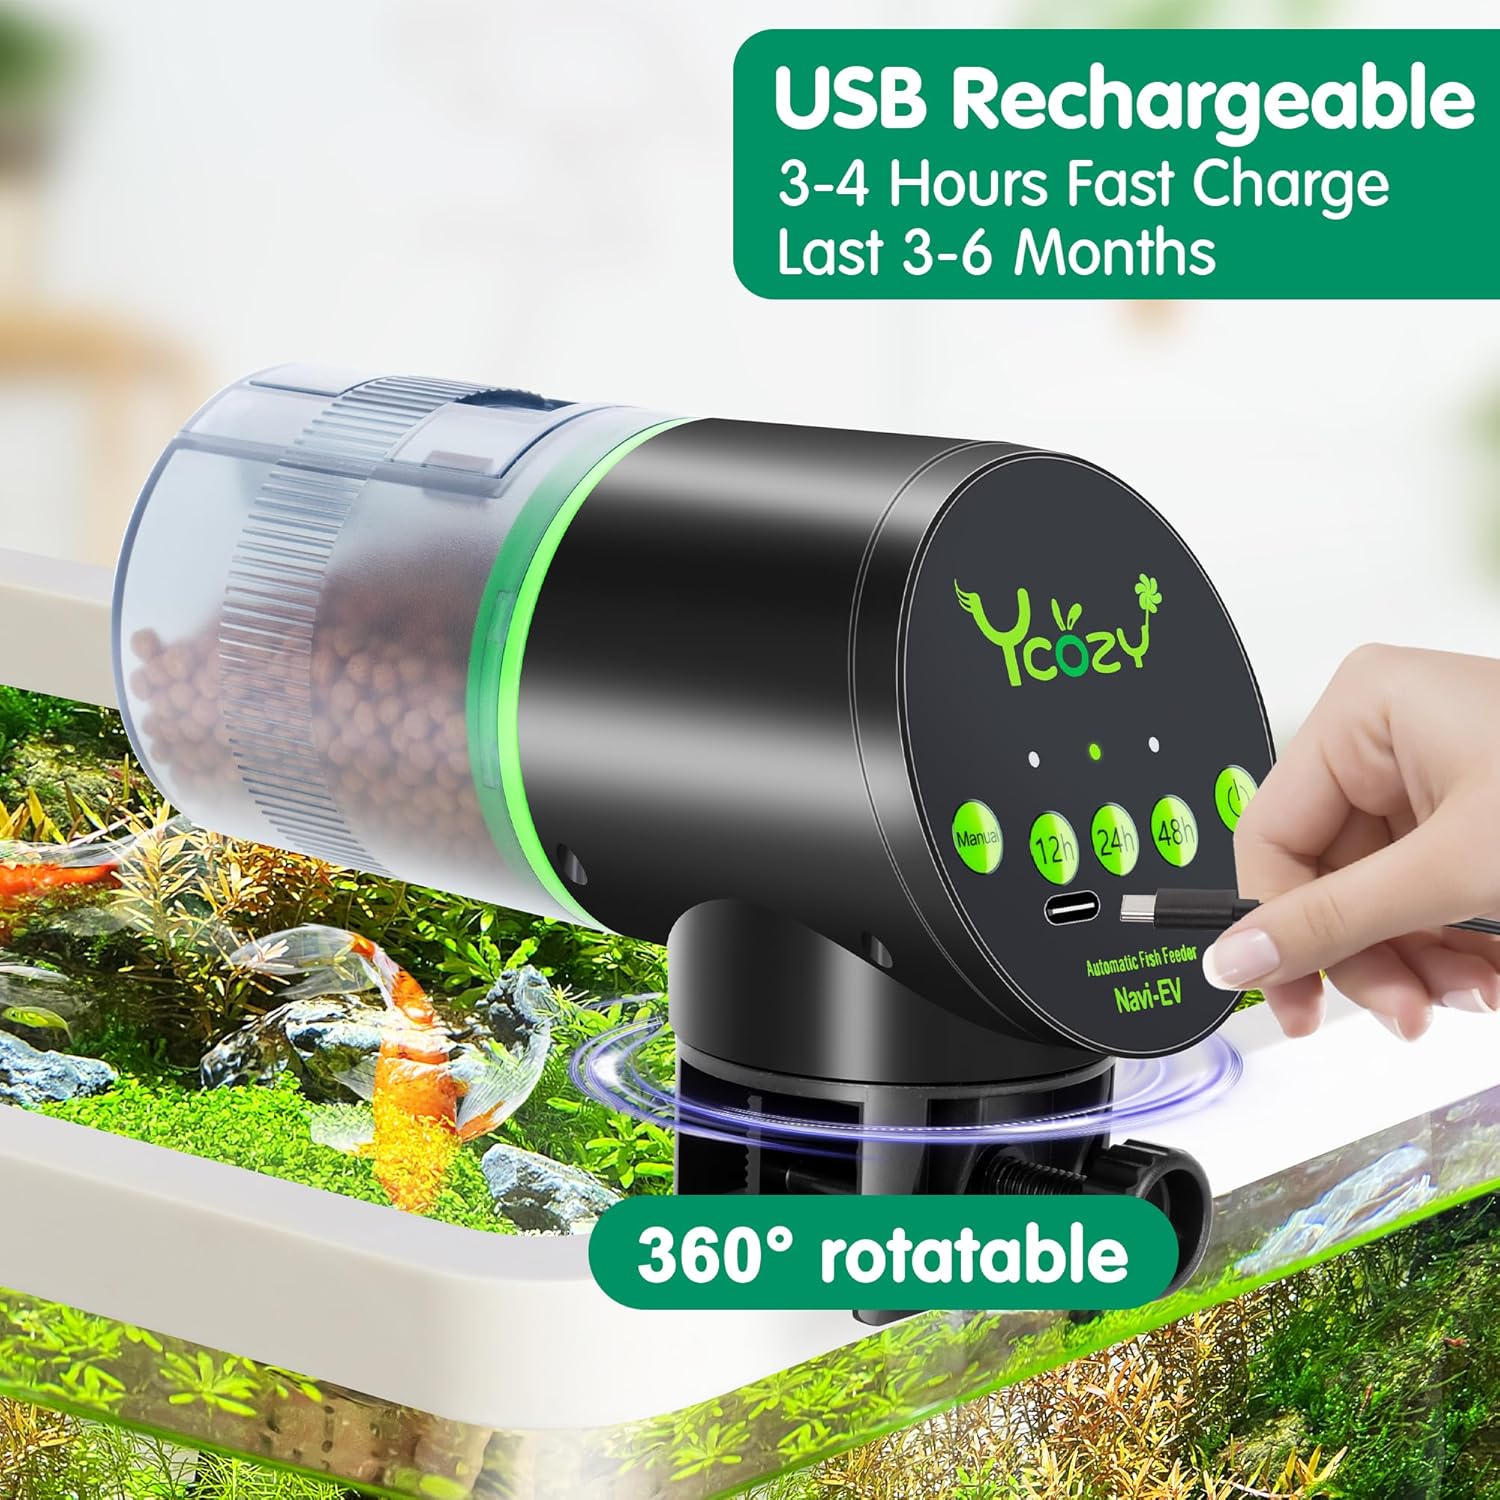
Figure 3: USB Charging
5.2 Installation Methods
The feeder offers two installation options:

Figure 4: Installation Methods
Method 1: Clamp Installation (for tanks without lids)
- Attach the mounting clamp to the feeder.
- Securely fasten the clamp to the edge of your aquarium. The clamp is suitable for tank glass thickness up to 24mm (0.95 inches).
- Adjust the feeder's position using the 360° rotatable holder to ensure food dispenses correctly into the water.
Method 2: Adhesive Installation (for tanks with lids)
- Clean and dry the desired mounting surface on your aquarium lid.
- Apply the reinforced acrylic double-sided adhesive to the bottom of the feeder.
- Press the feeder firmly onto the cleaned surface, ensuring it is stable and positioned to dispense food into the tank opening.
5.3 Adding Fish Food
The feeder is compatible with most types of dry fish food, including flakes, pellets, and crumbles.
- Open the moisture-proof flap on top of the food container.
- Pour the desired amount of fish food into the 210ml container. Do not overfill.
- Close the moisture-proof flap securely to prevent moisture from entering and keep the food dry.
- Food can be added without removing the feeder from the tank.

Figure 5: Easily Adding Feed
6. Operating Instructions
6.1 Power On/Off
- Press and hold the Power On/Off button for a few seconds to turn the feeder on or off.
6.2 Setting Automatic Feeding Schedules
The Navi-EV feeder offers three preset feeding intervals:
- 12h Button: Press this button to set the feeder to dispense food once every 12 hours.
- 24h Button: Press this button to set the feeder to dispense food once every 24 hours.
- 48h Button: Press this button to set the feeder to dispense food once every 48 hours.
- The corresponding LED indicator above the selected button will light up to confirm the setting.
6.3 Adjusting Food Dispensing Amount
The feeder features a 15-level adjustable slider to control the amount of food dispensed per feeding cycle. This helps prevent overfeeding.
- Locate the adjustable slider on the food outlet.
- Slide it to increase or decrease the opening size, thereby adjusting the food quantity.
- It is recommended to observe your fish's eating habits and adjust the amount accordingly to avoid waste and maintain water quality.

Figure 6: 15-Level Adjustable Slider
6.4 Manual Feeding
- Press the "Manual" button once for an immediate feeding cycle. This will dispense food once without affecting the programmed schedule.
6.5 LED Indicator Lights
The LED lights provide important status information:
- Green Light Blinking Slowly: Indicates the feeder is working normally and will feed once on the selected timer.
- Red Light Flashing Quickly: Indicates the battery is running out of power. Please charge the feeder as soon as possible.

Figure 7: LED Indicator Status
7. Maintenance
7.1 Cleaning the Feeder
- Turn off the feeder and remove it from the aquarium.
- Empty any remaining fish food from the hopper.
- Wipe the exterior of the feeder with a damp cloth. Do not use harsh chemicals or abrasive cleaners.
- The food container and moisture-proof flap can be carefully detached and rinsed with water. Ensure they are completely dry before reassembling and adding new food.
- Do not submerge the main electronic unit in water.
7.2 Ensuring Moisture-Proof Function
The feeder is designed with a moisture-resistant hopper and flap to keep food dry and prevent clumping.
- Always ensure the moisture-proof flap is securely closed after adding food.
- Avoid placing the feeder in areas with excessive humidity directly above the water surface if possible.
- Regularly check the food for any signs of moisture or clumping and clean the hopper if necessary.

Figure 8: Moisture-Proof Flap
8. Troubleshooting
| Problem | Possible Cause | Solution |
|---|---|---|
| Feeder not turning on. | Low battery or not charged. | Charge the feeder using the USB cable. Ensure the cable and power source are working. |
| Food not dispensing. | Food hopper empty, food clumped, or outlet blocked. | Refill food. Check for clumping and clear any blockages. Ensure the moisture-proof flap is closed. |
| Feeder making unusual noise. | Internal mechanism obstruction. | Turn off the feeder, remove food, and check for any foreign objects. If noise persists, contact support. |
| Food getting wet/clumped. | Moisture-proof flap not closed, high humidity, or feeder too close to water. | Ensure flap is sealed. Reposition feeder if necessary. Clean and dry hopper thoroughly. |
9. Specifications
| Feature | Detail |
|---|---|
| Model Name | Navi-EV |
| Brand | Ycozy |
| Power Source | USB Rechargeable (Internal Battery) |
| Charging Time | 3-4 hours |
| Battery Life | 3-6 months (per charge) |
| Food Hopper Capacity | 210ml |
| Feeding Intervals | 12h, 24h, 48h (automatic) |
| Food Dispense Levels | 15 adjustable levels |
| Material | ABS Plastic |
| Dimensions (LxWxH) | 3.54 x 4.72 x 6.5 inches |
| Item Weight | 8.8 ounces (0.25 Kilograms) |
| Max Tank Thickness (Clamp) | 24mm (0.95 inches) |
| Target Species | Fish |
10. Warranty and Support
10.1 Warranty Information
The Ycozy Navi-EV Automatic Fish Feeder comes with a 12-month warranty from the date of purchase. Additionally, a 90-day free return period is offered. Please retain your proof of purchase for warranty claims.
10.2 Customer Support
For any questions, technical assistance, or warranty claims, please contact Ycozy customer support through the retailer where you purchased the product or visit the official Ycozy website for contact details.


