1. Introduction
Thank you for choosing the Hoover H-GO 300 Hydro Robot Vacuum Cleaner and Mop. This manual provides essential information for the safe and efficient operation, maintenance, and troubleshooting of your device. Please read it thoroughly before first use and keep it for future reference.

Image: The Hoover H-GO 300 Hydro robot vacuum cleaner, its remote control, and a view of its underside with the mopping pad attached.
2. What's in the Box
Carefully unpack all components and ensure everything listed below is present:
- Hoover H-GO 300 Hydro Robot Vacuum Cleaner
- Charging Base
- Charger
- Remote Control with LCD Display
- Dustbin (0.35 L capacity)
- Water Tank (0.15 L capacity)
- 2 x Washable EPA Filters
- 2 x Mop Cloths
- 4 x Side Brushes (2 sets)
- 1 x Cleaning Brush

Image: The Hoover H-GO 300 Hydro robot vacuum with its dustbin detached, showing the internal compartment.

Image: The charging base for the robot vacuum and a separate mop cloth.
3. Setup
3.1 Initial Charging
Before first use, ensure the robot vacuum is fully charged. Connect the robot directly to the power outlet using the provided charger. This initial charge is crucial before the robot can automatically return to its charging base.
3.2 Charging Base Placement
Place the charging base against a wall in an open area. For optimal automatic return, ensure there is approximately 2 meters (6.5 feet) of clear space in front of the base and 1 meter (3.3 feet) on each side.

Image: The Hoover H-GO 300 Hydro robot vacuum docked on its charging base.

Image: The Hoover H-GO 300 Hydro robot vacuum approaching its charging station, indicated by arrows.
3.3 Installing Side Brushes
Attach the side brushes to the designated slots on the underside of the robot. Ensure they click into place securely.

Image: The Hoover H-GO 300 Hydro robot vacuum viewed from the side, showing its extended side brushes.
4. Operating the Robot Vacuum
4.1 Powering On/Off
Press the 'AUTO' button on the top of the robot or the power button on the remote control to turn the device on or off.

Image: Top view of the Hoover H-GO 300 Hydro robot vacuum, showing the 'AUTO' button.
4.2 Cleaning Modes
The H-GO 300 Hydro offers 5 distinct cleaning programs to suit various needs:
- Auto Mode: The robot intelligently navigates to clean the entire area.
- Parallel Mode: Cleans in a systematic, back-and-forth pattern.
- Edge Mode: Focuses on cleaning along walls and furniture edges.
- Spot Mode: Concentrates cleaning in a specific small area for intensive dirt.
- Manual Mode: Allows you to control the robot's movement using the remote control.
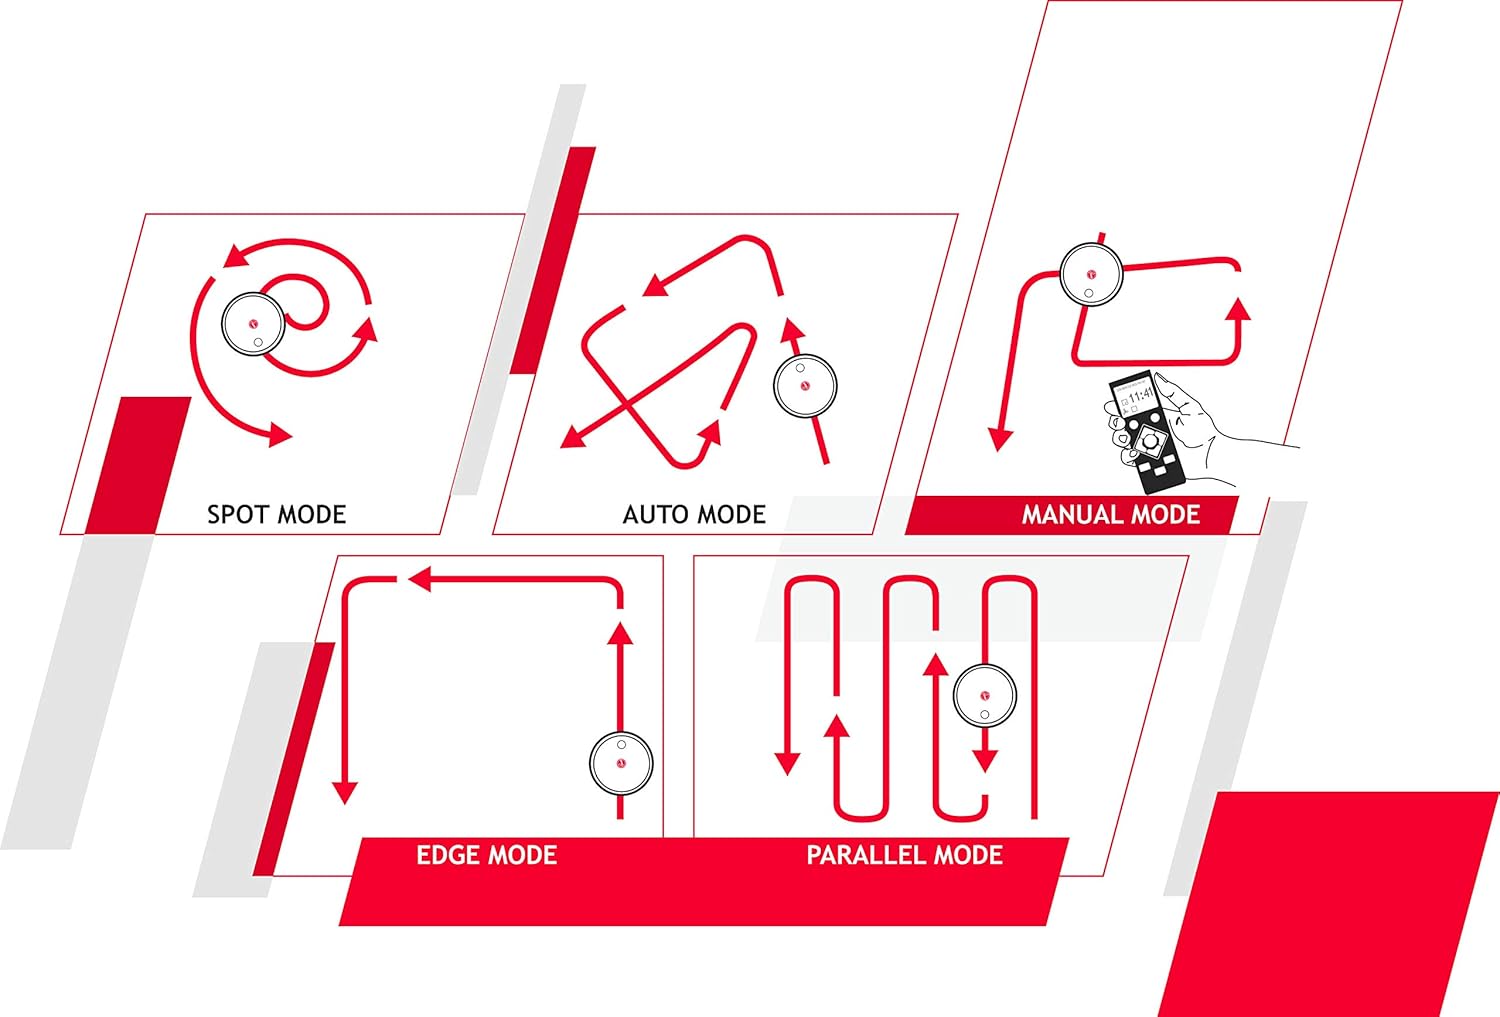
Image: A visual diagram explaining the various cleaning patterns: Spot, Auto, Manual, Edge, and Parallel modes.

Image: The Hoover H-GO 300 Hydro robot vacuum cleaning a living room, with white arrows on the floor illustrating its cleaning path.
4.3 Power Levels
Select between two power levels: Standard for regular cleaning and Turbo for more intensive suction on stubborn dirt or carpets.

Image: The Hoover H-GO 300 Hydro robot vacuum positioned on a carpet with visible dirt, illustrating its suction capability.
4.4 Scheduling
Use the remote control to program cleaning times, allowing the robot to clean automatically at your convenience.

Image: A hand holding the remote control for the Hoover H-GO 300 Hydro robot vacuum, with the robot visible in the background.
4.5 Mopping Function
To use the mopping function, fill the water tank with clean water and attach a mop cloth. The robot will vacuum and mop simultaneously. Note that the mopping function is designed for light cleaning and dust settling, not for removing heavy stains.

Image: The Hoover H-GO 300 Hydro robot vacuum actively mopping a polished wooden floor, leaving a damp trail.
5. Maintenance
Regular maintenance ensures optimal performance and extends the lifespan of your robot vacuum.
5.1 Emptying the Dustbin
The 0.35 L dustbin should be emptied after each cleaning cycle or when full. It is easily removable for quick disposal of collected dirt and debris.
5.2 Cleaning Filters
The robot includes two washable EPA filters. Clean them regularly by tapping out dust or rinsing with water. Ensure filters are completely dry before reinserting them.
5.3 Cleaning the Water Tank and Mop Cloths
After mopping, empty any remaining water from the 0.15 L water tank and rinse it. Remove and wash the mop cloths. Allow them to air dry completely before reuse.
5.4 Cleaning Brushes
Periodically check and clean the main brush and side brushes. Use the provided cleaning brush to remove tangled hair or debris.

Image: The underside of the Hoover H-GO 300 Hydro robot vacuum, highlighting its main brush, side brushes, and suction mechanism.
6. Troubleshooting
If you encounter issues with your Hoover H-GO 300 Hydro, refer to the following common problems and solutions:
| Problem | Possible Cause | Solution |
|---|---|---|
| Robot does not start or return to base. | Insufficient initial charge. | Ensure the robot is fully charged via direct cable connection before attempting automatic return. |
| Robot gets stuck or bumps into objects frequently. | Small obstacles or uneven surfaces. | Clear small objects (e.g., watering cans, thin rugs) from the cleaning path. The robot may struggle with obstacles around 2cm (0.8 inches) high or narrow tracks. |
| Mopping function leaves streaks or is ineffective. | Water tank empty, mop cloth dirty, or heavy stains. | Refill water tank. Clean or replace mop cloth. The mopping function is for light cleaning, not heavy stain removal. Note: The robot does not signal when the water tank is empty. |
| Robot voice prompts are in a foreign language. | Default language setting. | The robot's voice prompts are in English. This cannot be changed. |
| Robot does not clean under low furniture. | Furniture height is too low. | The robot has a height of 8 cm (3.15 inches). It cannot clean areas lower than this. |

Image: The Hoover H-GO 300 Hydro robot vacuum approaching furniture, with light beams indicating its obstacle detection sensors.

Image: The Hoover H-GO 300 Hydro robot vacuum positioned under a bed, with a measurement indicating its height of 8 cm.
7. Specifications
| Feature | Specification |
|---|---|
| Brand | Hoover |
| Model Number | 38383000 (HGO320H 011) |
| Color | Black |
| Product Dimensions (L x W x H) | 32 x 32 x 8 cm (12.6 x 12.6 x 3.15 inches) |
| Item Weight | 2.4 Kilograms (5.3 lbs) |
| Voltage | 14.8 Volts |
| Material | Plastic |
| Automatic Shutdown | Yes |
| Number of Speed Levels | 2 (Standard & Turbo) |
| Noise Level | 65 dB |
| Runtime | Up to 120 minutes |
| Dustbin Capacity | 0.35 L |
| Water Tank Capacity | 0.15 L |
| Special Features | No-Touch Sensors, Anti-fall Sensors, Time Programming, Remote Control with LCD Display, Gyroscopic Technology, Automatic Return to Charging Station, 2-in-1 Vacuum and Mop Function, Wet Mopping |
8. Warranty and Support
For warranty information and customer support, please refer to the documentation included with your purchase or visit the official Hoover website. Keep your proof of purchase for any warranty claims.