1. Product Overview
The Retekess TH103 Caregiver Pager System is designed to provide reliable communication for home safety, particularly for seniors and the elderly. It features a wireless strobe siren receiver and a waterproof pull-rope call button, offering an effective way to signal for assistance.
Key features include:
- Three levels of volume control (mute, low, high) for various environments.
- Fast emergency call activation by pressing the button or pulling the 27.5-inch rope.
- Flashing and beeping receiver for clear alerts.
- Compatibility with other Retekess products, such as watch receivers.
- Waterproof call button for versatile placement.
- Loud 110-decibel alarm.
- Operating range of 164-262 feet in open areas.


2. Package Contents
The package includes the following items:
- 1 x Wireless Strobe Siren Receiver
- 1 x Call Button with Pull Rope
- 1 x Power Adapter
- Mounting Screws

3. Setup and Installation
Follow these steps to set up your Retekess TH103 Caregiver Pager System:
3.1 Receiver Installation
- Choose a suitable location for the siren receiver, ensuring it is within the desired operating range of the call button.
- Mount the receiver to a wall using the provided screws. The diagram below illustrates the mounting process.
- Connect the power adapter to the receiver and plug it into a power outlet. The alarm only functions when connected to a power supply.


3.2 Call Button Placement
Place the waterproof call button in an easily accessible location for the user, such as a bathroom, bedroom, or living room. The pull rope is approximately 27.5 inches long for convenient access.


4. Operating Instructions
4.1 Pairing the Alarm System
The TH103 system typically comes pre-paired. If re-pairing is necessary or if you are adding new call buttons, follow these steps:
- Ensure the siren receiver is powered on.
- Press and hold the pairing button on the siren receiver (refer to Figure 5 for location) until the indicator light flashes.
- While the indicator light is flashing, press the "Call" button on the call button unit. The siren will sound, indicating successful pairing.
- Repeat for any additional call buttons.
Video 1: Demonstrates how to pair the TH103 alarm system with a call button, adjust volume, and delete paired buttons.
4.2 Activating an Alert
To activate an alert:
- Press the red "Call" button on the call unit.
- Alternatively, pull the red rope attached to the call unit.
Upon activation, the siren receiver will emit a loud alarm (up to 110 dB) and flash its red strobe light.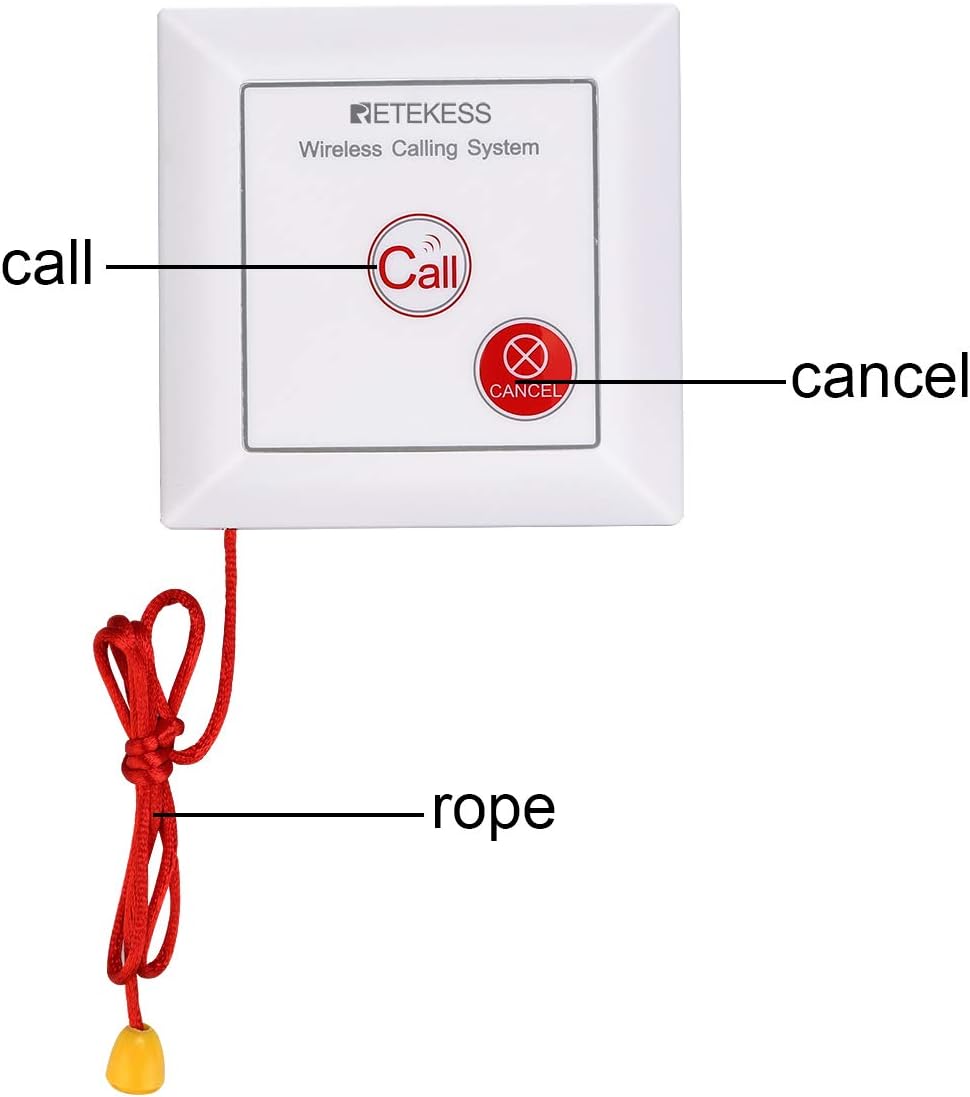

4.3 Cancelling an Alert
To cancel an active alert, press the "Cancel" button on the call unit (refer to Figure 9).
4.4 Volume Adjustment
The siren receiver has a switch to adjust the volume level. You can select between mute, low volume, and high volume settings to suit your environment. Refer to Figure 5 for the location of the siren switch.

5. Maintenance
To ensure optimal performance and longevity of your Retekess TH103 system:
- Cleaning: Wipe the units with a soft, dry cloth. Do not use abrasive cleaners or solvents.
- Battery: The call button uses a Lithium Ion battery (included). Replace the battery when the indicator light on the call button no longer illuminates or the range decreases significantly.
- Accessories: Always use original accessories, including the power adapter, to prevent damage and ensure proper function.
6. Troubleshooting
If you encounter issues with your TH103 system, consider the following:
| Problem | Possible Cause | Solution |
|---|---|---|
| Siren does not sound/flash. | Receiver not powered, call button battery low, units out of range, or not paired. | Ensure receiver is plugged in. Check call button battery. Move units closer. Re-pair the call button with the receiver (refer to Section 4.1). |
| Reduced operating range. | Obstructions (walls, metal objects), low call button battery, or environmental interference. | Relocate units to minimize obstructions. Replace call button battery. |
| Accidental alarms. | Call button pressed accidentally. | Ensure call button is placed where accidental activation is unlikely. Press the "Cancel" button to stop the alarm. |
| Cannot pair call button. | Incorrect pairing procedure, or previously paired button needs to be deleted. | Follow pairing steps carefully (Section 4.1). To delete a paired button, press and hold the pairing button on the siren receiver for an extended period (e.g., 5-10 seconds) until the indicator light changes or a specific sound is heard, then release. This typically clears all paired devices. Re-pair desired buttons. |

7. Specifications
| Feature | Detail |
|---|---|
| Model Number | FF9492B |
| Product Dimensions | 4.72"L x 3.74"W x 3.71"H |
| Item Weight | 10.5 ounces (298 Grams) |
| Power Source | Battery Powered (1 Lithium Ion battery included for call button) |
| Voltage | 6 Volts |
| Control Method | Touch |
| Noise Level | 110 Decibels |
| Mounting Type | Wall Mount |
| Sensor Technology | Manual |
| Special Features | Strobe Siren, Volume Control |
| Wireless Range | 164-262ft in open area |
| Call Button Rope Length | Approx. 27.5 inches |
| Compatible Devices | TD108, TD106, T128, T114, TD105 |

8. Warranty and Support
Warranty: Retekess provides a 2-year warranty for this product and a 30-day no-reason return policy. If product parts stop working within 1 year, replacements will be sent free of charge without requiring a return. Beyond the warranty period, maintenance services are offered, with buyers responsible for associated costs.
Support: For any inquiries or support needs, please contact Retekess via Amazon email. Responses are typically provided within 12 hours.
For more information, visit the official Retekess store on Amazon: Retekess Store.


