1. Introduction
Thank you for choosing the Moistenland Sprinkler Timer. This programmable hose timer is designed to simplify your garden watering, offering flexibility and efficiency. With its robust construction and user-friendly interface, you can ensure your lawns and gardens receive optimal hydration.

Figure 1.1: Moistenland Sprinkler Timer (Model HCT-355)
Key Features:
- 3 Separate Timers: Set up to 3 individual watering schedules.
- IP65 Waterproof: Durable and weather-resistant design for outdoor use.
- 3.5-inch Large LCD Screen: Easy to read and program.
- Child Lock Mode: Prevents unintended changes to settings.
- Rain Delay Sensor: Automatically pauses watering during rain.
- Manual Watering Option: Instant watering without interrupting schedules.
- Energy Saving: Screen auto-shuts down after 30 seconds.

Figure 1.2: Product packaging and included components
2. Setup Guide
2.1 Battery Installation
The timer requires 2 AA batteries (not included). Ensure correct polarity when inserting.
- Open the IP65 waterproof battery compartment cover on the back of the timer.
- Insert 2 x 1.5V AA Alkaline Batteries.
- Ensure the rubber ring on the battery cover is properly seated to maintain waterproof integrity.
- Close the battery compartment cover securely.
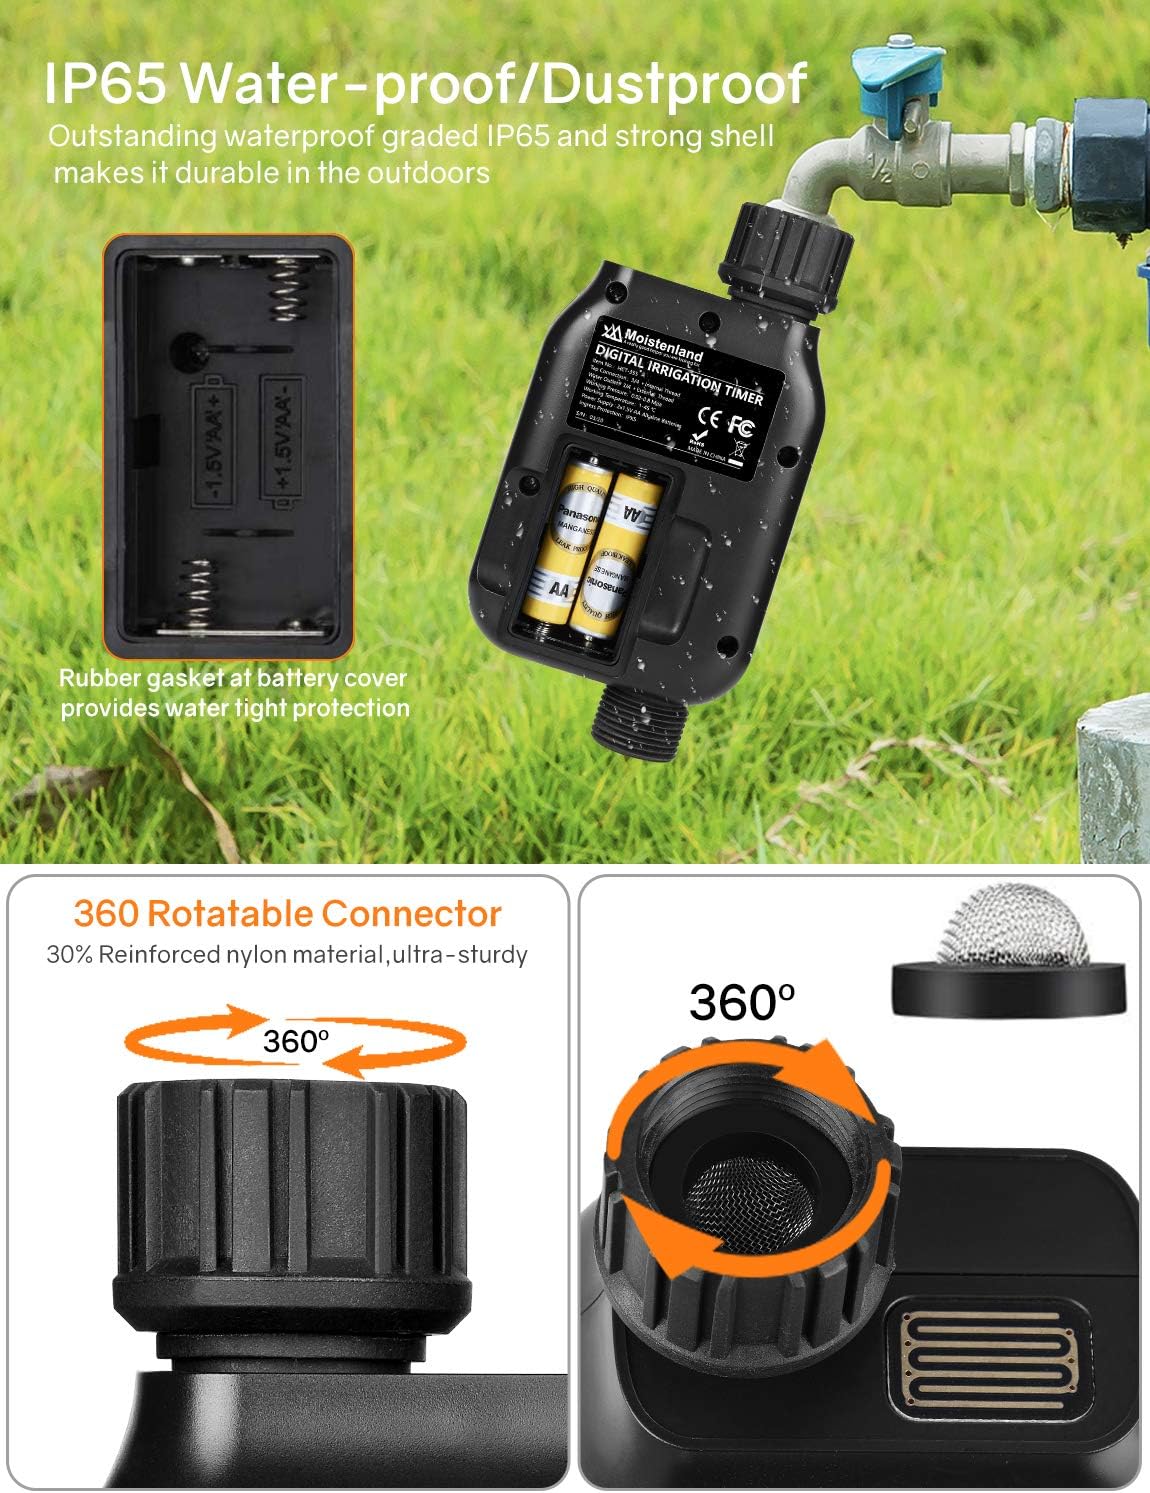
Figure 2.1: Battery installation and waterproof seal
2.2 Connecting the Timer
Connect the timer to your outdoor faucet and then attach your hose or irrigation system.
- Screw the top tap connector of the timer to your faucet. Tighten as much as you can by hand to ensure a secure, leak-free connection.
- If your faucet or hose has a different thread size, use the provided connector adapters (3/4" NPT standard/USA-type or 1/2" UN standard/EU-type) and ensure the rubber washer is in place.
- Connect your garden hose or irrigation system to the bottom outlet of the timer.

Figure 2.2: Connecting the timer to a faucet with included adapters
Note: The timer must be installed upright with the water exit fitting on the bottom to ensure proper operation and prevent water ingress.
3. Operating Instructions
The Moistenland Sprinkler Timer features a large LCD screen and intuitive buttons for easy programming.

Figure 3.1: Product Decomposition and Button Functions
3.1 Setting Current Time
Press the OK button to enter the setting mode. The 'NOW' time will flash. Use the UP and DOWN arrows to adjust the current time (24-hour format). Press OK to confirm and move to the next setting.
3.2 Programming Watering Schedules (P1, P2, P3)
The timer allows for up to three independent watering programs (P1, P2, P3).
- From the main screen, press OK to enter setting mode.
- Use the UP and DOWN arrows to select P1, P2, or P3. Press OK to begin programming the selected timer.
- Start Time: Adjust the desired start time for watering using the UP and DOWN arrows. Press OK.
- Watering Duration: Set how long the watering will last (from 1 second to 99 minutes 59 seconds). Press OK.
- Watering Frequency: Choose how often the program repeats (from every 1 hour to every 15 days). Press OK to save the program.
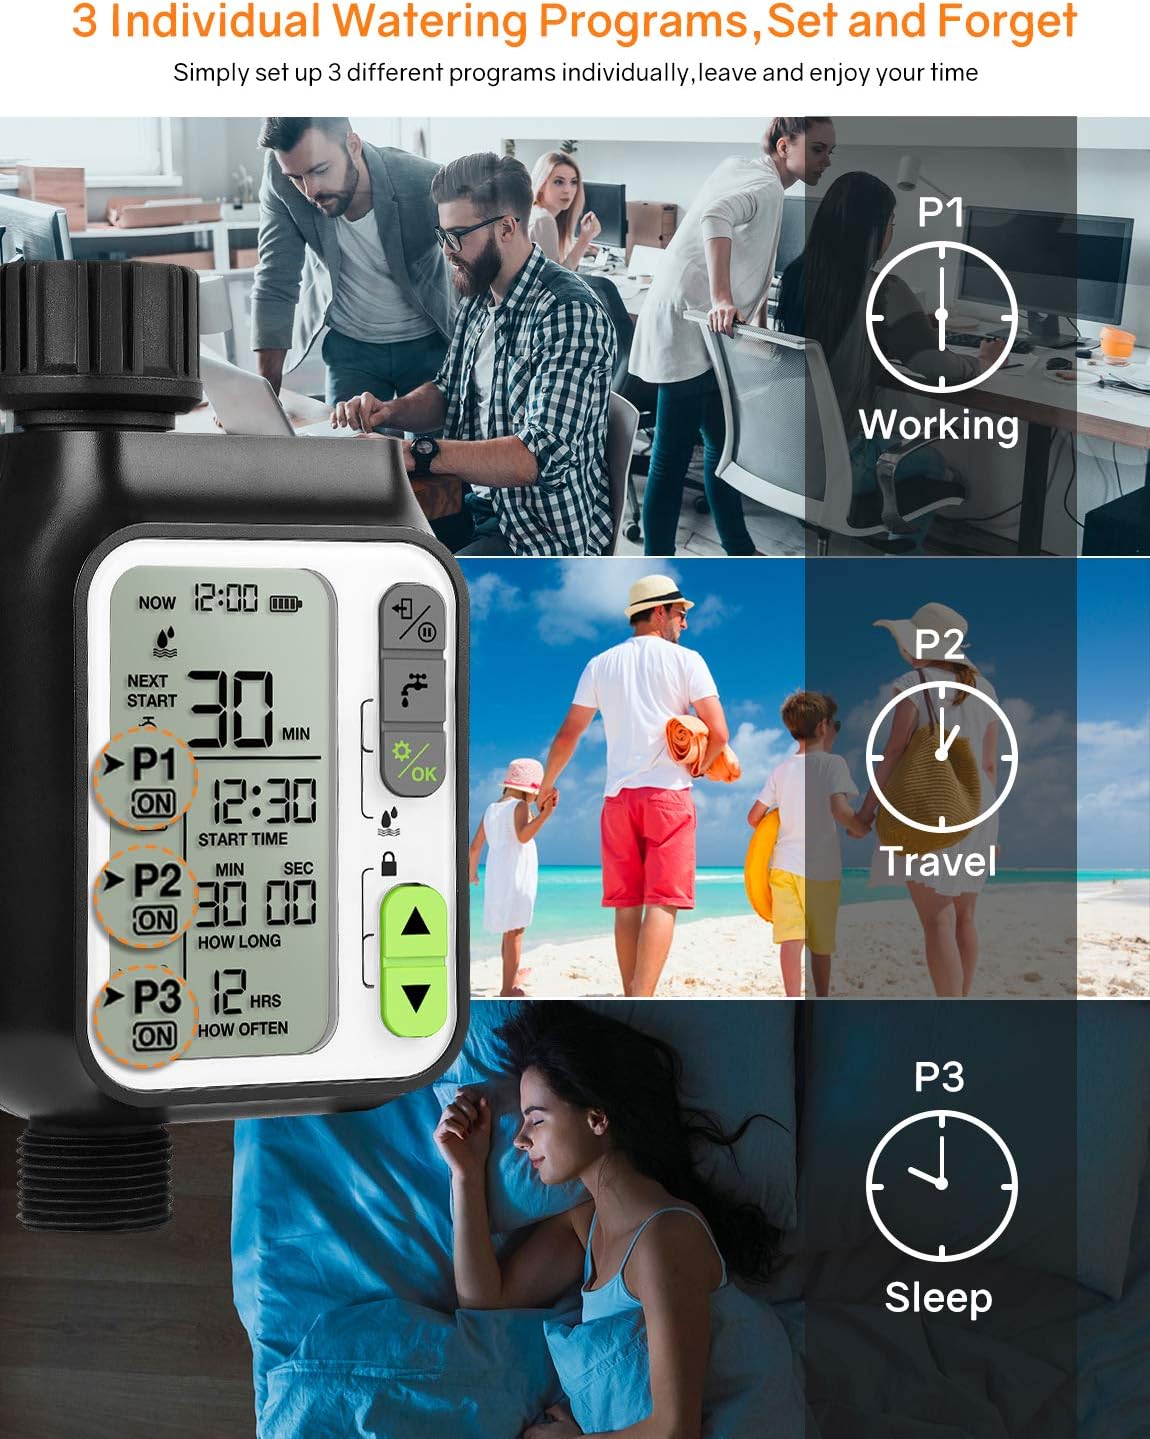
Figure 3.2: Setting up multiple watering programs

Figure 3.3: Customizable watering duration and frequency
3.3 Manual Watering
To manually water without affecting your programmed schedules:
- Press the Manual Watering button (faucet icon).
- Use the UP and DOWN arrows to set the desired manual watering duration.
- Press OK to start manual watering.
- To stop manual watering, press the Manual Watering button again.
3.4 Rain Delay Function
The built-in rain delay sensor temporarily pauses your programmed watering schedule to prevent over-watering and save water on rainy days.
- To activate or deactivate the Rain Sensor, press and hold the OK button and the Manual Watering button simultaneously for 3 seconds.
- The rain drop icon on the screen indicates the rain sensor status.

Figure 3.4: Rain Sensor Technology in action
3.5 Child Lock Mode
The Child Lock mode prevents unintended triggers by kids or pets, conserving water and maintaining your schedule.
- To activate or deactivate Child Lock, press and hold both the UP and DOWN arrow buttons simultaneously for 3 seconds.
- A lock icon will appear on the screen when Child Lock is active.

Figure 3.5: Child Lock feature for safety and water conservation
3.6 Auto Sleep Function
To conserve battery life, the screen will automatically shut down after 30 seconds of inactivity. Press any button to reactivate the screen.
3.7 Turning the Timer OFF/ON
To turn the timer completely OFF (disabling all programs), press and hold the Exit/Pause button (power icon) for 3 seconds. The screen will display "OFF". To turn it back ON, press and hold the same button for 3 seconds again.
3.8 Instructional Video
Video 3.1: Moistenland Programmable Water Timer - Installation and Programming Guide. This video demonstrates battery installation, connecting the timer to a faucet, setting irrigation programs (P1, P2, P3), manual watering, rain delay, child lock, and turning the timer ON/OFF.
4. Maintenance
4.1 General Care
- Clean the timer periodically with a soft, damp cloth. Do not use abrasive cleaners.
- Ensure the battery compartment is always sealed tightly to maintain IP65 waterproof rating.
- During freezing temperatures, disconnect the timer from the faucet and store it indoors to prevent damage.
4.2 Battery Replacement
When the battery indicator on the LCD screen shows low power, replace the 2 AA batteries promptly to ensure continuous operation. Follow the steps in Section 2.1 for proper battery installation.
5. Troubleshooting
If you encounter issues with your Moistenland Sprinkler Timer, please refer to the following common solutions:
- No Display/Timer Not Responding: Check battery installation and ensure batteries are fresh. Press any button to wake the screen from auto-sleep.
- Water Leakage: Ensure all connections (faucet to timer, timer to hose) are tightened securely. Verify that rubber washers are correctly seated in all connections.
- Timer Not Watering: Check if the timer is in "OFF" mode (Section 3.7). Verify that programs are correctly set (start time, duration, frequency). Ensure the faucet is turned on.
- Watering at Unexpected Times: Double-check all programmed schedules (P1, P2, P3) for correct start times and frequencies. Ensure the current time on the timer is accurate.
- Rain Delay Not Working: Ensure the rain sensor is activated (Section 3.4). Check for any obstructions on the rain sensor.
For further assistance, please contact customer support.
6. Specifications
| Feature | Detail |
|---|---|
| Model Number | HCT-355 |
| Brand | Moistenland |
| Color | 3-black |
| Material | Reinforced Nylon Material |
| Product Dimensions | 2.2"D x 3.23"W x 6.3"H |
| Item Weight | 0.41 Kilograms (14.4 ounces) |
| Number of Settings | 3 (Separate Timers) |
| Watering Duration | 1 second to 99 minutes 59 seconds |
| Watering Frequency | Every 1 hour to every 15 days |
| Batteries Required | 2 AA batteries (not included) |
| Waterproof Rating | IP65 |
| UPC | 674862984312 |

Figure 6.1: Product Dimensions
7. Warranty and Support
The Moistenland HCT-355 automatic sprinkler timer comes with a 1-year manufacturer’s warranty.
We are committed to providing 100% satisfaction customer service. If you have any questions or require assistance, please feel free to contact us. We offer 24-hour friendly customer service.
For support, please visit the official Moistenland store or contact their customer service directly.
Moistenland Store: https://www.amazon.com/stores/Moistenland/page/D4B0D00A-5F91-4E2D-8CC9-11F694C17908