ELIVED Full Motion Swivel and Tilt TV Wall Mount
ELIVED TV Wall Mount Instruction Manual
Model: Full Motion Swivel and Tilt TV Wall Mount
1. Introduction
This manual provides comprehensive instructions for the safe and proper installation, operation, and maintenance of your ELIVED Full Motion Swivel and Tilt TV Wall Mount. Please read this manual thoroughly before beginning installation and retain it for future reference.

Image: Overview of the ELIVED Full Motion TV Wall Mount, showing the wall plate, articulating arm, and TV bracket, along with included accessories like a level and cable ties.
2. Safety Information
WARNING: Failure to read and follow all instructions can result in personal injury, property damage, or voiding of warranty. If you do not understand these instructions or have doubts about the safety of the installation, please contact customer support.
- Do not install on drywall alone. This mount requires installation into a wood stud, solid concrete, or brick wall.
- Ensure the mounting surface can safely support the combined weight of the mount and the television.
- Do not exceed the maximum weight capacity of 77 lbs (35 kg).
- Verify VESA patterns of your TV are within the supported range (75x75mm to 400x400mm).
- Always use a stud finder to locate wood studs accurately.
- Wear appropriate safety gear, including eye protection, during installation.
- Keep children and pets away during installation.
- Check all connections periodically to ensure they remain secure.
3. Package Contents
Please verify that all components are present and undamaged before installation. If any parts are missing or defective, contact ELIVED customer service.
- Wall Plate Assembly with Articulating Arm
- TV Bracket (2 pieces)
- Mounting Hardware Kit (various screws, washers, spacers for TV and wall)
- Bubble Level
- Cable Ties (Velcro)
- Installation Manual
4. Specifications
| TV Size Compatibility | 26-55 inches |
| Weight Capacity | Up to 77 lbs (35 kg) |
| VESA Compatibility | 75x75mm to 400x400mm |
| Tilt Angle | +20° / -20° |
| Swivel Angle | ±90° (depending on TV size) |
| Screen Level Adjustment | ±3° |
| Extension from Wall | Approximately 3" to 19.2" |
| Material | Alloy Steel |

Image: Diagram illustrating VESA pattern compatibility (Max 400x400mm, Min 75x75mm) and maximum weight capacity (Max 77lbs) for the TV mount.

Image: Visual representation of the TV mount's tilt range (+5° to -13°) and swivel range (±90°), demonstrating viewing flexibility.

Image: Illustration showing the mount's extension capability from the wall (3" to 19.2") and the screen level adjustment range (±3°).
5. Setup and Installation
5.1 Pre-Installation Checklist
- Confirm your TV's weight and VESA pattern are within the mount's specifications.
- Identify the type of wall you will be mounting to (wood stud, concrete, or brick).
- Ensure there are no electrical wires or plumbing behind the drilling area.
- Check that the mount will not block any ports on your TV.

Image: Depiction of diverse wall compatibility, showing installation on a single wood stud, concrete wall, and brick wall. A warning indicates not to mount on drywall alone.
5.2 Tools Required (Not Included)
- Phillips Head Screwdriver
- Drill
- Stud Finder (for wood stud installation)
- Pencil
- Measuring Tape
- Socket Wrench (recommended for lag bolts)
- Hammer (for concrete anchors)
5.3 Installation Steps
Follow these general steps for installation. Refer to the detailed diagrams in your package for specific measurements and hardware usage.
- Attach Brackets to TV Back: Secure the two TV brackets to the back of your television using the appropriate screws, washers, and spacers from the hardware kit. Ensure they are centered and level.
- Install Wall Plate:
- For Wood Stud: Locate the center of a wood stud using a stud finder. Mark the drilling points. Drill pilot holes and secure the wall plate to the stud using the provided lag bolts.
- For Concrete/Brick Wall: Mark the drilling points. Drill holes to the specified depth and diameter. Insert concrete anchors (if applicable, may need to be requested separately). Secure the wall plate using the provided lag bolts.
- Hang TV onto Wall Plate: Carefully lift the television with the attached brackets and hook them onto the wall plate. Once securely seated, tighten the security screws on the TV brackets to lock the TV in place.

Image: A visual guide demonstrating the easy 3-step installation process: 1) Attach brackets to TV back, 2) Install wall plate, and 3) Hang TV onto wall plate.
6. Operating the Mount (Adjustments)
Your ELIVED Full Motion TV Wall Mount offers various adjustments for optimal viewing.
- Swivel: Gently push or pull the TV to the desired left or right angle. The mount allows for up to ±90° swivel, depending on your TV size and distance from the wall.
- Tilt: Loosen the tilt adjustment knobs on the TV brackets, adjust the screen to the desired upward or downward angle, and then re-tighten the knobs to secure the position. The tilt range is +20° to -20°.
- Extension/Retraction: Pull the TV away from the wall to extend the arm, or push it back towards the wall to retract it. The arm extends from approximately 3 inches to 19.2 inches.
- Level Adjustment: If your TV is slightly unlevel after installation, use the screen level adjustment feature (±3°) to fine-tune the horizontal alignment. Refer to the mount's specific mechanism for this adjustment.
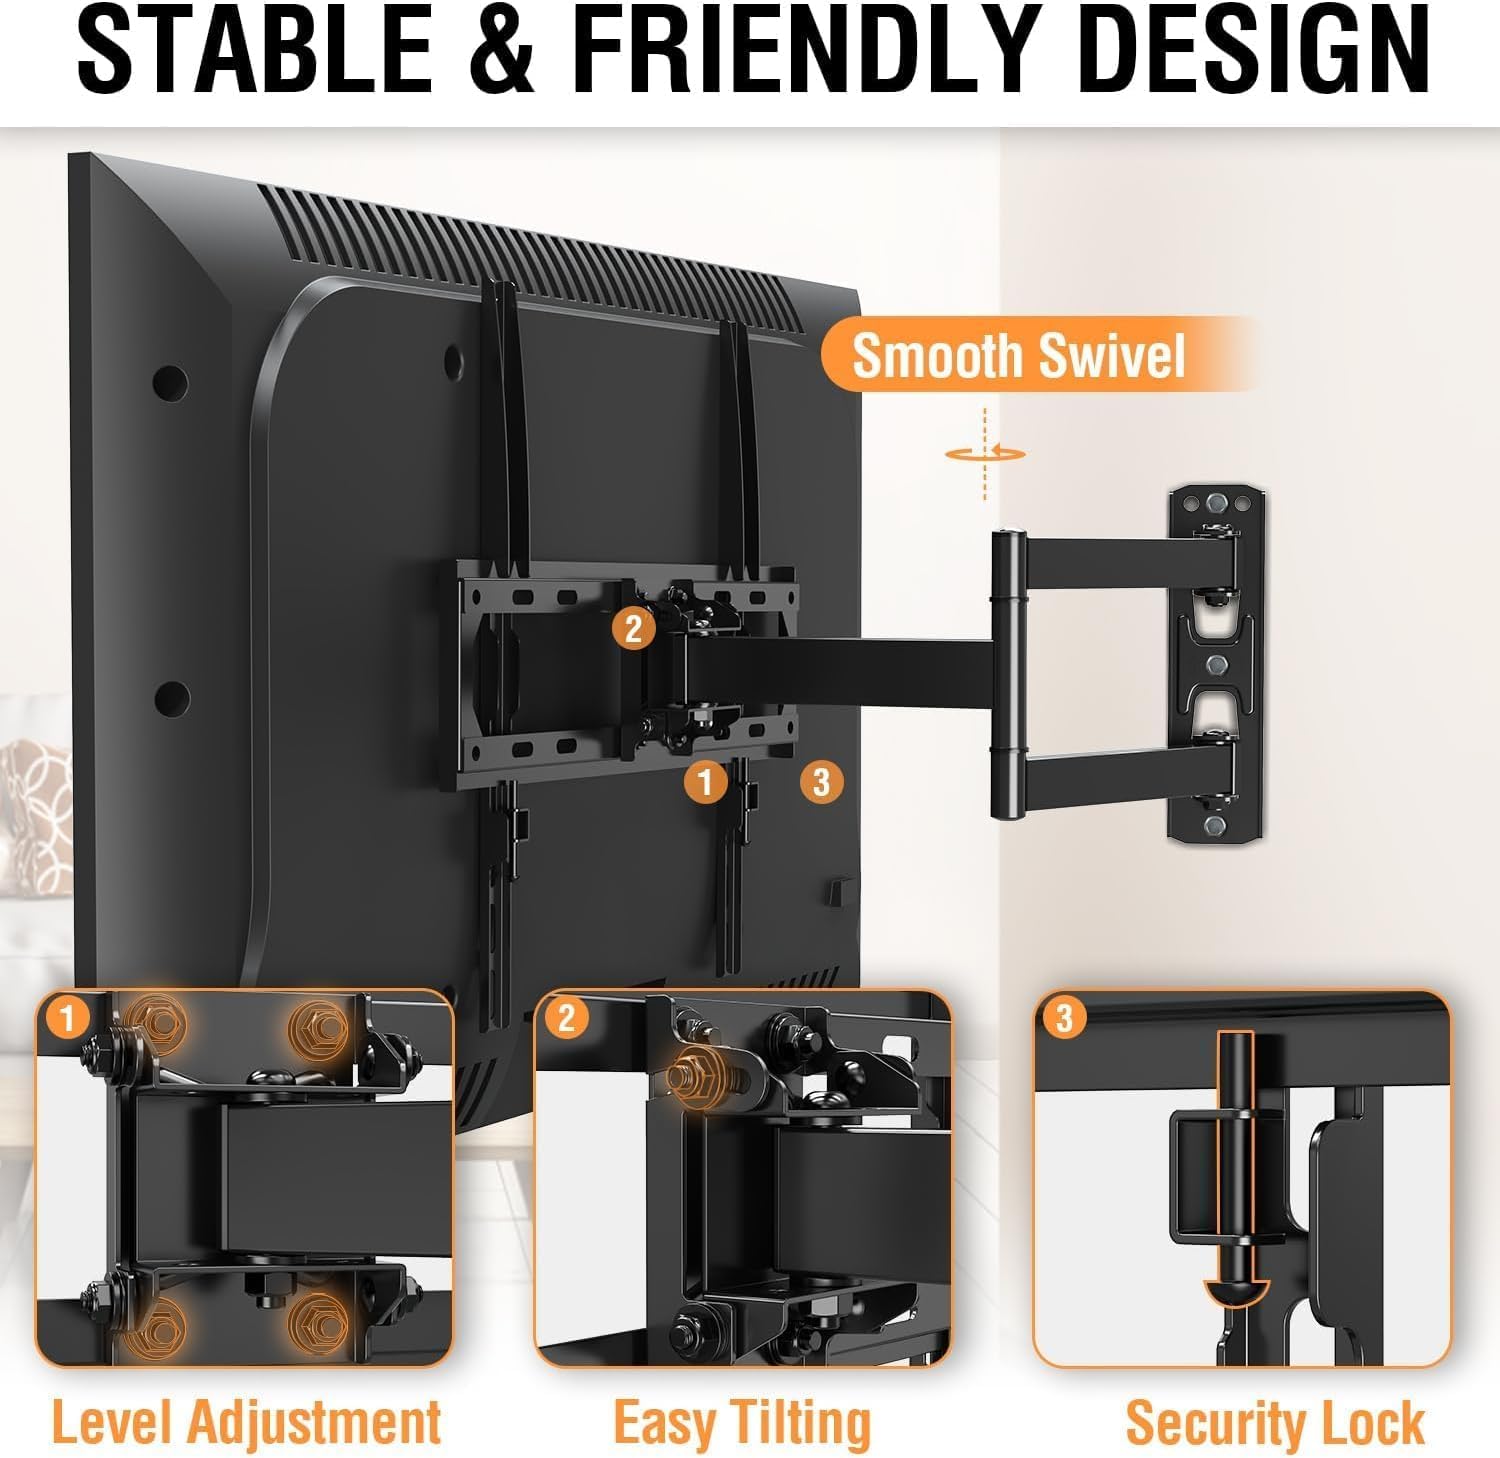
Image: Close-up views highlighting key design features: Level Adjustment, Easy Tilting mechanism, and the Security Lock for the TV brackets.

Image: An example of the TV mount installed in a corner, demonstrating its flexibility for corner mounting applications.
7. Maintenance
- Periodically check all screws and bolts to ensure they are tight and secure.
- Clean the mount with a soft, dry cloth. Avoid abrasive cleaners or solvents.
- Do not apply lubricants to the moving parts unless specifically instructed by ELIVED support.
8. Troubleshooting
| Problem | Possible Cause | Solution |
|---|---|---|
| TV is not level. | Wall plate not level during installation, or minor settling. | Use the screen level adjustment feature on the TV brackets to correct. |
| Mount feels loose on the wall. | Lag bolts are not fully tightened, or incorrect wall type used. | Re-tighten lag bolts. Ensure installation was on a stud, concrete, or brick. Do not use on drywall alone. |
| Mount is difficult to swivel/tilt. | Joints are too tight. | Some joints may be factory-tightened. Gently work the arm to loosen. Do not force or disassemble. |
| TV ports are blocked. | TV brackets installed incorrectly or mount position is too high/low. | Adjust the position of the TV brackets on the TV or consider re-mounting the wall plate if necessary. |
9. Warranty and Customer Support
ELIVED provides a 10-year warranty for this TV wall mount, covering defects in materials and workmanship under normal use. This warranty does not cover damage caused by improper installation, misuse, or natural disasters.
For technical assistance, missing parts, or warranty claims, please contact ELIVED customer service. Our professional support team is available 7 days a week to answer your questions.
Contact Information: Please refer to the contact details provided on the ELIVED official website or your purchase receipt.
For more information about ELIVED products, visit the official ELIVED Store: ELIVED Store on Amazon
Related Documents - Full Motion Swivel and Tilt TV Wall Mount
 |
ELIVED YD3033 Ultra Slim TV Wall Mount Installation Guide Detailed installation instructions for the ELIVED YD3033 Ultra Slim TV Wall Mount, covering wood stud and concrete wall mounting, VESA plate attachment, and leveling and tilt adjustments. Supports TVs from 26-60 inches, up to 88 lbs, with VESA up to 400x400mm. |
 |
PIXSF2 Full-Motion TV Wall Mount Installation Manual This manual provides instructions for installing the PIXSF2 Full-Motion TV Wall Mount. It covers safety information, compatibility checks, and step-by-step assembly for various wall types, including wood studs and solid concrete. |
 |
BEISHI TV Wall Mount Installation Guide - Full Motion Articulating Bracket Comprehensive installation instructions for the BEISHI TV Wall Mount, featuring full-motion articulating arm capabilities. Learn how to safely mount your 32-70 inch flat or curved TV with VESA compatibility. Includes mounting accessories, tools required, step-by-step guidance, and important safety precautions. |
 |
ELIVED YD3005 TV Wall Mount Installation Guide Comprehensive installation instructions for the ELIVED YD3005 TV Wall Mount, covering safety, parts, hardware, and step-by-step mounting procedures for wood stud and concrete walls. |
 |
BONTEC CT135B TV Wall Mount Installation Instructions Comprehensive installation guide for the BONTEC CT135B TV Wall Mount, covering unpacking, safety information, parts list, and step-by-step assembly for flat and curved screens on various wall types. |
 |
ELIVED TV Wall Mount Installation Guide Comprehensive instructions for installing the ELIVED TV Wall Mount, supporting most 26-55 inch TVs with full motion swivel and tilt capabilities. Includes hardware details, safety precautions, and step-by-step assembly for wood stud and concrete wall installations. |
Ask a question about this manual
Ask about setup, troubleshooting, compatibility, parts, safety, or missing instructions. Manuals+ will review the question and use this page’s manual context to help answer it.