
Introduction
The ASUS ProArt Z490-CREATOR 10G is an ATX content creation motherboard designed for Intel LGA 1200 processors. It features robust power delivery, high-speed connectivity options including Thunderbolt 3 Type-C, 10G LAN, and 2.5G Intel LAN, and multiple M.2 slots for storage. This manual provides essential information for setting up, operating, and maintaining your motherboard.
Setup
1. Unpacking and Inspection
Carefully remove the motherboard and its accessories from the packaging. Inspect all components for any signs of damage. Ensure all listed accessories are present.

Image: Top-down view of the ASUS ProArt Z490-CREATOR 10G motherboard, showcasing the CPU socket, RAM slots, and PCIe slots.
2. Motherboard Layout Overview
Familiarize yourself with the main components and connectors on the motherboard. Key areas include the CPU socket (LGA 1200), DDR4 memory slots, PCIe expansion slots, M.2 slots, SATA ports, and the rear I/O panel.
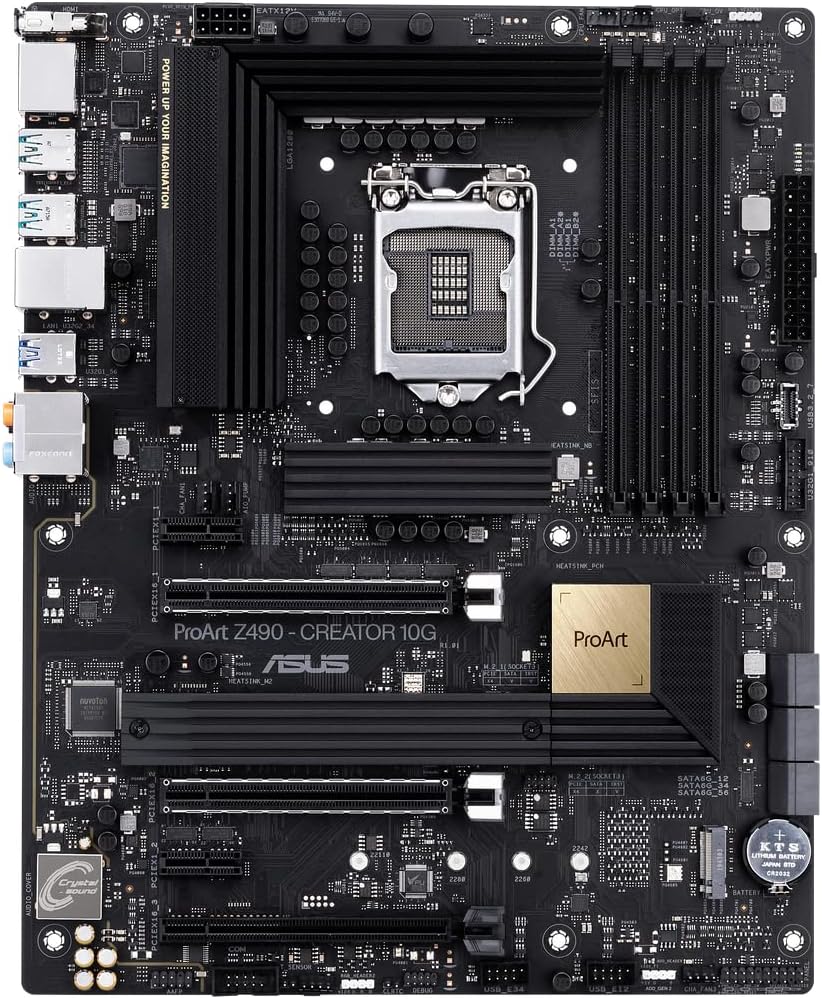
Image: Angled view of the motherboard, highlighting the heatsinks and various connectors.
3. CPU Installation (LGA 1200)
- Open the CPU socket lever and lift the load plate.
- Carefully align the Intel 10th Gen Core processor with the socket, ensuring the golden triangle on the CPU matches the triangle on the socket.
- Gently place the CPU into the socket. Do not force it.
- Close the load plate and push down the lever until it locks into place.
4. RAM Installation (DDR4)
- Open the clips on both ends of the DDR4 memory slots.
- Align the memory module with the slot, ensuring the notch on the module matches the key in the slot.
- Press down firmly on both ends of the memory module until the clips snap into place.
- For optimal performance, install memory modules in the recommended dual-channel configuration as per the motherboard manual.
5. Storage Device Installation
M.2 SSDs
- Locate the M.2 slots on the motherboard. Some slots may be covered by heatsinks.
- Remove the M.2 screw and standoff.
- Insert the M.2 SSD into the slot at a 30-degree angle.
- Push the SSD down and secure it with the M.2 screw.
- Note: M.2_1 can operate in PCIe or SATA mode. If M.2_1 is set to SATA mode, SATA2 port will be disabled. If M.2_2 is set to PCIe 4x mode, SATA5 and SATA6 ports will be disabled. Refer to the full manual for detailed configurations.
SATA Drives
- Connect one end of the SATA data cable to a SATA port on the motherboard.
- Connect the other end of the SATA data cable to your SATA hard drive or SSD.
- Connect a SATA power cable from your power supply unit (PSU) to the drive.
6. Expansion Card Installation
Graphics Card
- Open the retention clip on the primary PCIe x16 slot.
- Align your graphics card with the slot and press down firmly until it seats correctly and the retention clip locks.
- Secure the graphics card to your chassis with screws.
- Connect any necessary PCIe power cables from your PSU to the graphics card.
HYPER 10G LAN Card
The motherboard includes a HYPER 10G LAN card. Install this card into an available PCIe slot. Note that populating the PCIEx16_3 slot may disable Thunderbolt 3 functionality. Consider installing the 10G card in the PCIEx16_2 slot if Thunderbolt 3 is critical for your workflow, understanding that your GPU might operate at x8 speed in the primary slot.

Image: The ASUS HYPER 10G LAN card, an accessory included with the motherboard.
7. Power Connections
- Connect the 24-pin ATX power connector from your PSU to the motherboard.
- Connect the 8-pin (or 4+4-pin) CPU power connector(s) from your PSU to the motherboard.
8. Front Panel and Rear I/O Connections
- Connect the front panel headers (power button, reset button, HDD LED, power LED) to the corresponding pins on the motherboard.
- Connect front panel USB and audio headers.
- Connect peripherals to the rear I/O panel ports, including USB devices, Ethernet cables, and audio devices.

Image: Close-up view of the rear I/O panel, showing various USB ports, Ethernet ports, and audio jacks.
Operating Instructions
1. First Boot and BIOS/UEFI Access
After assembling your system, power it on. Press the DEL or F2 key during startup to enter the BIOS/UEFI setup utility.
2. BIOS/UEFI Configuration
- Boot Order: Configure your boot device priority to install your operating system.
- XMP Profile: If using high-speed RAM, enable the XMP (Extreme Memory Profile) for optimal memory performance. Caution: Enabling XMP with four RAM sticks may lead to system instability. It is generally more stable with two sticks.
- Intel Platform Trust Technology (PTT) / TPM: For Windows 11 compatibility, enable PTT in the BIOS. This functions as a firmware-based TPM 2.0. If using a discrete TPM module, ensure it is correctly installed and enabled.
- Integrated Graphics: If using a discrete graphics card and experiencing issues with NTFS formatted drives, consider disabling integrated graphics and enabling CSM (Compatibility Support Module) in the BIOS.
3. Driver Installation
After installing your operating system, install all necessary drivers from the ASUS support website or the included driver CD/USB. This includes chipset drivers, audio drivers, LAN drivers, and graphics drivers.
4. ProArt Creator Hub
The ProArt Creator Hub is a centralized software utility for monitoring and managing ASUS ProArt series products. Install it to optimize your content creation workflows, manage system settings, and monitor performance.
Maintenance
- Dust Removal: Regularly clean dust from your PC case and motherboard components using compressed air to prevent overheating.
- BIOS Updates: Periodically check the ASUS support website for BIOS updates. BIOS updates can improve stability, compatibility, and performance. Follow the instructions provided by ASUS carefully when updating the BIOS.
- Driver Updates: Keep your system drivers updated to ensure optimal performance and compatibility with new software and hardware.
Troubleshooting
- No Display Output:
- Ensure your monitor is connected to the correct graphics output (either integrated graphics or discrete graphics card).
- If using a discrete graphics card, ensure it is fully seated and has all necessary power connections.
- If using integrated graphics, ensure your CPU supports it.
- System Instability / Crashes:
- Check RAM seating and configuration. If using four RAM sticks with XMP, try disabling XMP or using only two sticks.
- Ensure CPU cooler is properly installed and making good contact.
- Verify all power connections are secure.
- M.2 / SATA Port Conflicts:
- Refer to the "Storage Device Installation" section and the full motherboard manual regarding M.2 slot usage and its impact on SATA port availability.
- Thunderbolt 3 / 10G LAN Card Conflicts:
- If Thunderbolt 3 is not functioning with the 10G LAN card installed, check the BIOS setting for 'PCIE connection to USB4' and ensure it's configured correctly, or consider the PCIe slot placement as mentioned in the "Expansion Card Installation" section.
- Windows 11 TPM Compatibility:
- Ensure Intel PTT is enabled in the BIOS for TPM 2.0 functionality.
Specifications
| Feature | Specification |
|---|---|
| Brand | ASUS |
| Model Name | ProART Z490-CREATOR 10G |
| CPU Socket | LGA 1200 |
| Compatible Processors | 10th Generation Intel Core |
| Chipset Type | Intel Z490 |
| RAM Memory Technology | DDR4 |
| Memory Clock Speed | 4700 MHz (Max) |
| Ram Memory Maximum Size | 128 GB |
| Memory Slots Available | 4 |
| Total SATA Ports | 6 |
| Total USB Ports | 9 (Rear I/O) + Front Panel Headers |
| Thunderbolt Ports | 2 x Thunderbolt 3 Type-C |
| LAN | 10G LAN Card, Onboard 2.5G Intel LAN |
| Graphics Card Interface | PCI Express |
| Total PCIe Ports | 16 (various slots) |
| Main Power Connector Type | 24-Pin |
| Platform | Windows 10 (Compatible with Windows 11) |
| Item Weight | 2.7 Pounds |
Warranty and Support
The ASUS ProArt Z490-CREATOR 10G motherboard comes with a 3-year warranty. For technical support, driver downloads, or further assistance, please visit the official ASUS support website. Always refer to the complete motherboard manual for detailed information and advanced configurations.