
MAG M27BS
MAG M27BS Headshell, Stylus, and Cartridge Instruction Manual
For Toshiba Turntables: SR-A270, SR-300, SR-220, SR-355, SR-Q660
Introduction
This manual provides instructions for the proper installation, operation, and maintenance of your MAG M27BS Black Tonearm Headshell with Moving Magnet Cartridge and Diamond Stylus. This unit is designed to be a complete, ready-to-use replacement or upgrade for compatible Toshiba turntable models, ensuring excellent sound quality and reliable tracking.
Safety Information
- Always handle the stylus with care to prevent damage. Avoid touching the stylus tip with your fingers.
- Ensure your turntable is powered off and unplugged before installing or removing the headshell.
- Keep the product out of reach of children.
- Do not attempt to disassemble the cartridge or stylus assembly.
Package Contents
Your package should contain the following items:
- 1 x MAG M27BS Black Tonearm Headshell with pre-installed Moving Magnet Cartridge and Diamond Stylus.
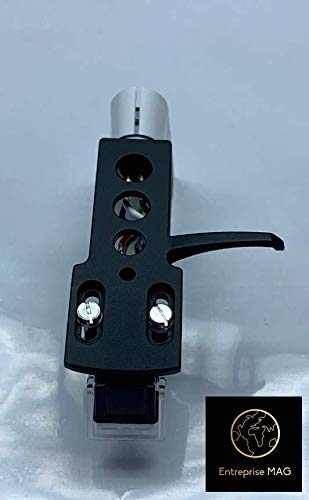
Image: Top-down view of the MAG M27BS headshell assembly. This image shows the black headshell with the blue cartridge body and the stylus protector in place. The four color-coded wires for connection are visible at the back.
Setup
The MAG M27BS is a complete unit, ready for installation. Follow these steps to properly install and set up your new headshell and cartridge.
1. Attaching the Headshell to the Tonearm
- Ensure your turntable is powered off and unplugged.
- Carefully remove your existing headshell (if any) by unscrewing the locking collar at the tonearm's end and gently pulling it straight out.
- Align the MAG M27BS headshell with the tonearm. The pins on the headshell should match the receptacles on the tonearm.
- Gently push the headshell into the tonearm socket until it is fully seated.
- Tighten the locking collar clockwise until the headshell is secure. Do not overtighten.

Image: Side view of the MAG M27BS headshell. This image highlights the four color-coded wires (red, green, white, blue) connecting the cartridge to the headshell's output pins, which connect to the tonearm.
2. Balancing the Tonearm
Proper tonearm balance is crucial for optimal sound and to prevent record and stylus wear.
- Ensure the anti-skate control (if present on your turntable) is set to zero.
- Lower the tonearm lift.
- Carefully rotate the counterweight at the rear of the tonearm until the tonearm floats freely and horizontally above the platter. It should not dip down or rise up.
- Once balanced, lock the tonearm in its rest.
3. Setting the Tracking Force
The recommended tracking force for the MAG M27BS cartridge is 3.0 grams, with a range of 2.5 to 3.5 grams.
- With the tonearm balanced and locked, locate the tracking force scale on the counterweight or tonearm.
- Rotate the numbered ring on the counterweight (without moving the counterweight itself) until the "0" aligns with the center line on the tonearm.
- Now, rotate the entire counterweight (including the numbered ring) counter-clockwise until the desired tracking force (e.g., "3.0") aligns with the center line.
- If your turntable has a separate tracking force gauge, use that to set the force to 3.0 grams.
4. Anti-Skate Adjustment
Set the anti-skate control on your turntable to match the tracking force you just set (e.g., if tracking force is 3.0g, set anti-skate to 3). This helps prevent the stylus from pulling towards the center of the record.
Operating
Playing a Record
- Place a record on the turntable platter.
- Remove the stylus protector from the cartridge by gently pulling it forward.
- Unlock the tonearm from its rest.
- Use the tonearm lift lever to raise the tonearm.
- Carefully position the tonearm over the desired starting groove of the record.
- Gently lower the tonearm lift lever to allow the stylus to descend onto the record.
- At the end of the record, use the tonearm lift lever to raise the tonearm, then return it to its rest and lock it.
- Always replace the stylus protector when the turntable is not in use.
Maintenance
Stylus Cleaning
A clean stylus is essential for optimal sound quality and to prolong the life of your records and stylus.
- Use a soft stylus brush, specifically designed for this purpose.
- Always brush from the back of the stylus towards the front, never side-to-side or front-to-back.
- For stubborn dirt, a specialized stylus cleaning fluid can be used sparingly, following the fluid manufacturer's instructions.
General Cleaning
Wipe the headshell body with a soft, dry, lint-free cloth. Avoid using harsh chemicals or abrasive materials.
Troubleshooting
| Problem | Possible Cause | Solution |
|---|---|---|
| No sound or weak sound | Loose connections, incorrect input selected on amplifier, damaged stylus. | Ensure headshell is securely attached to tonearm. Check amplifier input. Inspect stylus for damage. |
| Distorted sound | Dirty stylus, incorrect tracking force, damaged stylus. | Clean stylus. Re-adjust tracking force. Inspect stylus for damage. |
| Skipping or jumping | Incorrect tracking force, anti-skate setting, dirty record, damaged record, damaged stylus. | Adjust tracking force and anti-skate. Clean record. Inspect stylus. |
Specifications
- Type: Moving Magnetic Cartridge (MM)
- Model: M27BS
- Stylus Tip: Stereo Spherical Diamond Tip
- Output Voltage (at 1kHz, 5 cm/sec): 5.5 mV ± 3dB
- Channel Balance (at 1kHz): Below 1 dB
- Channel Separation (at 1kHz): More than 15 dB
- Frequency Response: 20 ~ 20,000 Hz
- Tracking Force: 3.0g (recommended range: 2.5 ~ 3.5g)
- Headshell Color: Black
- Cartridge Color: Blue
- Compatibility: Toshiba SR-A270, SR-300, SR-220, SR-355, SR-Q660 turntables
Warranty and Support
This MAG M27BS headshell and cartridge unit comes with a 6-month warranty from the date of purchase, covering manufacturing defects. Additionally, a 14-day "any reason" return policy is offered. For support or warranty claims, please contact your retailer or the manufacturer directly.
Please retain your proof of purchase for warranty purposes.
Ask a question about this manual
Ask about setup, troubleshooting, compatibility, parts, safety, or missing instructions. Manuals+ will review the question and use this page’s manual context to help answer it.