
Introduction
Thank you for choosing the Barista Coffee Maker Mahlwerk. This appliance is designed to provide you with fresh, aromatic coffee using either whole beans or ground coffee. Please read this manual carefully before first use to ensure safe operation and optimal performance.
Safety Instructions
- Always connect the appliance to a grounded power outlet.
- Do not immerse the appliance, power cord, or plug in water or other liquids.
- Keep the appliance out of reach of children.
- Do not operate the appliance if the power cord or plug is damaged.
- Ensure the thermal jug is properly placed before brewing to prevent spills.
- The heating plate remains hot after brewing; avoid touching it directly.
- Unplug the appliance before cleaning and when not in use.
- Use only original accessories and spare parts.
Product Components
Familiarize yourself with the parts of your Barista Coffee Maker Mahlwerk:

1 - Filter Lid, 2 - Permanent Filter, 3 - Filter Holder, 4 - Coffee Bean Container Lid, 5 - Grinder, 6 - LCD Display, 7 - Thermal Jug, 8 - Coffee Scoop.
- Coffee Bean Container: For storing whole coffee beans.
- Grinder: Integrated conical grinder for fresh grinding.
- Water Tank: With water level indicator.
- Filter Holder: Holds the permanent filter or paper filter.
- Thermal Jug: Stainless steel jug to keep coffee warm.
- Control Panel: With LCD display and buttons for settings.
- Heating Plate: Keeps the thermal jug warm after brewing.
Setup
- Unpacking: Carefully remove all packaging materials. Check for any damage.
- First Cleaning: Before first use, clean all removable parts (thermal jug, filter holder, permanent filter) with warm soapy water. Wipe the main unit with a damp cloth.
- Positioning: Place the coffee maker on a stable, flat, heat-resistant surface, away from water sources and heat.
- Power Connection: Plug the power cord into a grounded electrical outlet.
- Initial Rinse Cycle: Fill the water tank with cold water to the maximum level. Do not add coffee. Run a brewing cycle to clean the internal components. Discard the water. Repeat this process once or twice.
Operating Instructions
Brewing Coffee from Whole Beans
- Fill Water Tank: Open the water tank lid and fill with fresh, cold water up to the desired number of cups indicated on the water level indicator.
- Add Coffee Beans: Open the lid of the coffee bean container (4) and add the desired amount of whole coffee beans. Close the lid securely.
- Insert Filter: Place the permanent filter (2) into the filter holder (3). Ensure it is correctly seated.
- Set Grind Level: Use the grind level adjustment knob (part of 5) to select your desired grind fineness. A finer grind results in stronger coffee.
- Place Thermal Jug: Ensure the thermal jug (7) is correctly positioned on the heating plate.
- Start Brewing: Press the "Start/Stop" button. The appliance will begin grinding the beans and then brewing the coffee.

The conical grinder allows for individual aroma strength adjustment. Choose between whole beans or pre-ground coffee.
Brewing Coffee from Ground Coffee
- Fill Water Tank: Follow step 1 from "Brewing Coffee from Whole Beans".
- Add Ground Coffee: Place the permanent filter (2) into the filter holder (3). Add the desired amount of ground coffee directly into the permanent filter. Do not add ground coffee to the bean container.
- Disable Grinder: Press the "Mahlwerk Aus" (Grinder Off) button on the control panel (6) to bypass the grinding function.
- Place Thermal Jug: Ensure the thermal jug (7) is correctly positioned on the heating plate.
- Start Brewing: Press the "Start/Stop" button. The appliance will begin brewing the coffee.
Using the 24-Hour Timer
The 24-hour timer allows you to program the coffee maker to start brewing at a specific time.

Set the desired brewing time using the LCD display for perfect coffee at your preferred moment.
- Prepare Coffee Maker: Follow steps 1-5 for brewing whole beans or steps 1-4 for ground coffee.
- Set Current Time: If not already set, adjust the current time on the LCD display using the "Std" (Hour) and "Min" (Minute) buttons.
- Set Programmed Time: Press the "Timer" button. The display will show "PROG". Use the "Std" and "Min" buttons to set the desired start time for brewing.
- Activate Timer: Press the "Timer" button again to confirm the programmed time. The timer indicator will light up. The coffee maker will start brewing automatically at the set time.
Keep Warm Function
After the brewing cycle is complete, the heating plate will automatically keep the coffee warm for approximately 30 minutes. After this period, the appliance will switch off automatically for safety and energy saving.

The heating plate keeps your coffee warm for an extended period after brewing.
Maintenance and Cleaning
Regular cleaning ensures optimal performance and extends the lifespan of your coffee maker.
- Unplug: Always unplug the appliance from the power outlet before cleaning.
- Clean Removable Parts: Remove the thermal jug, filter holder, and permanent filter. Wash them with warm water and a mild detergent. Rinse thoroughly and dry.
- Clean Grinder and Bean Chamber: The removable lid and large opening allow for easy cleaning of the coffee bean chamber and integrated grinder. Use a brush to remove coffee residues.
- Wipe Main Unit: Wipe the exterior of the coffee maker with a soft, damp cloth. Do not use abrasive cleaners or immerse the main unit in water.
- Descaling: Depending on water hardness, descaling may be necessary every 2-3 months. Use a commercial descaling agent suitable for coffee makers and follow the manufacturer's instructions. Run several rinse cycles with clear water after descaling.
- Dishwasher Safety: The appliance and its parts are NOT dishwasher safe.

The reusable permanent filter is washable and environmentally friendly.
Troubleshooting
| Problem | Possible Cause | Solution |
|---|---|---|
| Coffee does not brew. | No water in tank; appliance not plugged in; "Start/Stop" button not pressed. | Fill water tank; check power connection; press "Start/Stop" button. |
| Coffee is too weak/strong. | Incorrect coffee-to-water ratio; grind level too coarse/fine. | Adjust coffee amount; adjust grind level (finer for stronger, coarser for weaker). |
| Grinder not working. | "Mahlwerk Aus" (Grinder Off) button pressed; bean container empty; grinder clogged. | Ensure grinder is enabled; fill bean container; clean grinder. |
| Coffee overflows from filter. | Too much coffee; filter clogged; filter not seated correctly. | Reduce coffee amount; clean filter; ensure filter is properly inserted. |
| Timer not activating. | Timer not set correctly; timer not activated after setting. | Review timer setting steps; ensure timer indicator is lit. |
If the problem persists after attempting these solutions, please contact customer support.
Specifications
| Brand | Barista Kaffee & Technik |
| Model Name | Mahlwerk |
| Capacity | 1 Liter (up to 10 cups) |
| Power | 1000 W |
| Dimensions (D x W x H) | 26.5 cm x 22 cm x 43 cm |
| Weight | 5.7 kg |
| Material | Aluminum, Stainless Steel (thermal jug) |
| Coffee Type | Whole Beans, Ground Coffee |
| Filter Type | Reusable Permanent Filter |
| Special Features | Adjustable Conical Grinder, 24-Hour Timer, Keep Warm Function (30 min), Drip Stop, Automatic Shut-off. |
| Dishwasher Safe | No |
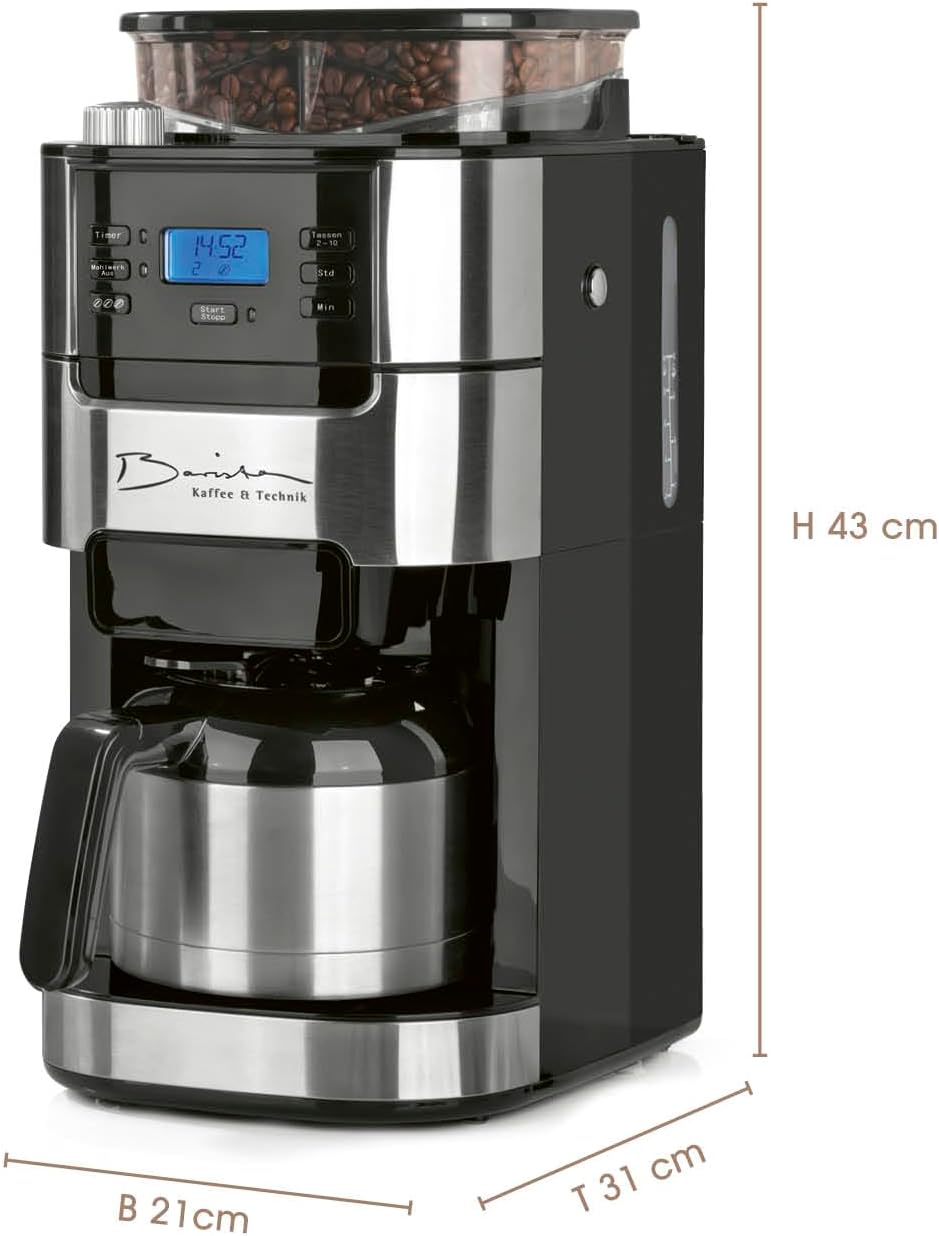
Dimensions: Height 43 cm, Width 22 cm, Depth 26.5 cm.
Warranty and Support
This product comes with a standard manufacturer's warranty. For warranty claims or technical support, please refer to the contact information provided with your purchase documentation or visit the official Barista Kaffee & Technik website. Please have your model number (Mahlwerk) and proof of purchase ready when contacting support.