
1. Introduction
This manual provides detailed instructions for the assembly, operation, and programming of the Adeept 5DOF Robotic Arm Kit. Designed for enthusiasts and students, this kit offers an engaging platform for learning robotics and programming concepts compatible with Arduino IDE. Please read this manual thoroughly before beginning assembly or operation to ensure proper functionality and safety.

Figure 1.1: The Adeept 5DOF Robotic Arm Kit assembled and holding a ball.
2. Product Overview
2.1 Key Features
- Programming & Robotics Education: Developed for robot enthusiasts, compatible with Arduino IDE. Includes a detailed PDF manual and various Arduino code routines.
- Versatile Control Methods: Supports Manual Control via potentiometer knobs on the driver board and Remote Control using graphical processing-based PC software.
- Multiple Operational Modes: Features self-learning, drawing, and imitating capabilities.
- Digital Assembly Guides: Comprehensive PDF tutorials are provided. The download link is located on the product packaging.
2.2 Components (Packing List)
The Adeept 5DOF Robotic Arm Kit includes the following components:
- Adeept Robotic Arm Drive Board x1
- OLED Display x1
- Ribbon Cable x1
- 18650 Battery Holder x1 (Note: 18650 batteries are not included and must be supplied separately)
- Servo Motors x6
- Extension Cable for Servo x1
- USB Cable x1
- Large Cross-head Screwdriver x1
- Small Cross-head Screwdriver x1
- Cross Socket Wrench x1
- Sucking Disc x4
- Various M2 and M3 Screws, Nuts, Copper Standoffs, and Nylon Standoffs
- Acrylic Parts for the robotic arm structure
- Bearing Turntable x1

Figure 2.1: Detailed view of the components included in the Adeept 5DOF Robotic Arm Kit.
3. Setup and Assembly
Assembly of the Adeept 5DOF Robotic Arm Kit requires careful attention to detail. Follow the provided digital assembly guides for step-by-step instructions.
3.1 Accessing Assembly Guides
The complete PDF tutorials, totaling 270 pages, are available digitally. Locate the download address on the product packaging box to access these resources. These guides include detailed diagrams and instructions for building the robotic arm.

Figure 3.1: Example pages from the comprehensive PDF tutorials and code resources.
3.2 Important Assembly Notes
- Battery Requirement: The kit requires 2x18650 batteries for operation, which are not included. Ensure you have these batteries and a compatible charger before proceeding.
- Servo Priming: It is recommended to 'prime' the servo motors to a 90-degree angle before attaching the rocker-arms and other structural components. This ensures correct alignment as per the instructions. Refer to the assembly video or specific tutorial sections for guidance on this step.
- Part Verification: Before starting assembly, perform an inventory check of all parts against the packing list to ensure no components are missing.
- Tool Usage: Use the provided screwdrivers and wrench carefully. Some parts, especially small screws and nuts, require finesse during assembly.
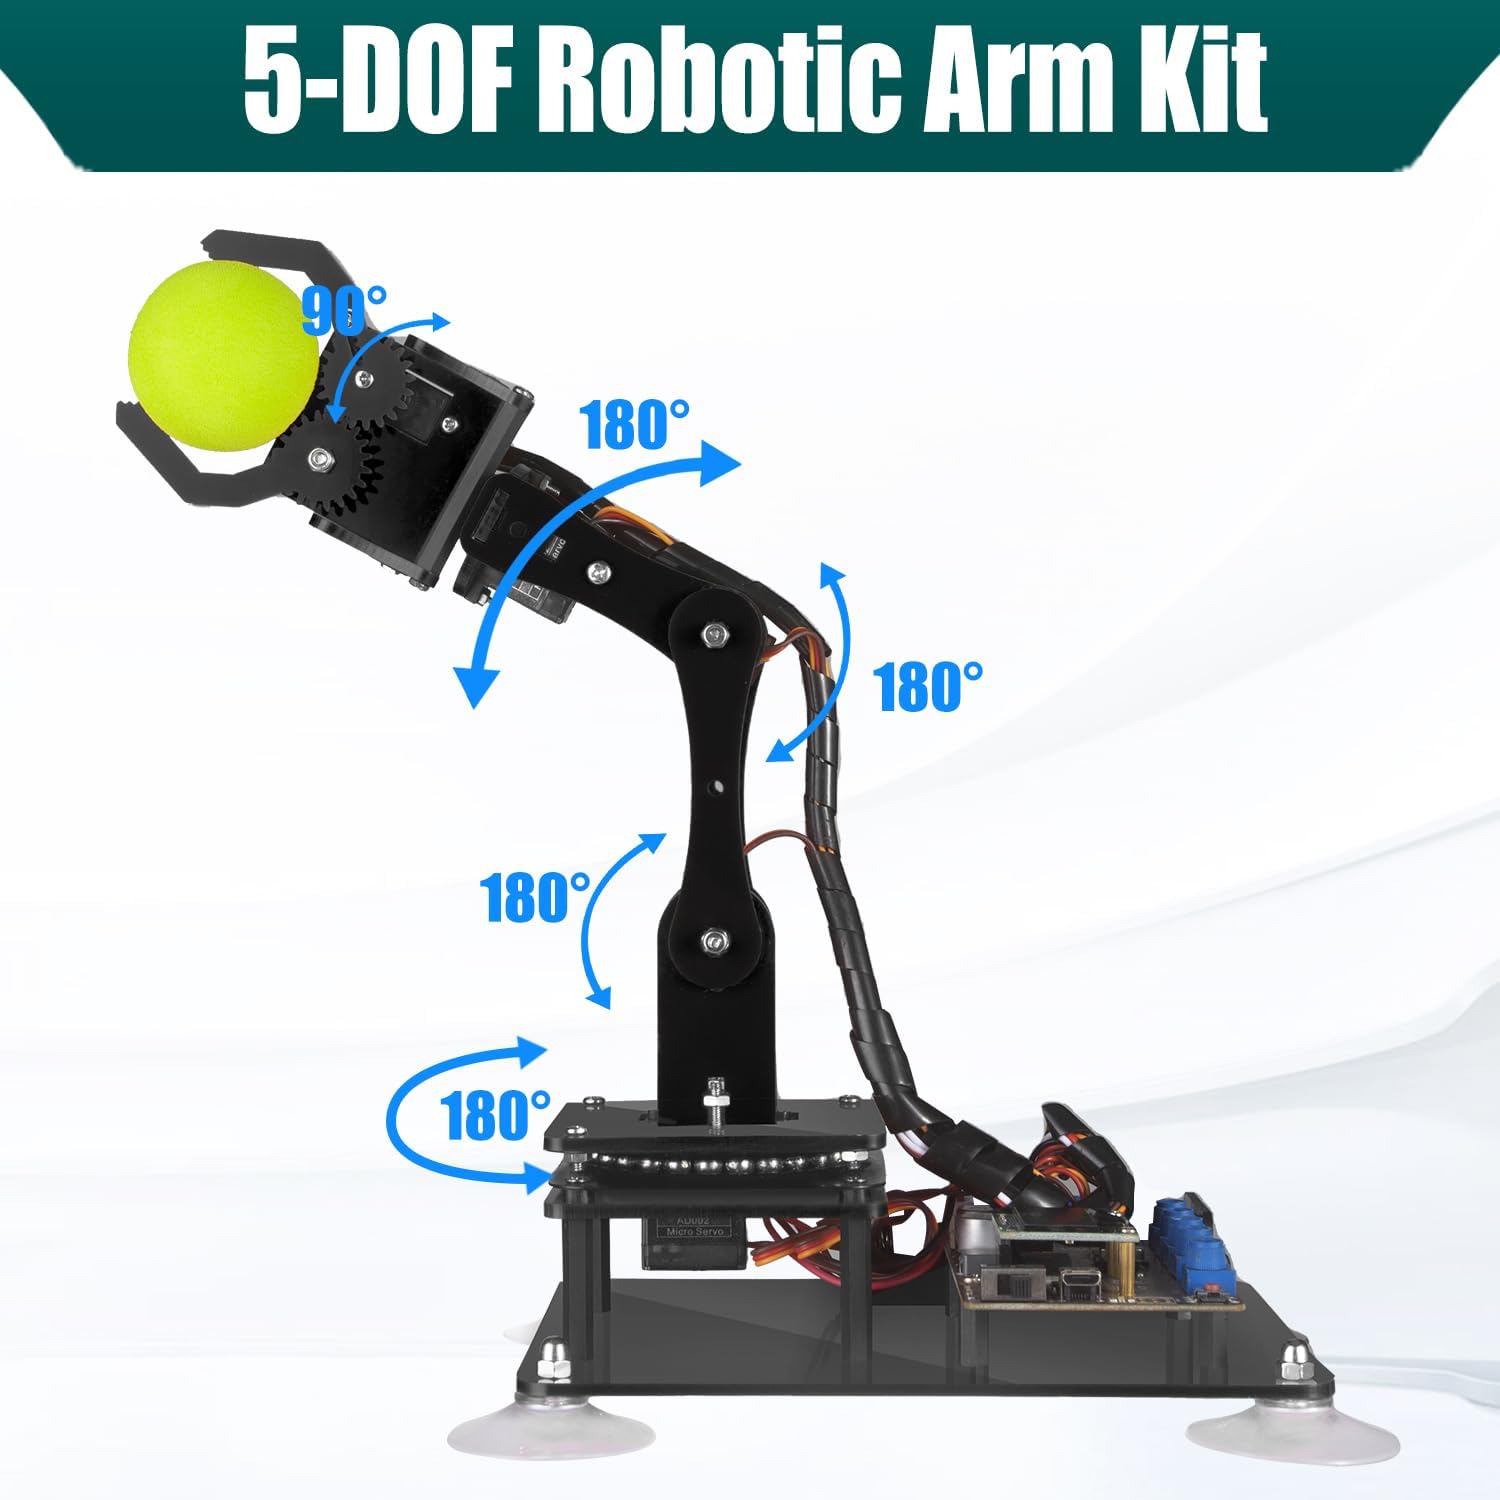
Figure 3.2: Illustration of the 5-DOF (Degrees of Freedom) robotic arm, indicating the range of motion for each axis.
4. Operating Instructions
The Adeept 5DOF Robotic Arm Kit offers multiple methods for control and various operational modes.
4.1 Control Methods
- Manual Control: The robotic arm can be controlled directly by rotating the potentiometer knobs located on the driver board. This method allows for immediate, hands-on manipulation of each axis.
- Remote Control (PC Software): Utilize the graphical processing-based PC software to control the robotic arm remotely. This method provides a visual interface for commanding the arm's movements.

Figure 4.1: Overview of the multi-function control modes, including PC software, handle control (potentiometers), and mouse control.
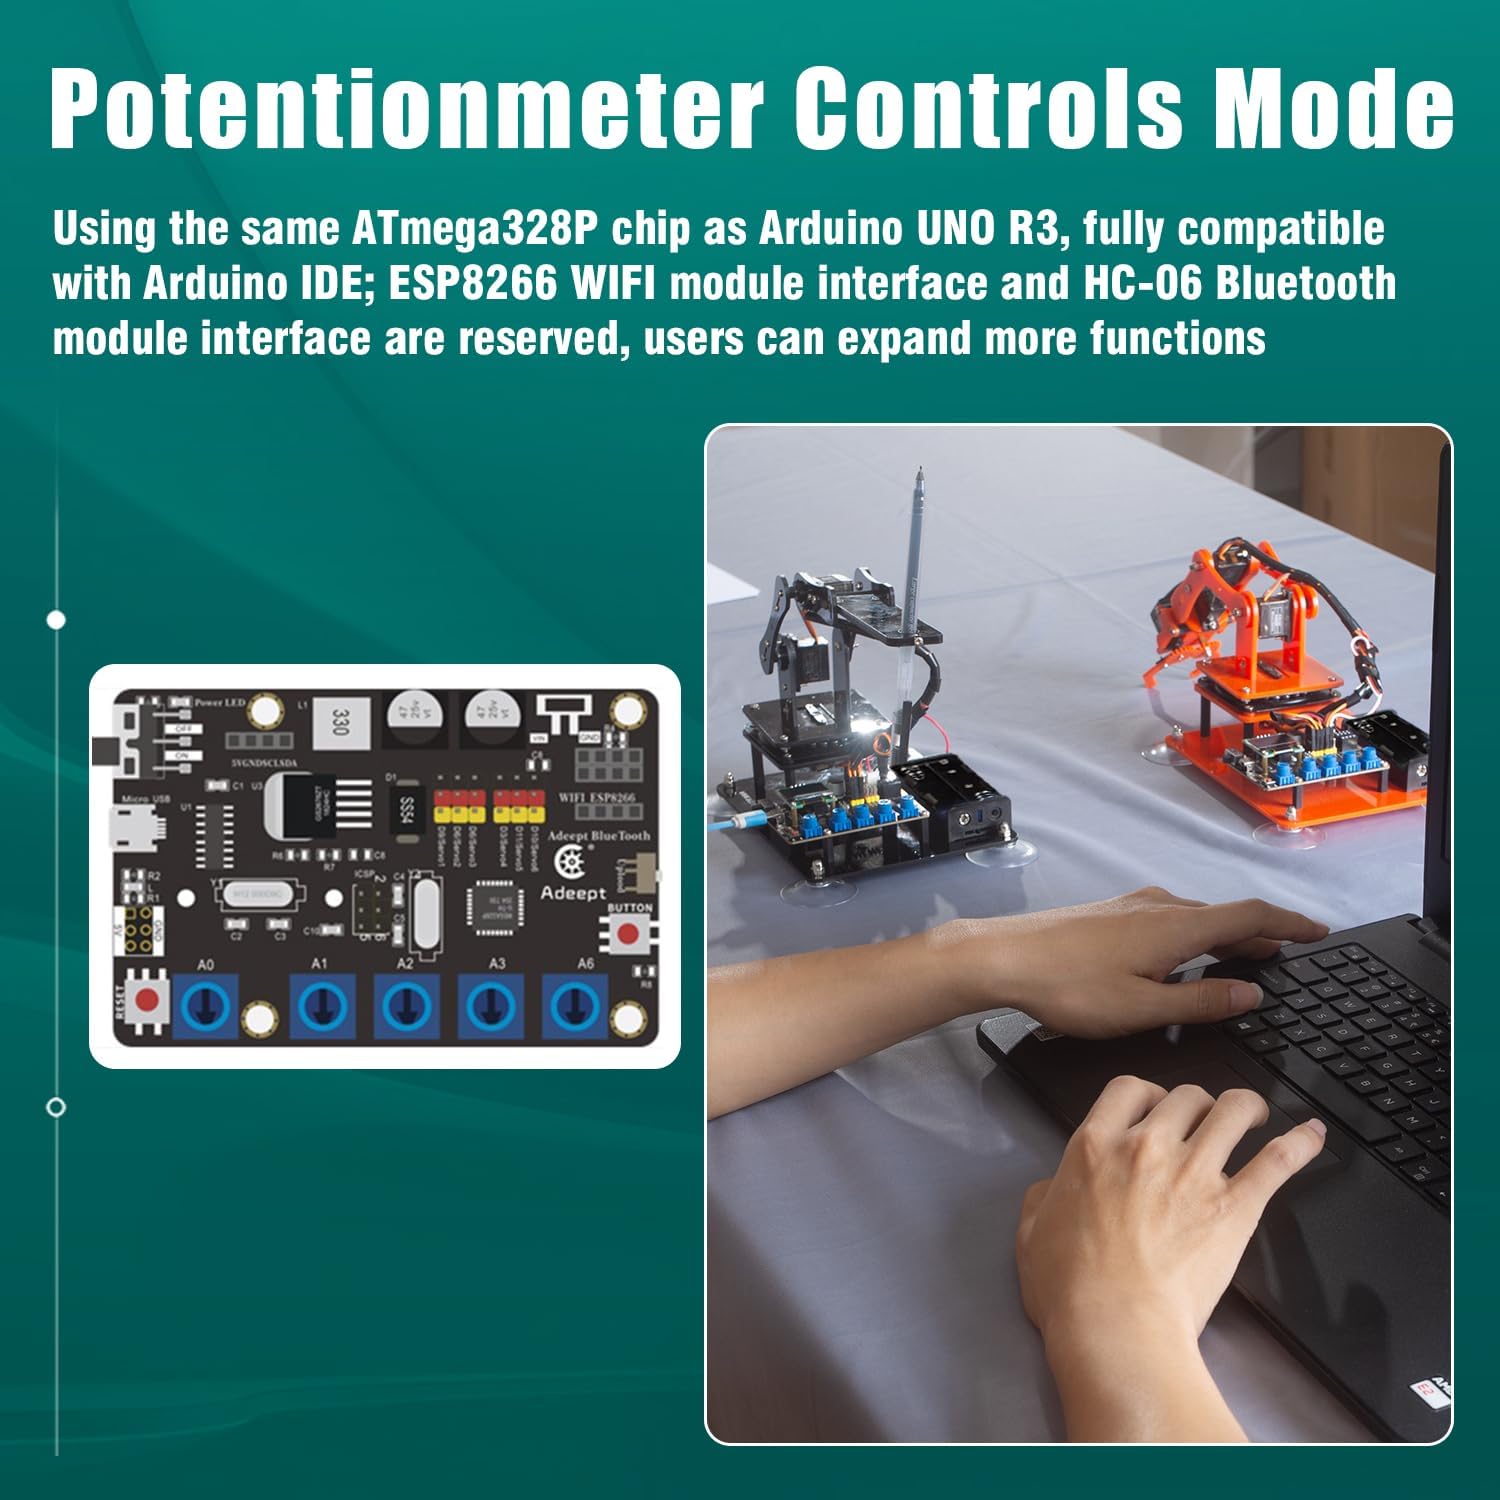
Figure 4.2: Demonstrates manual control using the potentiometer knobs on the driver board.
4.2 Operational Modes
The robotic arm supports several distinct operational modes:
- Learning Mode: Write code to control the robotic arm to perform specific motions. By pressing a key on the computer, the robotic arm executes the programmed commands.
- Drawing Board Mode: Draw a shape on a computer interface, and the robotic arm will replicate the same shape on paper.
- Memory Mode: Press the red button briefly to record the arm's movements. After all steps are recorded, press the red button for approximately 3 seconds, and the arm will repeat the recorded sequence.
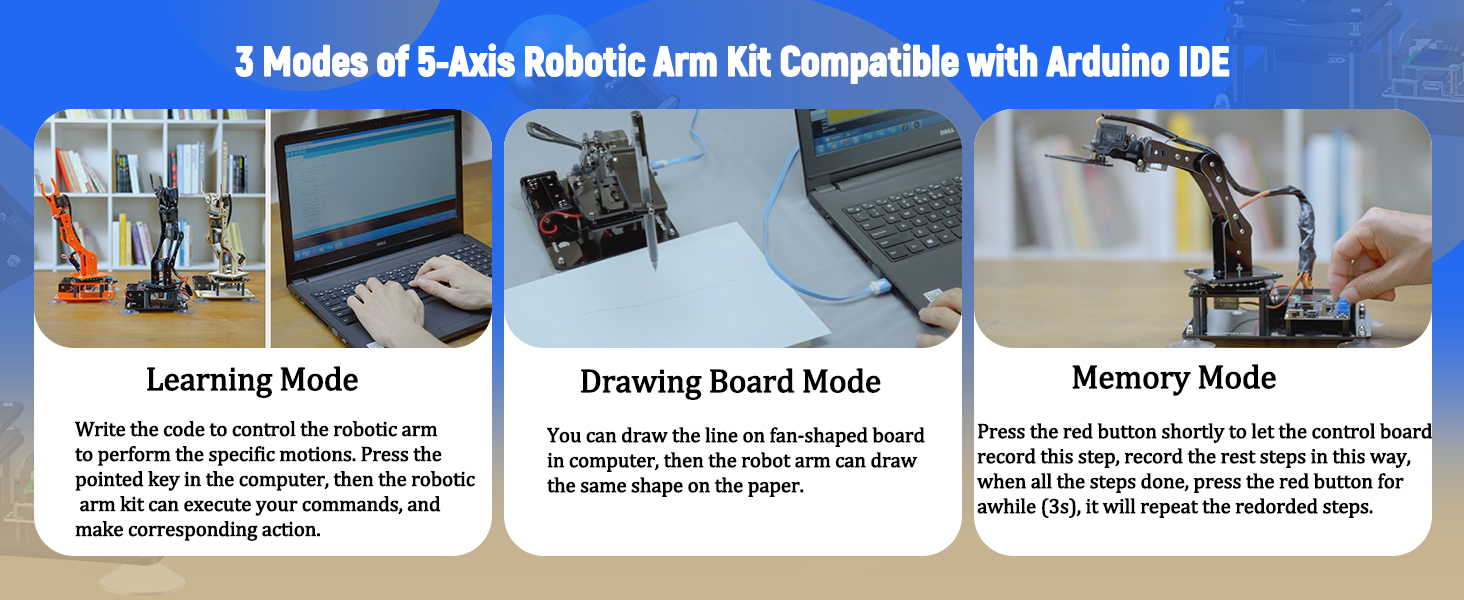
Figure 4.3: Visual representation of the Learning, Drawing, and Memory modes of the robotic arm.

Figure 4.4: The robotic arm demonstrating capabilities such as controlling computer typing, painting, and moving objects.
5. Programming
The Adeept 5DOF Robotic Arm Kit is fully compatible with the Arduino IDE, making it an excellent tool for learning programming.
5.1 Arduino IDE Compatibility
The kit's control board utilizes the ATmega328P chip, similar to Arduino UNO R3, ensuring full compatibility with the Arduino IDE. This allows users to write and upload custom code to control the robotic arm.

Figure 5.1: The robotic arm alongside an Arduino IDE interface, demonstrating its programming compatibility.
5.2 Provided Code and Tutorials
A variety of interesting Arduino code routines (C/C++ and Processing) are provided with the kit. These routines serve as examples and starting points for users to explore and develop their own programs. The detailed PDF manual includes guidance on using these codes.
5.3 Expanding Functionality
The control board includes reserved interfaces for an ESP8266 WiFi module and an HC-06 Bluetooth module, allowing users to expand the robotic arm's functions with wireless communication capabilities.
6. Maintenance
Regular maintenance ensures the longevity and optimal performance of your Adeept 5DOF Robotic Arm Kit.
- Cleaning: Keep the robotic arm and its components clean and free from dust and debris. Use a soft, dry cloth for cleaning. Avoid using liquids directly on electronic components.
- Connection Checks: Periodically inspect all wire connections to ensure they are secure. Loose connections can lead to erratic behavior or non-functionality.
- Structural Integrity: Check for any loose screws or acrylic parts. Tighten as necessary, but avoid over-tightening, which could damage the acrylic.
- Servo Care: Avoid forcing the robotic arm's joints manually, as this can damage the internal gears of the servo motors.
7. Troubleshooting
This section addresses common issues that may arise during the assembly or operation of the robotic arm.
7.1 Common Issues and Solutions
- Missing or Incorrect Hardware: If you find any screws or other small parts missing or incorrect, first check your workspace thoroughly. If parts are genuinely missing, contact Adeept technical support.
- Servos Not Moving Correctly: Ensure all servo connections are correct and secure. Verify that the servos were primed to the correct angle during assembly. Incorrect priming can lead to limited or incorrect movement.
- Power Issues: Confirm that 2x18650 batteries are correctly installed and sufficiently charged. Alternatively, ensure the Micro USB power source is providing adequate power.
- Programming Errors (Arduino IDE): If you encounter compilation errors in Arduino IDE, ensure all necessary libraries are installed. For example, for "#include <Adafruit_GFX.h>", go to Tools > Manage Libraries and search for "Adafruit GFX Library" to install it.
- Software/Driver Problems: If using the CH340 chip for USB communication, you may need to install specific drivers. Some users report that the driver might interfere with Arduino files; restarting the Arduino IDE or your computer may resolve this.
7.2 Technical Support
If you encounter any technical problems that cannot be resolved using this manual, please send an email to Adeept technical support. Responses are typically provided within 24 hours.
8. Specifications
| Specification | Detail |
|---|---|
| Product Dimensions | 8.8 x 6.3 x 2.3 inches |
| Item Weight | 1.5 pounds |
| Model Number | ADA031 |
| Manufacturer | Adeept |
| Recommended Age | 14 years and up |
| Control Board | ATmega328P (Arduino UNO R3 compatible) |
| Degrees of Freedom (DOF) | 5 |
| Power Supply | Micro USB or 2x18650 batteries (not included) |
| Connectivity | Reserved ESP8266 WiFi and HC-06 Bluetooth module interfaces |
9. Warranty and Support
Adeept is committed to providing quality products and support. For any technical issues or inquiries regarding your Adeept 5DOF Robotic Arm Kit, please contact our technical support team via email. We aim to respond to all inquiries within 24 hours.
Please retain your proof of purchase for any warranty claims or support requests.