
1. Introduction
Thank you for choosing the Homlee 5-in-1 Planetary Stand Mixer. This versatile kitchen appliance is designed to simplify various food preparation tasks, offering functions such as mixing, kneading, blending, meat grinding, and vegetable chopping. Please read this manual carefully before first use to ensure safe and optimal operation of your appliance.

Image 1.1: The Homlee 5-in-1 Planetary Stand Mixer with its primary attachments.
2. Important Safety Instructions
Always follow basic safety precautions when using electrical appliances to reduce the risk of fire, electric shock, and/or injury to persons, including the following:
- Read all instructions before operating the appliance.
- Do not immerse the motor unit in water or other liquids.
- Keep hands, hair, and clothing, as well as spatulas and other utensils, away from moving parts during operation to prevent injury.
- Unplug from outlet when not in use, before putting on or taking off parts, and before cleaning.
- Do not operate any appliance with a damaged cord or plug, or after the appliance malfunctions or has been dropped or damaged in any manner.
- The use of attachments not recommended or sold by the manufacturer may cause fire, electric shock, or injury.
- Do not use outdoors.
- Do not let cord hang over edge of table or counter.
- Do not let cord contact hot surfaces.
- This appliance is for household use only.
- Ensure the appliance is placed on a stable, flat, and dry surface during operation.
- Always ensure the tilt-head is securely locked before operation.
- Do not overload the appliance. Refer to the maximum capacities for each function.
3. Product Components
Familiarize yourself with the various parts of your Homlee 5-in-1 Planetary Stand Mixer.

Image 3.1: Labeled components of the Homlee Stand Mixer and its accessories.
3.1 Main Unit
- Motor Base: Contains the motor, speed control dial, and power cord.
- Tilt-Head: Allows access to the mixing bowl and attachment points. Features a tilt lock.
- Mixing Bowl Platform: Secures the stainless steel mixing bowl.
- Attachment Ports:
- Front Output Shaft: For meat grinder and vegetable chopper.
- Top Output Shaft: For the blender.
- Planetary Mixing Head: For whisk, beater, and dough hook.
3.2 Accessories
- 5.5L Stainless Steel Mixing Bowl: For mixing, kneading, and beating.
- Dough Hook: For heavy mixtures like bread dough and pizza dough.
- Beater (Mixing Attachment): For medium-heavy mixtures like cake batter, mashed potatoes, and salads.
- Whisk: For light mixtures like whipped cream, egg whites, and light batters.
- Splash Guard: Prevents splashing during mixing.
- Meat Grinder Attachment: Includes various grinding plates (fine, medium, coarse) and a food pusher.
- Sausage Stuffer Kit: Funnels and attachments for making sausages.
- 1.5L Blender Jar: For blending liquids, smoothies, and crushing ice.
- Vegetable Chopper/Slicer/Shredder Attachment: Includes 3 interchangeable blades for slicing, coarse shredding, and fine shredding.
- Spatula: For scraping the bowl.
- Egg White Separator: For separating egg yolks from whites.
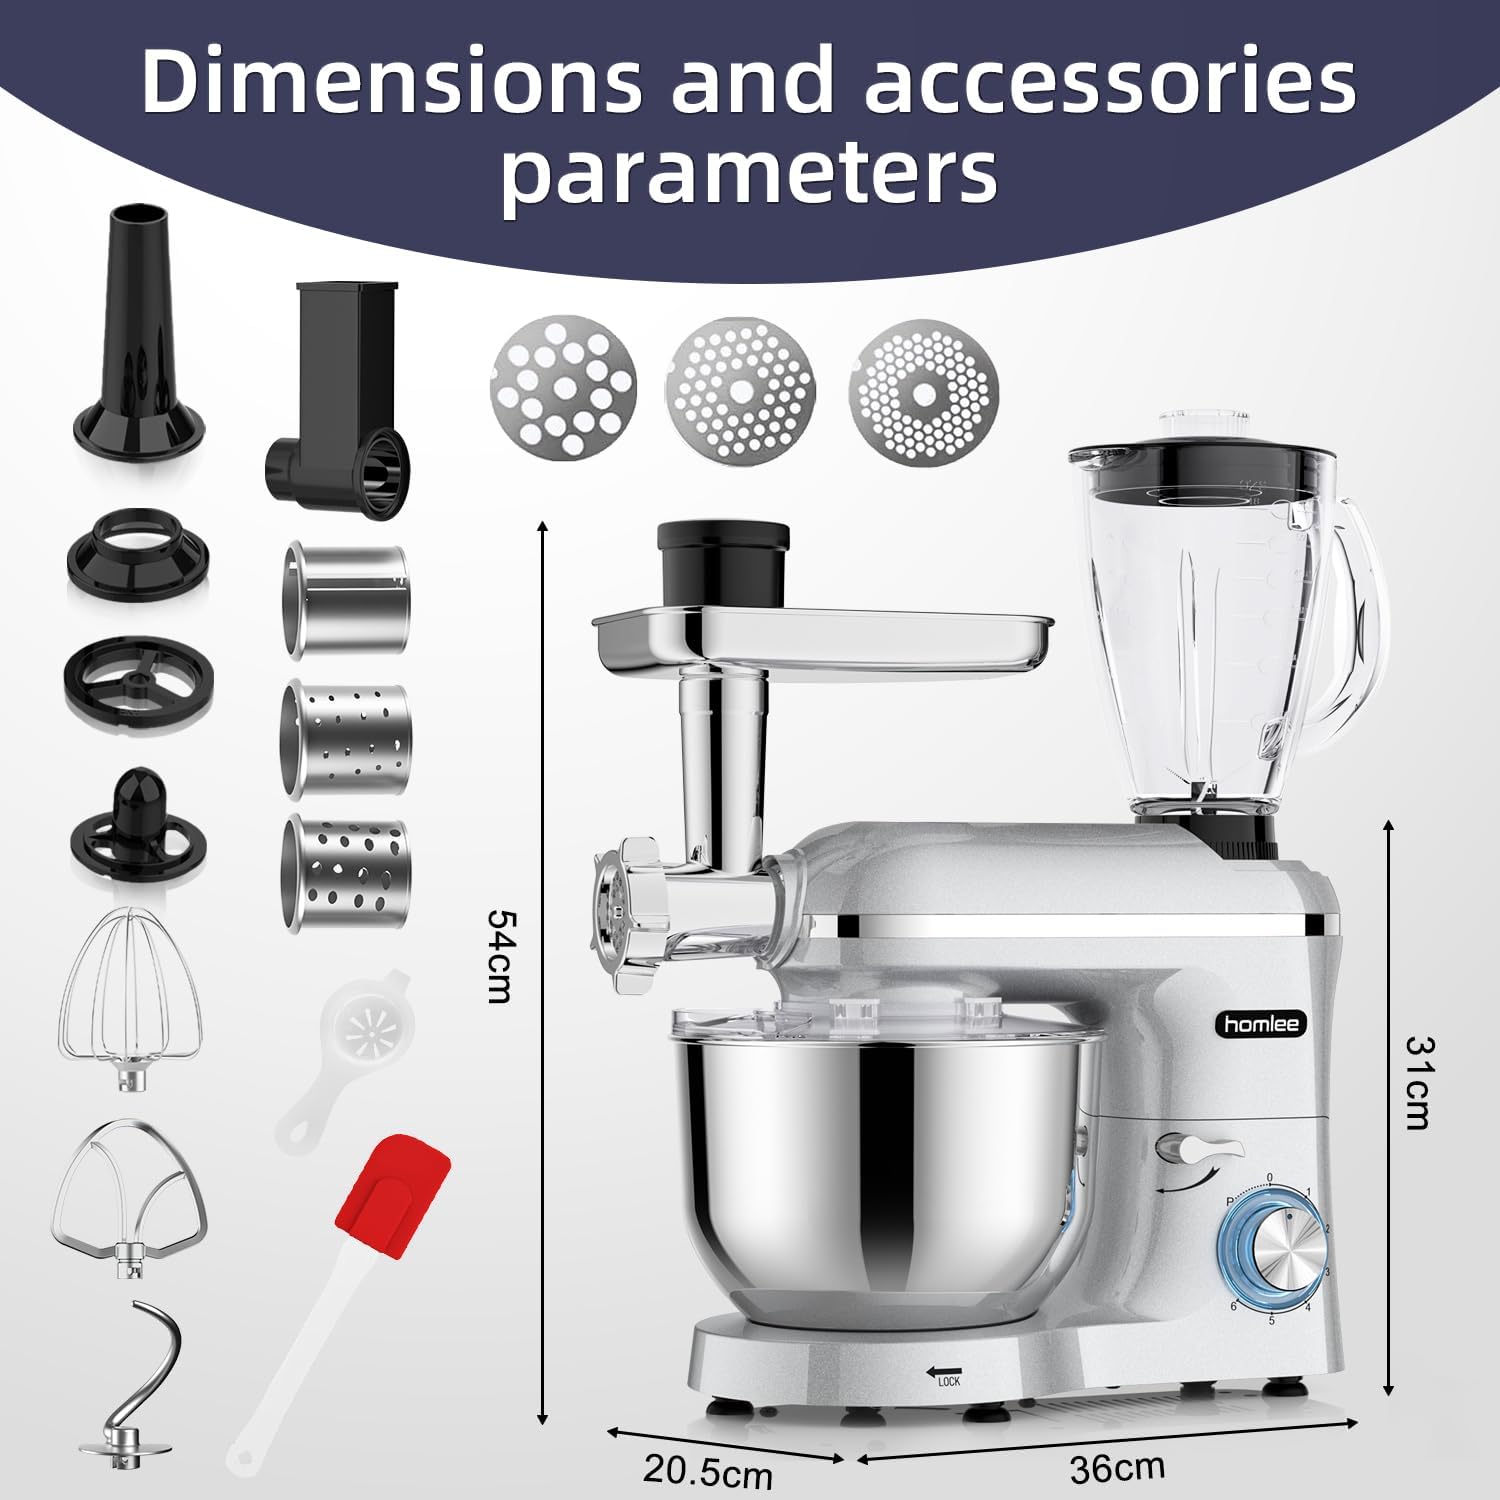
Image 3.2: Dimensions and complete set of accessories.
4. Setup and Assembly
Before first use, clean all parts that will come into contact with food as described in the "Cleaning and Maintenance" section.
4.1 Assembling the Stand Mixer for Mixing
- Ensure the appliance is unplugged.
- Press the tilt-head release button and lift the motor head.
- Place the stainless steel mixing bowl onto the base, turning it clockwise until it locks securely.
- Attach the desired accessory (dough hook, beater, or whisk) by pushing it upwards into the planetary shaft and turning it slightly until it clicks into place.
- Lower the tilt-head until it locks into position.
- If desired, attach the splash guard to the mixing bowl.

Image 4.1: The 5.5L stainless steel mixing bowl with whisk attachment.
4.2 Assembling the Meat Grinder
- Ensure the appliance is unplugged.
- Assemble the meat grinder components: feed screw, cutting blade, grinding plate (choose desired coarseness), and retaining ring.
- Remove the cover from the front output shaft of the mixer.
- Insert the assembled meat grinder into the front output shaft and turn the locking knob clockwise to secure it.
- Place the feeding tray on top of the meat grinder.

Image 4.2: The meat grinder attachment with various grinding plates.
4.3 Assembling the Blender
- Ensure the appliance is unplugged.
- Ensure the blender jar is properly assembled with its blade and lid.
- Remove the cover from the top output shaft of the mixer.
- Place the blender jar onto the top output shaft, aligning the grooves, and turn clockwise to lock it in place.

Image 4.3: The 1.5L blender attachment.
4.4 Assembling the Vegetable Chopper/Slicer/Shredder
- Ensure the appliance is unplugged.
- Insert the desired blade (slicing, coarse shredding, or fine shredding) into the chopper housing.
- Remove the cover from the front output shaft of the mixer (same as meat grinder port).
- Insert the assembled vegetable chopper into the front output shaft and turn the locking knob clockwise to secure it.

Image 4.4: The vegetable chopper attachment with interchangeable blades.
5. Operating Instructions
Always ensure the appliance is properly assembled and locked before plugging it in and operating.
5.1 General Operation
- Plug the appliance into a suitable power outlet (220V).
- Turn the speed control dial to the desired setting (1-6).
- For quick bursts of power, use the Pulse function.
- To stop, turn the speed control dial to '0' and unplug the appliance.
5.2 Mixing, Kneading, and Beating
Use the appropriate attachment for your recipe:
- Dough Hook (Speeds 1-3): For heavy doughs like bread, pizza, and pasta. Start at a low speed and gradually increase.
- Beater (Speeds 3-4): For medium-heavy mixtures such as cakes, cookies, frostings, and mashed potatoes.
- Whisk (Speeds 5-6): For light mixtures like whipped cream, egg whites, and light batters.

Image 5.1: Recommended speeds for different mixing attachments.
5.3 Meat Grinding
- Prepare meat by cutting it into small pieces that fit into the feeding tube. Remove bones, gristle, and excessive fat.
- Place a bowl under the grinder outlet to collect minced meat.
- Turn the speed dial to a medium setting (e.g., Speed 3-4).
- Feed meat into the tube using the food pusher. Never use your fingers or other utensils.
5.4 Blending
- Add ingredients to the blender jar. Do not exceed the maximum fill line (1.5L).
- Secure the lid firmly.
- Turn the speed dial to a desired setting or use the Pulse function for short bursts.
- For crushing ice, use the Pulse function.
5.5 Vegetable Chopping/Slicing/Shredding
- Prepare vegetables by cutting them into pieces that fit into the feeding tube.
- Place a bowl under the outlet to collect processed vegetables.
- Turn the speed dial to a medium setting (e.g., Speed 3-4).
- Feed vegetables into the tube using the food pusher.
5.6 Sausage Making
- Assemble the meat grinder with the appropriate sausage stuffer funnel.
- Prepare your seasoned ground meat mixture.
- Carefully slide the sausage casing onto the funnel.
- Turn the speed dial to a low setting (e.g., Speed 1-2).
- Feed the meat mixture into the grinder, guiding the casing as it fills to create sausages.

Image 5.2: Sausage processing accessories and example output.
6. Cleaning and Maintenance
Proper cleaning ensures the longevity and hygiene of your appliance.
6.1 Before Cleaning
- Always unplug the appliance from the power outlet.
- Disassemble all attachments and the mixing bowl from the main unit.
6.2 Cleaning the Main Unit
- Wipe the motor base and tilt-head with a damp cloth.
- Do not immerse the motor unit in water or any other liquid.
- Do not use abrasive cleaners or scouring pads.
6.3 Cleaning Attachments and Bowl
- The stainless steel mixing bowl, whisk, beater, and dough hook are generally dishwasher safe, or can be washed by hand with warm soapy water.
- For the blender jar, add warm water and a drop of dish soap, then run the blender on a low speed for a few minutes. Rinse thoroughly.
- The meat grinder and vegetable chopper components should be disassembled and washed immediately after use with warm soapy water to prevent food residue from drying. Use a brush for hard-to-reach areas.
- Ensure all parts are thoroughly dried before reassembling or storing.
7. Troubleshooting
Refer to the table below for common issues and their solutions.
| Problem | Possible Cause | Solution |
|---|---|---|
| Appliance does not start. | Not plugged in; power switch off; tilt-head not locked; thermal overload protection activated. | Ensure plug is securely in outlet; turn speed dial to '0' then to desired speed; ensure tilt-head is locked; unplug and let cool for 30 minutes before restarting. |
| Motor stops during operation. | Overload; thermal overload protection activated. | Reduce load; unplug and let cool for 30 minutes. If problem persists, contact customer support. |
| Attachments not fitting correctly. | Incorrect attachment for port; not aligned properly. | Refer to "Setup and Assembly" section for correct attachment placement; ensure proper alignment and locking. |
| Excessive noise or vibration. | Appliance not on a stable surface; bowl or attachment not securely locked; overloaded. | Place on a flat, stable surface; ensure all parts are securely locked; reduce ingredients if overloaded. |
| Meat grinder clogs. | Meat not cut small enough; bones/gristle present; too much meat fed at once. | Cut meat into smaller pieces; ensure meat is boneless and gristle-free; feed meat slowly and use the food pusher. Disassemble and clean if severely clogged. |
8. Specifications
| Feature | Detail |
|---|---|
| Brand | Homlee |
| Model Number | SM-1518BM |
| Power | 2000 Watts |
| Voltage | 220V |
| Mixing Bowl Capacity | 5.5 Liters |
| Blender Capacity | 1.5 Liters |
| Number of Speeds | 6 + Pulse Function |
| Noise Level | ≤70 dB |
| Material | Plastic (housing), Stainless Steel (bowl, some attachments) |
| Dimensions (L x W x H) | 36 x 20.5 x 31 cm (main unit) |
| Item Weight | 7.6 Kilograms |
| Special Features | Automatic Shut-Off, Tilt Head |
| Certifications | CE, GS, LFGB |
9. Warranty and Customer Support
Homlee products are designed for quality and reliability. If you encounter any problems during the use of your mixer, please contact our customer service immediately. Customer satisfaction is our priority.
For support, please refer to the contact information provided with your purchase or visit the official Homlee website.