
1. Introduction
This manual provides detailed instructions for the installation, operation, and maintenance of your YUNTX PX6 Android 10 Autoradio. This 10.1-inch universal double DIN head unit features an Android 10 operating system, PX6 Hexa-Core processor, 4GB RAM, and 64GB ROM, offering advanced navigation, multimedia, and connectivity options for your vehicle.
2. What's in the Box
Carefully unpack the box and ensure all items are present. If any items are missing or damaged, please contact customer support.
- 1 x YUNTX PX6 Android 10 Autoradio Head Unit
- 1 x Power Socket
- 1 x Mounting Bracket
- 1 x Screws Set
- 1 x RCA Output Socket A
- 1 x RCA Output Socket B
- 1 x GPS Antenna
- 2 x USB Cables
- 1 x Rear Camera
- 1 x User Manual (this document)

Figure 2.1: Included components in the YUNTX PX6 Autoradio package. This image displays the main head unit, various cables (power, RCA, USB), GPS antenna, mounting hardware, and the rear camera, along with the user manual.
3. Product Dimensions
Before installation, verify the dimensions of the head unit to ensure compatibility with your vehicle's dashboard opening.

Figure 3.1: Front and side dimensions of the YUNTX PX6 Autoradio. The front panel is 251mm wide and 146mm high. The unit's depth is 80mm, with a 50mm protrusion for the heat sink.
4. Setup and Installation
Proper installation is crucial for optimal performance. If you are unsure about any steps, consult a professional installer.
4.1 Wiring Diagram
Refer to the following diagram for connecting the power, audio, and accessory cables.
Figure 4.1: Rear view of the YUNTX PX6 Autoradio showing connection points and corresponding cable harnesses. Key connections include the main power harness, RCA output sockets for audio and video, USB ports, and the GPS antenna input.
4.1.1 Power Socket (1)
- B+ (Yellow): Connect to constant 12V power supply.
- ACC (Red): Connect to ignition switched 12V power supply.
- GND (Black): Connect to vehicle chassis ground.
- ILL (Orange): Connect to vehicle illumination wire.
- REVERSE (Brown): Connect to reverse light trigger for rear camera activation.
- PARKING (Pink): Connect to parking brake wire for safety features.
- KEY1/KEY2 (Green/White): Connect to steering wheel control wires (if applicable).
- Speaker Wires (RL+/-, RR+/-, FL+/-, FR+/-): Connect to corresponding vehicle speakers.
4.1.2 RCA Output Socket A (2)
- AUX IN L/R: For external audio input.
- SUB-WOOFER: For subwoofer output.
- VIDEO IN 1: For external video input.
- FRONT CAMERA: For front view camera input.
- External Mic: For connecting an external microphone.
4.1.3 USB Cables (3, 4)
Connect USB devices such as flash drives, 4G modems, or smartphones for data transfer and charging.
4.1.4 RCA Output Socket B (5)
- AUX IN L/R: Additional external audio input.
- VIDEO OUT 1/2: For connecting external monitors (e.g., headrest screens).
- REAR CAMERA: Dedicated input for the included rear view camera.
4.1.5 GPS Antenna (6)
Connect the GPS antenna and mount it in a location with a clear view of the sky for optimal satellite reception.
5. Operating Instructions
This section details the various functions and features of your YUNTX PX6 Autoradio.
5.1 Basic Operation
- Power On/Off: Press and hold the power button on the front panel or use the vehicle's ignition.
- Volume Control: Adjust using the physical buttons or the on-screen controls.
- Touchscreen: Navigate the Android interface by tapping, swiping, and pinching.
5.2 Navigation (GPS)
The unit supports both online and offline GPS navigation. You can download various map applications from the Google Play Store.

Figure 5.1: GPS Navigation interface. The unit supports 3D maps and voice guidance, allowing for simultaneous use of other functions like radio or Bluetooth audio.
5.3 Connectivity
5.3.1 Wi-Fi and 4G
Connect to Wi-Fi hotspots or use an external USB 4G modem (sold separately) for internet access.
5.3.2 Bluetooth 4.0
Pair your smartphone for hands-free calls, contact synchronization, and Bluetooth music streaming.
5.3.3 Mirror Link
Mirror your smartphone screen (Android & iOS) via USB cable or Wi-Fi connection. This allows you to view and control your phone's content on the car stereo display.

Figure 5.2: MirrorLink functionality, allowing smartphone content to be displayed and controlled on the head unit screen.
5.3.4 Android Auto & Apple CarPlay
The unit supports Android Auto and Apple CarPlay for seamless smartphone integration. An adapter may be required (sold separately).

Figure 5.3: Apple CarPlay interface, providing a safer way to use your iPhone's features while driving.
5.4 Multimedia
5.4.1 4K Video Player
Enjoy ultra-high definition video playback up to 4K (3840 x 2160 pixels) and 1080P HD video.
5.4.2 HDMI Output
The unit supports 4K HDMI video output, allowing you to sync 4K video and audio streams to external displays (HDMI cable sold separately).
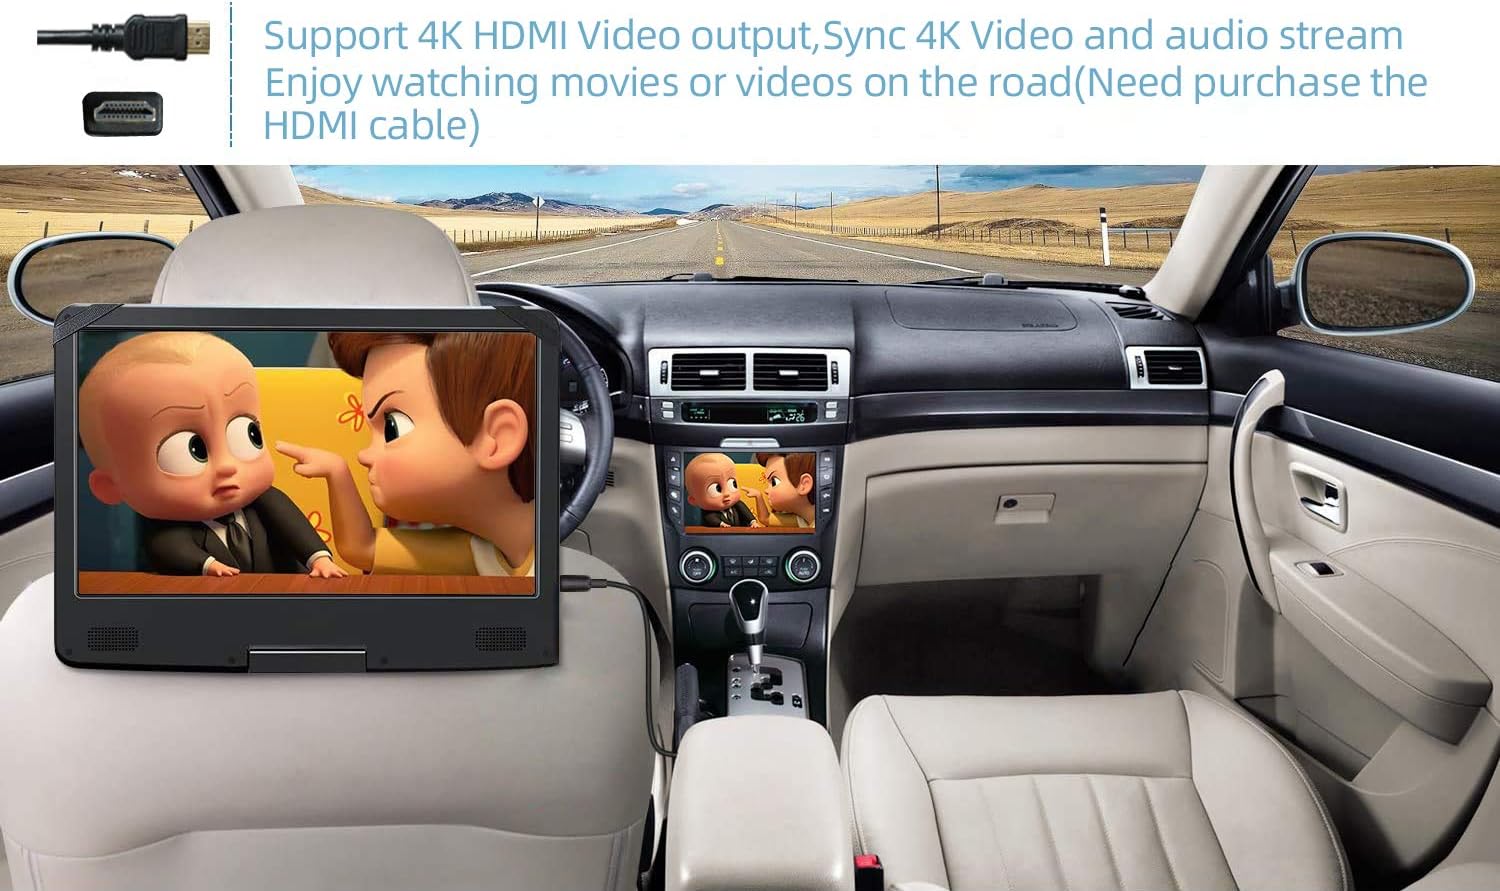
Figure 5.4: Example of HDMI output connecting to a rear seat monitor for passenger entertainment.
5.4.3 USB & Micro SD
Play media files from USB drives and micro SD cards up to 128GB.
5.5 Radio
The unit features an NXP TEF7786 radio IC for good reception, supporting AM/FM tuner (worldwide) and RDS Radio.
5.5.1 DAB+ Digital Radio
DAB+ Digital Radio is supported (optional, requires external DAB+ tuner, sold separately).
5.6 Customization
5.6.1 Multicolor Illumination
Personalize the button illumination with your preferred color.
5.6.2 Wallpaper & Car Logo
Customize the screen background with static or dynamic wallpapers and set a custom car logo for startup.
5.7 Google Play Store
Access the Google Play Store to download and install various applications, expanding the functionality of your autoradio.
5.8 Split Screen Mode
Run two applications simultaneously side-by-side on the screen for enhanced multitasking.
5.9 Steering Wheel Control
If your vehicle supports it, connect the steering wheel control wires to conveniently manage functions like track changes and volume.
5.10 OBD (On-Board Diagnostics)
The unit is compatible with most Bluetooth type ELM327 OBD2 scanners (optional, sold separately) for vehicle diagnostics.
6. Maintenance
To ensure the longevity and optimal performance of your YUNTX PX6 Autoradio, follow these maintenance guidelines:
- Cleaning the Screen: Use a soft, lint-free cloth to gently wipe the touchscreen. For stubborn smudges, slightly dampen the cloth with water or a screen-safe cleaner. Avoid harsh chemicals or abrasive materials.
- General Cleaning: Keep the unit free from dust and debris. Use a soft brush or compressed air to clean vents and button areas.
- Software Updates: Periodically check for firmware updates provided by YUNTX to ensure you have the latest features and bug fixes. Follow the instructions provided with the update carefully.
- Avoid Extreme Temperatures: Do not expose the unit to extreme heat or cold for extended periods, as this can affect its electronic components.
- Cable Connections: Periodically check all cable connections to ensure they are secure and free from corrosion.
7. Troubleshooting
If you encounter issues with your autoradio, refer to the following common problems and solutions. If the problem persists, contact customer support.
- No Power:
- Check power connections (B+, ACC, GND) for proper wiring and secure contact.
- Verify vehicle's fuse for the radio circuit.
- No Sound:
- Check speaker wiring connections.
- Ensure volume is not muted or set to minimum.
- Verify audio source selection (e.g., Radio, Bluetooth, USB, AUX).
- GPS Signal Lost/Inaccurate:
- Ensure GPS antenna is securely connected and mounted in a location with a clear view of the sky.
- Check GPS settings within the unit.
- Bluetooth Connection Issues:
- Ensure Bluetooth is enabled on both the autoradio and your smartphone.
- Delete previous pairings and re-pair the devices.
- Move devices closer to each other.
- Touchscreen Unresponsive:
- Restart the unit by turning off the vehicle ignition and restarting.
- Perform a factory reset if the issue persists (note: this will erase all user data).
- Rear Camera Not Displaying:
- Check the REVERSE trigger wire connection to the vehicle's reverse light.
- Verify the RCA video cable connection from the camera to the unit.
- Ensure the camera itself is powered.
8. Specifications
| Feature | Specification |
|---|---|
| Operating System | Android 10 |
| CPU | PX6 RK3399 - A72 + A53 Hexa Core - 2.0 GHz |
| RAM | 4GB |
| ROM | 64GB |
| Screen Size | 10.1-Inch |
| Resolution | 1024*600 |
| Touch Screen Type | Capacitive |
| Radio IC | NXP TEF7786 |
| Amplifier IC | TDA7388 |
| Audio Output | 4*50W |
| Bluetooth | BT 4.0 |
| Wi-Fi | Built-in Wi-Fi modem |
| 4G Internet | Supports external USB 4G modem (required) |
| USB & Micro SD | Up to 128GB |
| Video Playback | Supports 4K (3840 x 2160 pixels) / 1080P HD |
| GPS | Online & offline navigation, 3D Maps, voice guidance |
| Compatible Devices | Smartphone (Mirror Link, Android Auto, CarPlay) |
| Mounting Type | Dashboard Mount |
| Parcel Dimensions | 29.8 x 20.1 x 19.5 cm |
| Weight | 2.21 kg |
9. Warranty and Support
9.1 Warranty Information
YUNTX provides a 2-month free exchange policy for product defects (excluding damage caused by human actions). Please retain your proof of purchase for warranty claims.
9.2 Technical Support
For any questions, technical assistance, or issues regarding your YUNTX PX6 Autoradio, please contact our professional technical support team:
Email: yuntx_techsupport@163.com
We are committed to providing constant firmware updates and support to enhance your product experience.