
Introduction
Thank you for choosing the INFURIDER YF-770K TRMS 6000 Count Digital Multimeter. This device is a high-performance, auto-ranging multimeter designed for accurate measurements in various electrical and automotive applications. It features True RMS for precise readings of non-sinusoidal waveforms and a 6000-count display for enhanced resolution. This manual provides essential information for safe and effective use of your multimeter.

Figure 1: INFURIDER YF-770K Digital Multimeter. This image shows the front view of the multimeter, highlighting its large LCD display, rotary dial for function selection, input jacks, and a built-in rotating stand. Key features like built-in double fuses and a protective case are also indicated.
Safety Information
To ensure safe operation, please read and understand all safety warnings and operating instructions before using this multimeter.
- Always adhere to local and national safety codes.
- Do not apply more than the rated voltage, as marked on the meter, between terminals or between any terminal and ground.
- Use caution when working with voltages above 30V AC RMS, 42V peak, or 60V DC. These voltages pose a shock hazard.
- Before making resistance, continuity, or diode measurements, disconnect power to the circuit and discharge all high-voltage capacitors.
- Replace the battery as soon as the low battery indicator appears to avoid incorrect readings.
- Ensure the test leads are in good condition, without any damage to the insulation.
- The multimeter is equipped with a rubber protective shell and integrated fuses for overload protection. Do not bypass these safety features.
Key Features
- True RMS Measurement: Provides accurate readings for both sinusoidal and non-sinusoidal AC waveforms.
- 6000 Count Display: Offers high resolution for precise measurements.
- Wide Measurement Range: Measures AC/DC Voltage, AC/DC Current, Resistance, Capacitance, Temperature, Frequency, Duty Cycle, Diode, and Continuity.
- Automotive Analysis Functions: Includes Dwell Angle, Pulse Width (0.1ms to 10.0ms), and Tachometer (600 to 12000 RPM) for engine diagnostics.
- Non-Contact Voltage (NCV) Detection: Safely detects AC voltage without direct contact.
- User-Friendly Design: Features a 3.0-inch LCD with automatic backlight, Data Hold, Max/Min value retention, Auto Power Off, and a 180° rotating stand for hands-free operation.
- Robust Protection: Equipped with a durable rubber protective shell and built-in fuses for overload protection.
- Temperature Measurement: Switchable between Celsius (℃) and Fahrenheit (℉).
- Optional Current Clamp Compatibility: Can be used with the optional YF-605A AC/DC current clamp for measuring up to 600A without interrupting the circuit (clamp not included).

Figure 2: Multimeter with its 3.0-inch LCD backlight and robust rubber protective shell. The image highlights the clear display and the protective casing.
Setup
1. Battery Installation
- Ensure the multimeter is turned off.
- Locate the battery compartment cover on the back of the unit.
- Unscrew the retaining screw(s) and remove the cover.
- Insert the required battery (typically a 9V battery, refer to specifications for exact type) observing the correct polarity.
- Replace the battery compartment cover and secure it with the screw(s).
2. Connecting Test Leads
- Insert the black test lead into the "COM" (common) input jack.
- For most measurements (Voltage, Resistance, Capacitance, Frequency, Diode, Temperature), insert the red test lead into the "VΩHz" input jack.
- For current measurements up to 600mA, insert the red test lead into the "mA" input jack.
- For high current measurements up to 20A, insert the red test lead into the "20A" input jack.
- Always ensure test leads are fully inserted before taking measurements.

Figure 3: The INFURIDER YF-770K Multimeter with its included test leads and accessories. The image also illustrates common applications such as car repair, home appliance repair, electronic product testing, and fuel tank inspection.
Operating Instructions
Turn the rotary switch to the desired function. The multimeter will automatically select the appropriate range for most measurements (auto-ranging).
1. Voltage Measurement (AC/DC)
- Set the rotary switch to the "V~" for AC voltage or "V—" for DC voltage.
- Connect the test leads in parallel to the circuit or component under test.
- Read the voltage value on the display.

Figure 4: Demonstrating AC/DC voltage measurement. The image shows the multimeter's probes inserted into a wall outlet to measure voltage.
2. Resistance Measurement
- Set the rotary switch to the "Ω" position.
- Ensure the circuit is de-energized before connecting the test leads across the component.
- Read the resistance value on the display.
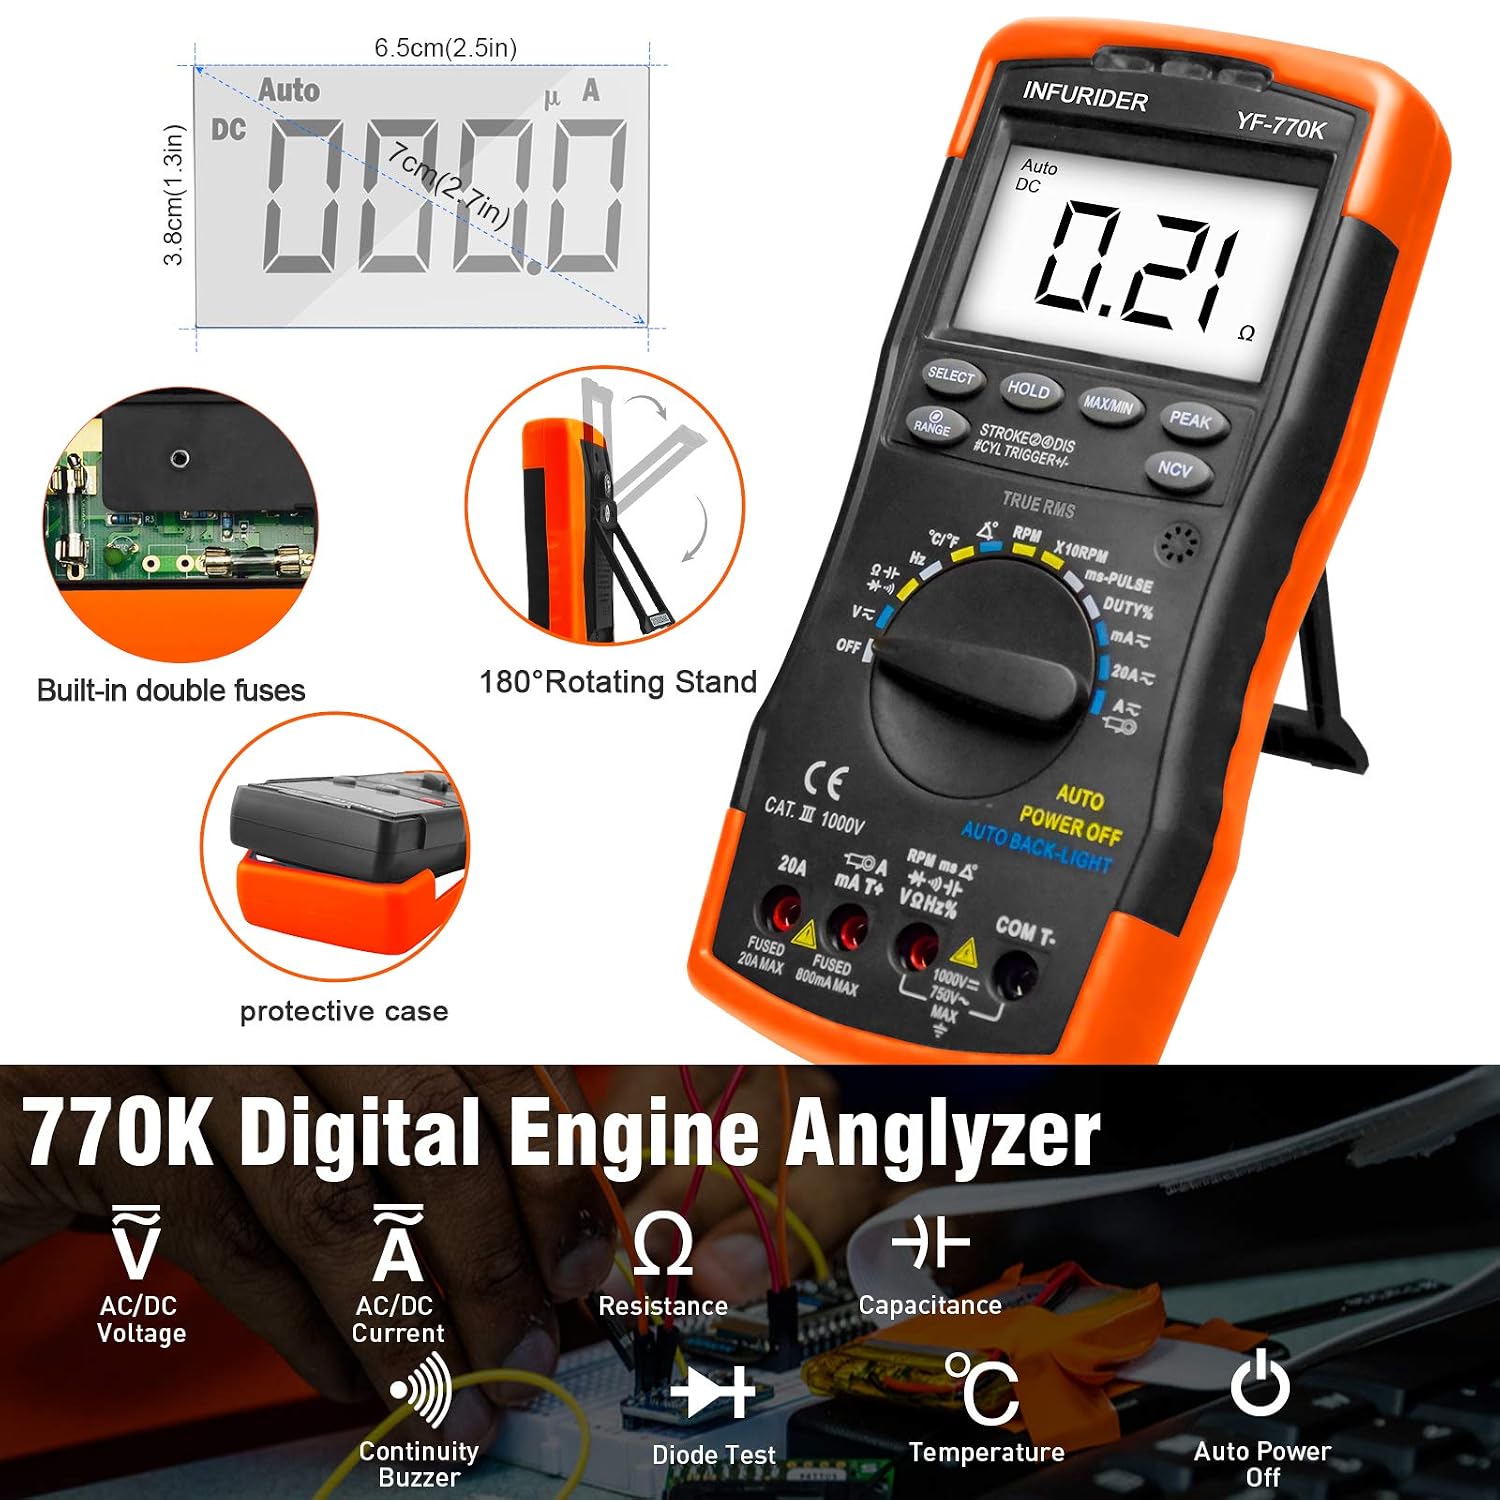
Figure 5: Illustrating a resistance test. The multimeter's probes are connected to a large resistor to measure its resistance.
3. Non-Contact Voltage (NCV) Detection
- Set the rotary switch to the "NCV" position.
- Move the top end of the multimeter near an AC voltage source (e.g., a live wire or outlet).
- The meter will emit an audible alarm and the NCV indicator light will flash when AC voltage is detected.

Figure 6: Non-Contact Voltage (NCV) testing. The image shows the multimeter detecting AC voltage from a power strip and adapter, indicating live and null wires.
4. Automotive Engine Analysis (Dwell Angle, Pulse Width, Tachometer)
- Refer to your vehicle's service manual for specific connection points for dwell angle, pulse width, and tachometer measurements.
- Set the rotary switch to the appropriate automotive function (e.g., "RPM" for tachometer, "ms-PULSE" for pulse width, "DUTY%" for duty cycle which can be related to dwell).
- Connect the test leads as instructed by the vehicle's manual and the multimeter's display prompts.
- Read the measurement on the display.

Figure 7: Multimeter in use for engine analysis. The image shows a user connecting the multimeter probes to a car engine for diagnostic purposes.
5. Special Functions
- HOLD: Press the "HOLD" button to freeze the current reading on the display. Press again to release.
- MAX/MIN: Press the "MAX/MIN" button to record the maximum or minimum value during a measurement session. Press repeatedly to cycle through MAX, MIN, and current readings.
- SELECT/RANGE: Use the "SELECT" button to switch between different measurement types within a single rotary switch position (e.g., AC/DC in voltage mode, or different functions like diode/continuity). The "RANGE" button allows manual range selection if auto-ranging is not desired.
- Backlight: The LCD features an automatic backlight for visibility in dimly lit areas.
- Auto Power Off: The multimeter will automatically power off after a period of inactivity to conserve battery life.
Maintenance
1. Cleaning
- Wipe the case with a damp cloth and mild detergent. Do not use abrasives or solvents.
- Keep the terminals free from dirt and moisture.
2. Battery Replacement
- When the low battery indicator appears on the display, replace the battery promptly to ensure accurate readings.
- Follow the steps outlined in the "Battery Installation" section under Setup.
3. Fuse Replacement
- If the current measurement function stops working, the fuse may need replacement.
- Ensure the multimeter is turned off and disconnect all test leads.
- Open the back cover (similar to battery replacement, but may involve more screws).
- Replace the blown fuse with a fuse of the exact same type and rating as specified in the specifications section (e.g., Fused 20A MAX, Fused 600mA MAX).
- Securely close the back cover.
Troubleshooting
| Problem | Possible Cause | Solution |
|---|---|---|
| Meter does not power on or display is blank. | Dead or improperly installed battery. | Check battery installation and replace with a fresh battery if necessary. |
| Inaccurate readings. | Low battery; incorrect function selection; damaged test leads. | Replace battery; ensure correct function is selected; inspect and replace test leads if damaged. |
| Current measurement not working. | Blown fuse; incorrect input jack. | Check and replace the fuse if blown. Ensure the red test lead is in the correct current input jack (mA or 20A). |
| Display shows "OL" (Overload). | Measurement exceeds the selected range or meter's maximum capacity. | Switch to a higher range (if not in auto-ranging) or ensure the measured value is within the meter's limits. |
| Auto Power Off occurs too frequently. | Normal operation to save battery. | Briefly turn the rotary switch or press a button to reactivate. |
Specifications
| Measurement Function | Range | Accuracy |
|---|---|---|
| DC Voltage | 600mV / 6V / 60V / 600V / 1000V | ± (1.0% + 5) |
| AC Voltage | 600mV / 6V / 60V / 600V / 750V | ± (1.5% + 8) |
| DC Current | 60mA / 600mA / 20A | ± (2.5% + 5) |
| AC Current | 60mA / 600mA / 20A | ± (3.0% + 7) |
| Resistance | 600Ω / 6KΩ / 60KΩ / 600KΩ / 6MΩ / 60MΩ | ± (1.0% + 5) |
| Capacitance | 9.999nF / 99.99nF / 999.9nF / 9.999uF / 99.99uF / 999.9uF / 60mF | ± (2.5% + 10) |
| Temperature | -20℃ to 1000℃ / -4℉ to 1832℉ | ± (3% + 2) |
| Frequency | 9.999Hz / 99.99Hz / 999.9Hz / 9.999KHz / 99.99KHz / 999KHz / 9.999MHz | ± (0.1% + 5) |
| Duty Cycle | 1% - 99.9% | ± (2.0% + 5) |
| Pulse Width | 0.1ms - 10.0ms | (Accuracy not specified in source) |
| Tachometer | 600 - 12000 RPM | (Accuracy not specified in source) |
General Specifications
- Display: 6000 Counts, 3.0-inch LCD with automatic backlight
- Power: (Typically 9V battery, specific type not provided in source)
- Auto Power Off: Yes
- Dimensions: 23.4 x 13.3 x 6.4 cm (Package dimensions, actual device dimensions may vary)
- Weight: 630 grams (Package weight)
- Safety Rating: CAT III 1000V
- Fuses: Fused 20A MAX, Fused 600mA MAX
Warranty Information
INFURIDER products are designed to be reliable and durable. Specific warranty details for the YF-770K Digital Multimeter are typically provided with the product packaging or on the official INFURIDER website. Please refer to these resources for information regarding warranty duration, coverage, and claims process. Keep your purchase receipt as proof of purchase.
Customer Support
For technical assistance, troubleshooting, or any questions regarding your INFURIDER YF-770K Digital Multimeter, please contact INFURIDER customer support.
- Website: Visit the official INFURIDER website for FAQs, product information, and contact forms.
- Email: Refer to your product packaging or the official website for customer service email addresses.
- Phone: Contact numbers may be available on the official website for direct support.
When contacting support, please have your product model (YF-770K) and purchase details ready.