1. Introduction
This manual provides detailed instructions for the installation, operation, and maintenance of your ORICO 3549RU3 4-Bay USB 3.0 RAID Enclosure. This device is designed for secure and efficient data storage, supporting up to four 2.5-inch or 3.5-inch SATA HDDs/SSDs with a total capacity of 64TB. It features multiple RAID modes for flexible data management and robust construction for reliable performance.
2. Key Features
- 4-Bay Large Capacity: Supports up to four 2.5-inch or 3.5-inch SATA I/II/III HDDs/SSDs, with a maximum total capacity of 64TB (16TB per drive). Each drive is secured with independent brackets and screws.
- High-Speed Data Transfer: Equipped with USB 3.0 interface, offering data transfer speeds up to 5Gbps. Backward compatible with USB 2.0 and 1.1.
- Robust Power Supply: Features a built-in 150W power supply and a SATA3.0 6Gb/s dual-core chip, ensuring stable and safe operation for high-capacity drives. Includes overcurrent, short-circuit, leakage, overheat, and overvoltage protection.
- Efficient Heat Dissipation: Constructed with a unibody aluminum-alloy shell (up to 4mm thick) and an integrated quiet fan (80*80mm) for effective heat ventilation and extended lifespan.
- Multiple RAID Modes: Supports RAID 0, RAID 1, RAID 3, RAID 5, RAID 10, JBOD, CLONE, and Normal modes to meet various data storage requirements.
- Universal Compatibility: Compatible with Windows XP/7/8/8.1/10, VISTA, Linux, and Mac OS 9.1/10.2 or higher.

Figure 1: The ORICO 3549RU3 enclosure highlighting its 64TB maximum storage capacity.

Figure 2: Demonstrating the SuperSpeed USB 3.0 connectivity with up to 5Gbps data transfer rate.

Figure 3: The enclosure's 150W built-in power supply, featuring multiple protection mechanisms.

Figure 4: Illustrating universal compatibility with various operating systems and the secure screw-fixing mechanism for hard drives.

Figure 5: Rear panel of the ORICO 3549RU3, detailing power input, power switch, RAID DIP switches, SET button, and USB 3.0 port.
3. Setup Instructions
3.1 Installing Hard Drives
- Ensure the enclosure is powered off and disconnected from your computer.
- Gently pull out the drive trays from the front of the enclosure.
- Mount your 2.5-inch or 3.5-inch SATA HDD/SSD onto the tray using the provided screws. Ensure the drive's SATA connector aligns with the tray's connector.
- Slide the loaded tray back into the enclosure until it clicks into place. Repeat for all desired drives.
3.2 Connecting to Your Computer
- Connect the power adapter to the enclosure's AC input and then to a power outlet.
- Connect the USB 3.0 cable from the enclosure's USB 3.0 port to an available USB 3.0 port on your computer.
- Flip the power switch on the rear of the enclosure to the "ON" position.
3.3 RAID Configuration (Hardware Method)
The ORICO 3549RU3 supports hardware RAID configuration using DIP switches located on the rear panel. Important: Changing RAID modes will erase all data on the drives. Back up your data before proceeding.
- Ensure the enclosure is powered off.
- Refer to the table below for the correct DIP switch settings for your desired RAID mode.
- Adjust the DIP switches (1-4) to match the configuration for your chosen RAID mode.
- While holding down the "SET" button, power on the enclosure. Continue holding the "SET" button for approximately 5-10 seconds until the RAID indicator lights change, then release.
- The enclosure will initialize the new RAID configuration. This process may take some time depending on the drive capacity.
- Once initialized, the new RAID volume will appear on your computer. You may need to format the new volume through your operating system's disk management utility before use.
Note: If you encounter issues, ensure the enclosure is powered off, then hold the SET button while powering on. This is crucial for the RAID mode change to take effect.
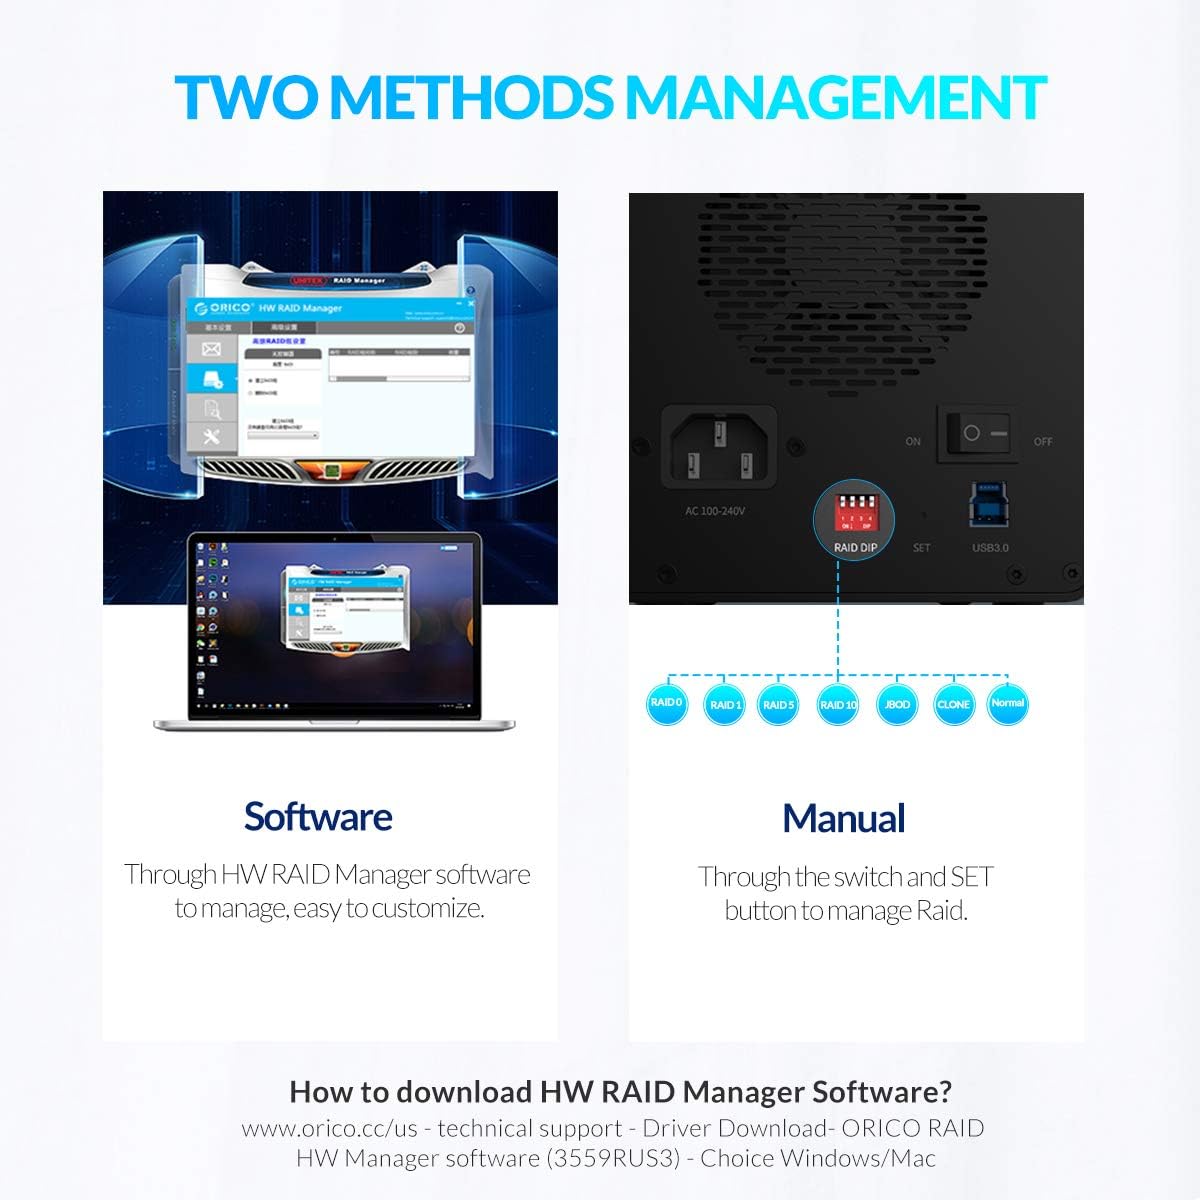
Figure 6: Overview of RAID management options, including the manual DIP switch method.
RAID Mode DIP Switch Settings:
| RAID Mode | DIP Switch 1 | DIP Switch 2 | DIP Switch 3 | DIP Switch 4 | Description |
|---|---|---|---|---|---|
| Normal | OFF | OFF | OFF | OFF | Each drive appears as an independent disk. |
| JBOD | ON | OFF | OFF | Combines all drives into a single large volume. No redundancy. | |
| RAID 0 | OFF | ON | OFF | Striping for maximum performance. No redundancy. | |
| RAID 1 | ON | ON | OFF | Mirroring for data redundancy. Requires at least two drives. | |
| RAID 3 | OFF | OFF | ON | Striping with dedicated parity. Requires at least three drives. | |
| RAID 5 | ON | OFF | ON | Striping with distributed parity. Requires at least three drives. | |
| RAID 10 | OFF | ON | ON | Striping and mirroring. Requires at least four drives. | |
| CLONE | ON | ON | ON | Creates exact copies of the source drive. |
Note: "ON" typically means the switch is pushed down or towards the "ON" label, while "OFF" means it's up or away from the label. Refer to the physical markings on your device.
4. Operating the Enclosure
4.1 Drive Recognition and Formatting
After successful RAID configuration and powering on, your operating system should detect the new storage volume. For new drives or after changing RAID modes, you will need to initialize and format the disk(s) through your OS's Disk Management (Windows) or Disk Utility (macOS) before they can be used.
4.2 Data Transfer
Once formatted, the enclosure will function as a standard external storage device. You can drag and drop files, or use backup software to transfer data to and from the enclosure. The USB 3.0 interface ensures fast data transfer speeds up to 5Gbps.
4.3 Software Management (Optional)
ORICO may provide optional software (e.g., "ORICO HW RAID Manager") for managing RAID configurations and monitoring drive status. This software can offer a graphical interface for easier customization. Please visit the official ORICO website for software downloads and compatibility information. Note that software compatibility may vary with operating system versions (e.g., some versions may not support newer macOS releases).
5. Maintenance
5.1 Heat Dissipation
The ORICO 3549RU3 features an aluminum-alloy body and an internal cooling fan to maintain optimal operating temperatures. Ensure the enclosure is placed in a well-ventilated area and that the fan vents are not obstructed. Regular airflow helps prevent overheating and prolongs the lifespan of your drives and the enclosure.

Figure 7: The enclosure's cooling system, featuring a quiet 80x80mm fan for efficient heat dissipation.
5.2 Cleaning
To clean the exterior of the enclosure, use a soft, dry cloth. Do not use liquid cleaners or solvents, as these can damage the finish or internal components. Periodically check the fan vents for dust accumulation and gently clean them with compressed air if necessary to maintain optimal airflow.
6. Troubleshooting
- Enclosure not recognized by computer:
- Ensure the power cable and USB cable are securely connected.
- Verify the enclosure is powered on.
- Try connecting to a different USB port on your computer.
- Test with a different USB cable if available.
- Check your computer's Disk Management (Windows) or Disk Utility (macOS) to see if the drives are detected but uninitialized/unformatted.
- RAID mode change not taking effect:
- Ensure the enclosure is powered off before adjusting DIP switches.
- After setting DIP switches, hold down the "SET" button while powering on the enclosure. Continue holding for 5-10 seconds. This step is critical for the new RAID configuration to be applied.
- Remember that changing RAID modes will erase all data.
- Slow data transfer speeds:
- Ensure you are connected to a USB 3.0 port on your computer. USB 2.0 ports will result in significantly slower speeds.
- Check the health of your hard drives. Failing drives can impact performance.
- Ensure your computer's USB drivers are up to date.
- Software (e.g., HW RAID Manager) not working:
- Verify that you have downloaded the correct software version for your operating system from the official ORICO website.
- Check for compatibility issues with newer operating system versions (e.g., macOS Big Sur or later may have specific requirements or limitations).
- Ensure your enclosure's firmware is up to date, if applicable.
- Drive failure in RAID array:
- For RAID modes with redundancy (RAID 1, RAID 3, RAID 5, RAID 10), the array should remain operational.
- Identify the failed drive (usually indicated by an LED on the enclosure).
- Replace the failed drive with a new drive of equal or greater capacity. Refer to the ORICO support documentation for specific drive replacement and rebuild procedures for your RAID mode.
7. Specifications
| Model | 3549RU3 |
| Brand | ORICO |
| Material | Aluminium Alloy |
| Color | Black |
| Drive Bays | 4 |
| Compatible Drive Types | 2.5 / 3.5 inch SATA I/II/III HDD/SSD |
| Max Capacity | 64 TB (16TB per drive) |
| Output Interface | USB 3.0 Type-B |
| Transfer Rate | USB 3.0: 5Gbps |
| RAID Modes | RAID 0, RAID 1, RAID 3, RAID 5, RAID 10, JBOD, CLONE, Normal |
| Power Supply | Built-in 150W |
| Cooling System | 80*80mm Quiet Fan, Aluminum-Alloy Body |
| Compatible OS | Windows XP/7/8/8.1/10, VISTA, Linux, Mac OS 9.1/10.2 or higher |
| Manufacturer | ORICO Technologies Co.,Ltd. |
8. Warranty and Support
ORICO provides a 36-month worry-free service and lifetime technical support for this product. For technical assistance, warranty claims, or further inquiries, please contact ORICO customer support through their official website or the contact information provided with your purchase.
Please visit www.orico.cc for the latest drivers, software, and support resources.