1. Introduction
This manual provides detailed instructions for the installation, operation, and maintenance of the ICC 14-inch Plastic Structured Wiring Enclosure, model ICRESDP14E. This enclosure is designed for the organized distribution of networking services within residential or commercial environments.

Figure 1: ICC 14-inch Plastic Structured Wiring Enclosure with cover removed, showing the internal mounting grid.
Key Features:
- Durable ABS Plastic Construction: Built with 0.1-inch thick ABS plastic, offering enhanced strength and lightweight design.
- UL Listed (E125268): Certified for safety and reliability in professional installations.
- TAA Compliant & Section 889 Certified: Meets U.S. government regulations.
- Vented Cover: Protects modules and electronics from heat, assisting with heat dissipation.
- Mud Guard: Provides protection for the enclosure during the rough-in phase of construction.
- Built-in Bridge Lances: Facilitates organized cable management.
- Power Knockouts: Allows for the installation of AC power outlets and cable exits.
- Universal Hole Pattern: Compatible with ICC connectivity modules and most electronic modules without additional brackets.
2. Setup and Installation
Proper installation ensures optimal performance and longevity of the structured wiring enclosure. This enclosure is designed for indoor use only and can be mounted between 16-inch wall studs or directly to a wall surface.
2.1 Enclosure Placement and Mounting
- Select Location: Choose an indoor location that allows for easy access and is free from moisture or extreme temperatures. Ensure the location accommodates the enclosure's dimensions (refer to Section 6, Specifications).
- Prepare Wall: If mounting between wall studs, ensure studs are 16 inches on center. If surface mounting, mark the desired position.
- Install Mud Guard (Optional): During the rough-in phase of construction, install the provided mud guard to protect the enclosure from debris.

Figure 2: Installation of the mud guard and the vented cover.
2.2 Module and Cable Installation
- Install Modules: The enclosure features a universal hole pattern compatible with ICC connectivity modules and most electronic modules. Modules can be snapped in securely, either horizontally or vertically, without the need for additional brackets.
- Utilize Cable Management: Use the built-in bridge lances to secure and organize cables within the enclosure, preventing tangles and maintaining a neat appearance.

Figure 3: Cables organized using built-in bridge lances.
2.3 Power and Cable Exits
- Electrical Knockouts: The enclosure includes knockouts for AC power outlets and cable exits on all sides. These can be easily removed with a screwdriver to install a 1-gang electrical box (sold separately).
- Cable Protection: For enhanced cable protection, consider installing ICC plastic grommets (SKU ICRESDCAC3), sold separately, in the cable exit points.

Figure 4: Electrical knockouts for power and cable exits.
3. Operation
The ICC Structured Wiring Enclosure functions as a central hub for your home or office network. Once installed and populated with the necessary modules (e.g., data, voice, video), it provides a secure and organized environment for your networking infrastructure.
3.1 Network Distribution
Connect your incoming service lines (e.g., internet, telephone, cable TV) to the appropriate modules within the enclosure. Then, connect the distribution cables from these modules to the various outlets throughout your premises.
3.2 Heat Management
The vented cover is crucial for maintaining optimal operating temperatures for the electronic modules housed inside. Ensure the vents are not obstructed to allow for proper airflow and heat dissipation, extending the lifespan of your equipment.
4. Maintenance
Regular maintenance helps ensure the continued efficiency and safety of your structured wiring enclosure.
- Cleaning: Periodically clean the exterior of the enclosure with a soft, dry cloth. Avoid using harsh chemicals or abrasive cleaners.
- Ventilation Check: Ensure that the vents on the cover are clear of dust and debris to maintain proper airflow and prevent overheating of internal components.
- Cable Inspection: Occasionally inspect cables for any signs of wear, damage, or loose connections. Re-secure or replace as necessary.
- Module Check: Verify that all installed modules are securely seated and functioning correctly.
5. Troubleshooting
If you encounter issues with your structured wiring setup, consider the following basic troubleshooting steps:
- No Signal/Connectivity:
- Verify all cables are securely connected to the correct ports on the modules.
- Check the status indicators on your networking equipment (modem, router, switches) for any error lights.
- Ensure power is supplied to any active modules or devices within the enclosure.
- Overheating:
- Confirm that the enclosure's vents are not blocked.
- Ensure adequate space around the enclosure for air circulation.
- Loose Modules:
- Gently press on modules to ensure they are fully seated in the universal hole pattern.
For persistent issues, consult a qualified technician or contact ICC customer support.
6. Specifications
| Attribute | Detail |
|---|---|
| Model Number | ICRESDP14E |
| Product Dimensions (D x W x H) | 4.88" x 14.94" x 14.96" |
| Weight | 4 Pounds |
| Material | ABS Plastic (0.1-inch thick) |
| Color | White (Enclosure) |
| Certifications | UL Listed (E125268), TAA Compliant, Section 889 Certified, RoHS Compliant |
| Manufacturer | ICC |
| Compatibility | Fits between 16" wall studs, universal hole pattern for ICC and most electronic modules |
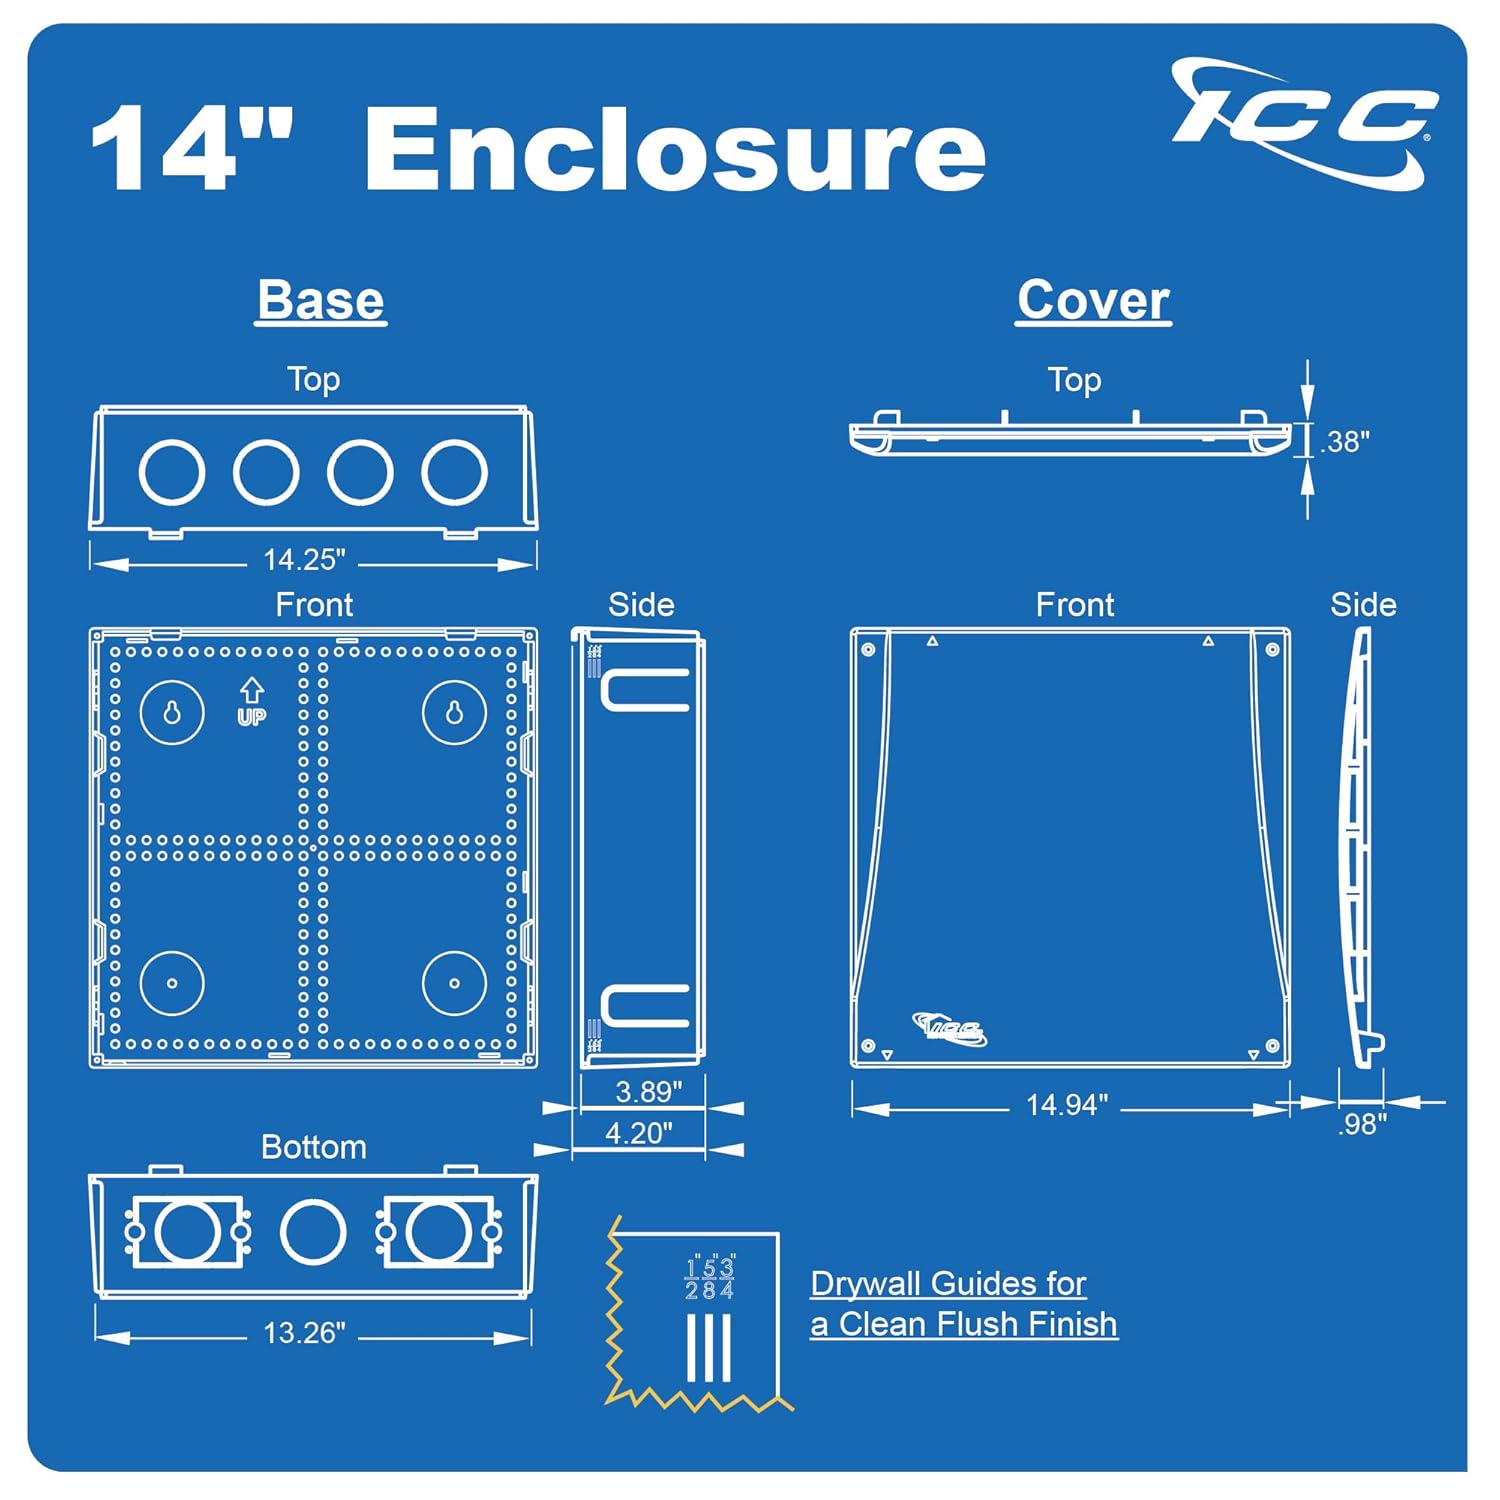
Figure 5: Detailed dimensions of the 14-inch enclosure.
7. Warranty and Support
ICC has been manufacturing structured cabling products since 1984, providing reliable solutions. For specific warranty information or technical support, please refer to the official ICC website or contact their customer service department directly.
Manufacturer: ICC
Website: www.icc.com (Example link, please verify official support channels)