1. Introduction
This user manual provides essential information for the safe and effective operation of the RockSeed CM1 True-RMS Clamp Meter. Please read this manual thoroughly before using the device and retain it for future reference. The RockSeed CM1 is a versatile digital multimeter designed for measuring AC/DC voltage, AC current, resistance, continuity, diode, and temperature, featuring True-RMS for accurate readings on non-linear signals.
2. Safety Information
Always adhere to basic safety precautions when using electrical testing equipment to prevent personal injury or damage to the meter or equipment under test. This device complies with CAT III 600V safety standards.
- Do not apply voltage or current that exceeds the maximum specified limits for the meter.
- Exercise extreme caution when working with live circuits.
- Ensure the test leads are in good condition, without any damage to the insulation.
- Verify the meter's function by testing a known voltage or current source before use.
- Do not operate the meter if it appears damaged or if the case is open.
- Remove test leads from the circuit before changing functions.
- Replace batteries when the low battery indicator appears to ensure accurate readings.
3. Product Overview
3.1 Included Components
- 1 x RockSeed CM1 True-RMS Clamp Meter
- 1 x K-Type Thermocouple
- 1 x Test Leads (Pair)
- 2 x 1.5V AAA Batteries
- 1 x User Manual (this document)
- 1 x Cloth Pouch
3.2 Meter Layout
The RockSeed CM1 clamp meter features a compact design with an intuitive layout for ease of use.

Image 3.2.1: The RockSeed CM1 Clamp Meter shown with its test leads, K-type thermocouple, AAA batteries, and protective cloth pouch.

Image 3.2.2: A detailed view of the CM1's LCD display, rotary function dial, and control buttons, highlighting its various measurement capabilities.
Key components include:
- Clamp Jaw: Used for non-contact AC current measurement.
- Function Dial: Selects the desired measurement mode (e.g., AC/DC Voltage, AC Current, Resistance, Temperature).
- LCD Display: Shows measurement readings, units, and function indicators. Features a backlight for low-light conditions.
- Buttons: Include 'RAN' (Range), 'V-Alert' (NCV), 'HOLD' (Data Hold), and 'SEL' (Select/Backlight).
- Input Jacks: 'COM' (Common) and 'INPUT' for connecting test leads.

Image 3.2.3: This image illustrates the test lead input jacks and the unique test line buckle design, which helps secure leads and prevent dust ingress.
4. Setup
4.1 Battery Installation
The RockSeed CM1 requires two 1.5V AAA batteries for operation. These are included in the package.
- Locate the battery compartment cover on the back of the meter.
- Use a screwdriver to open the cover.
- Insert the two AAA batteries, ensuring correct polarity (+ and -).
- Replace the battery compartment cover and secure it with the screw.
4.2 Connecting Test Leads
For most measurements (voltage, resistance, continuity, diode, temperature), test leads are required.
- Insert the black test lead into the 'COM' (Common) input jack.
- Insert the red test lead into the 'INPUT' jack.
- For temperature measurements, connect the K-type thermocouple to the designated input ports, observing polarity if applicable.
5. Operating Instructions
Turn the function dial to the desired measurement mode. The meter features auto-ranging for most functions, simplifying operation.
5.1 AC/DC Voltage Measurement (V~)
- Turn the function dial to the 'V~' position.
- Connect the test leads in parallel to the circuit or component to be measured.
- The display will show the voltage reading. Use the 'SEL' button to switch between AC and DC voltage if necessary.
5.2 AC Current Measurement (A~)
The CM1 uses its clamp jaw for non-contact AC current measurement, offering True-RMS accuracy and a resolution up to 1mA.
- Turn the function dial to the 'A~' position.
- Open the clamp jaw and enclose only one conductor of the circuit. Ensure the jaw is fully closed.
- The display will show the AC current reading.

Image 5.2.1: The clamp meter is shown in use, measuring the AC current flowing through a single conductor of an outdoor air conditioning unit.
5.3 Resistance Measurement (Ω)
- Turn the function dial to the 'Ω' position.
- Ensure the circuit or component is de-energized before connecting the test leads.
- Connect the test leads across the component to measure its resistance.
5.4 Continuity Test (☊)
- Turn the function dial to the 'Ω' position and press 'SEL' until the continuity symbol (☊) appears.
- Connect the test leads across the circuit or component.
- If the resistance is below a certain threshold (typically 50Ω), the meter will emit an audible beep, indicating continuity.
5.5 Diode Test (▲)
- Turn the function dial to the 'Ω' position and press 'SEL' until the diode symbol (▲) appears.
- Connect the red test lead to the anode and the black test lead to the cathode of the diode.
- The display will show the forward voltage drop. Reverse the leads to check for an open circuit, indicating a good diode.
5.6 Temperature Measurement
- Turn the function dial to the temperature symbol.
- Connect the K-type thermocouple to the input jacks.
- Place the thermocouple tip on or near the object whose temperature is to be measured.
- The display will show the temperature reading in Celsius or Fahrenheit.

Image 5.6.1: The CM1 is shown measuring the temperature of water in a glass using the included K-type thermocouple.
5.7 Non-Contact Voltage (NCV) Detection (V-Alert)
The NCV function allows for quick detection of AC voltage without direct contact, enhancing safety.
- Press the 'V-Alert' button.
- Move the top of the meter near a conductor or outlet.
- If AC voltage is detected, the meter will beep and the NCV indicator will light up.
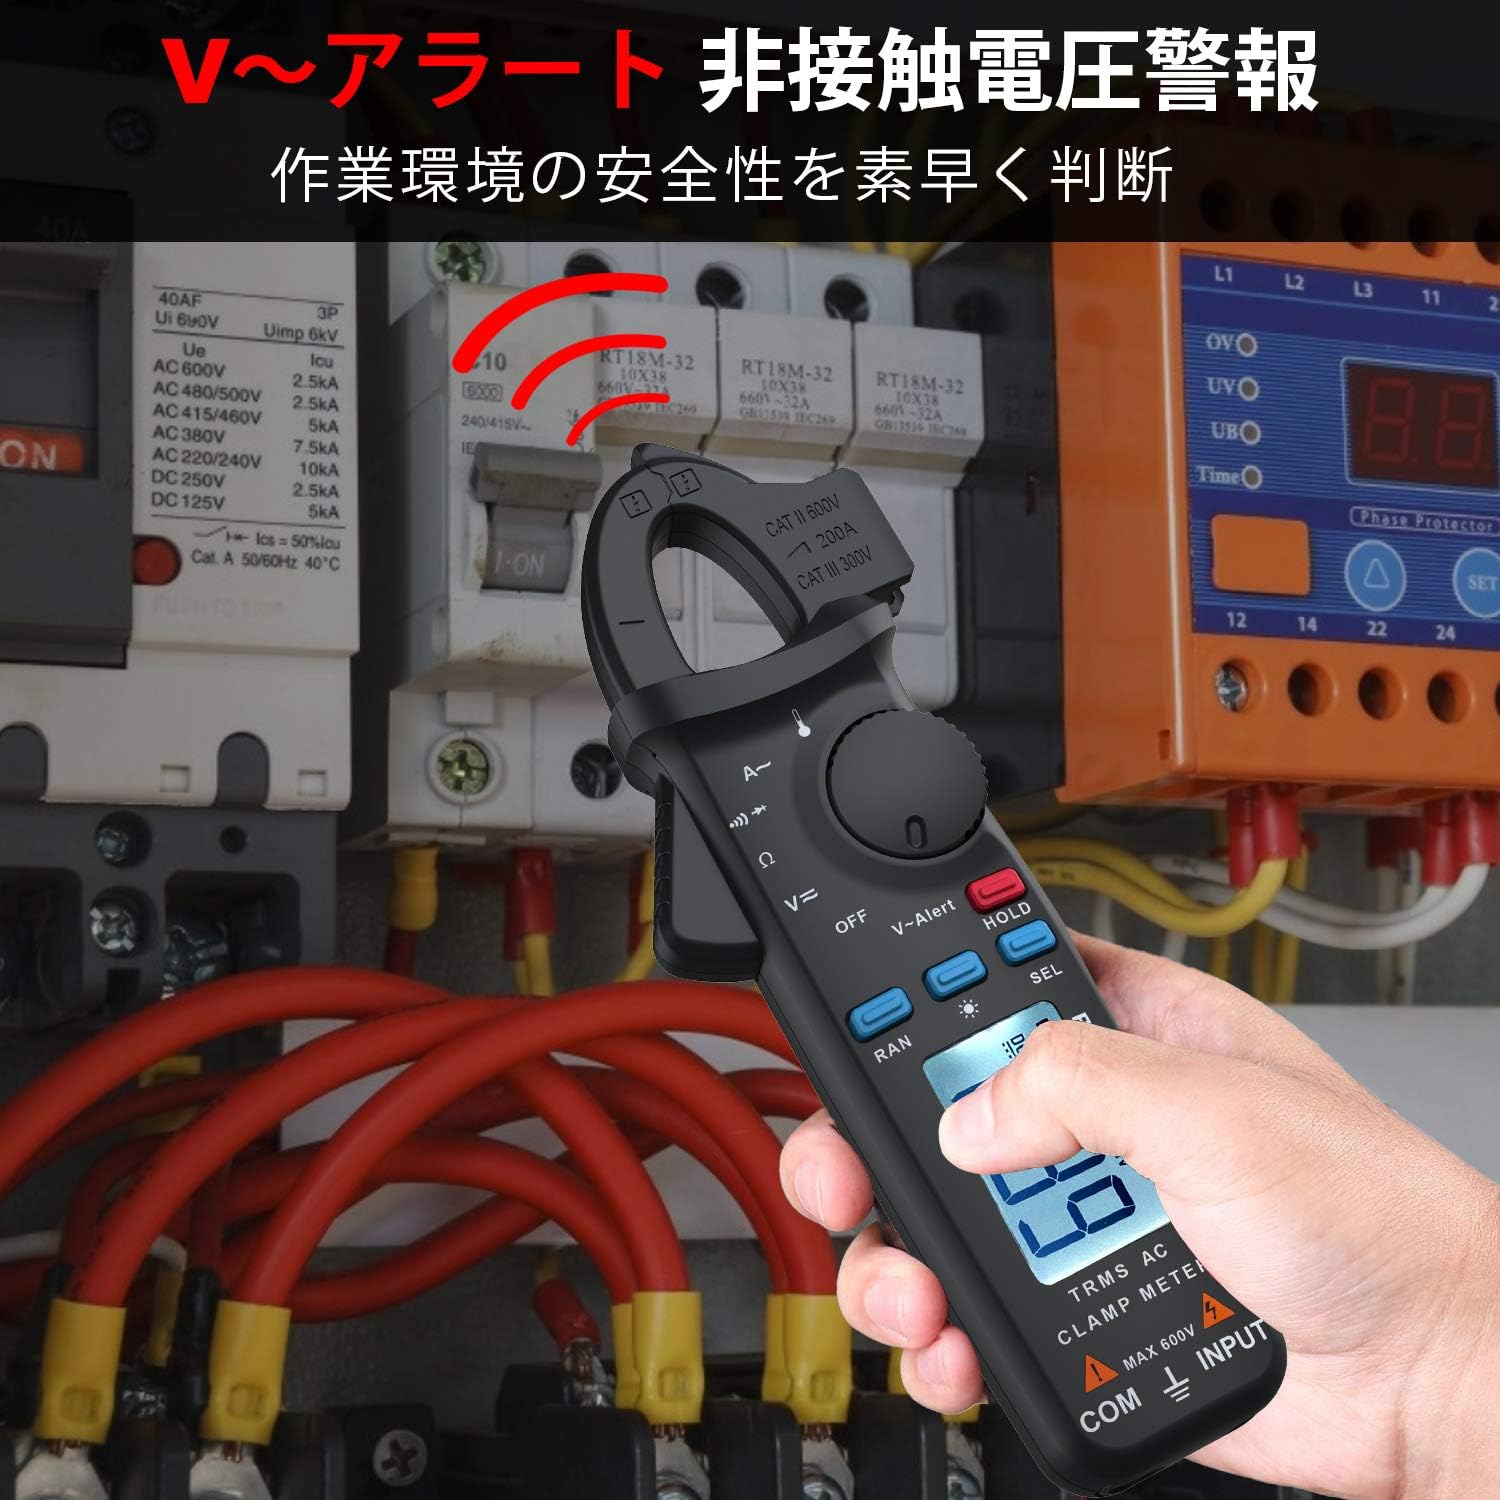
Image 5.7.1: The clamp meter is used to detect non-contact voltage near a circuit breaker panel, indicating the presence of live AC voltage.
5.8 Special Functions
- Data Hold (HOLD): Press the 'HOLD' button to freeze the current reading on the display. Press again to release.
- Backlight: Press and hold the 'SEL' button to activate the display backlight for improved visibility in dark environments. Press again to turn off.
- Auto Range (RAN): The meter automatically selects the appropriate measurement range. Press 'RAN' to switch to manual ranging, then press again to cycle through ranges. Press and hold 'RAN' to return to auto-ranging.
- Auto Power Off: The meter will automatically power off after approximately 15 minutes of inactivity to conserve battery life.
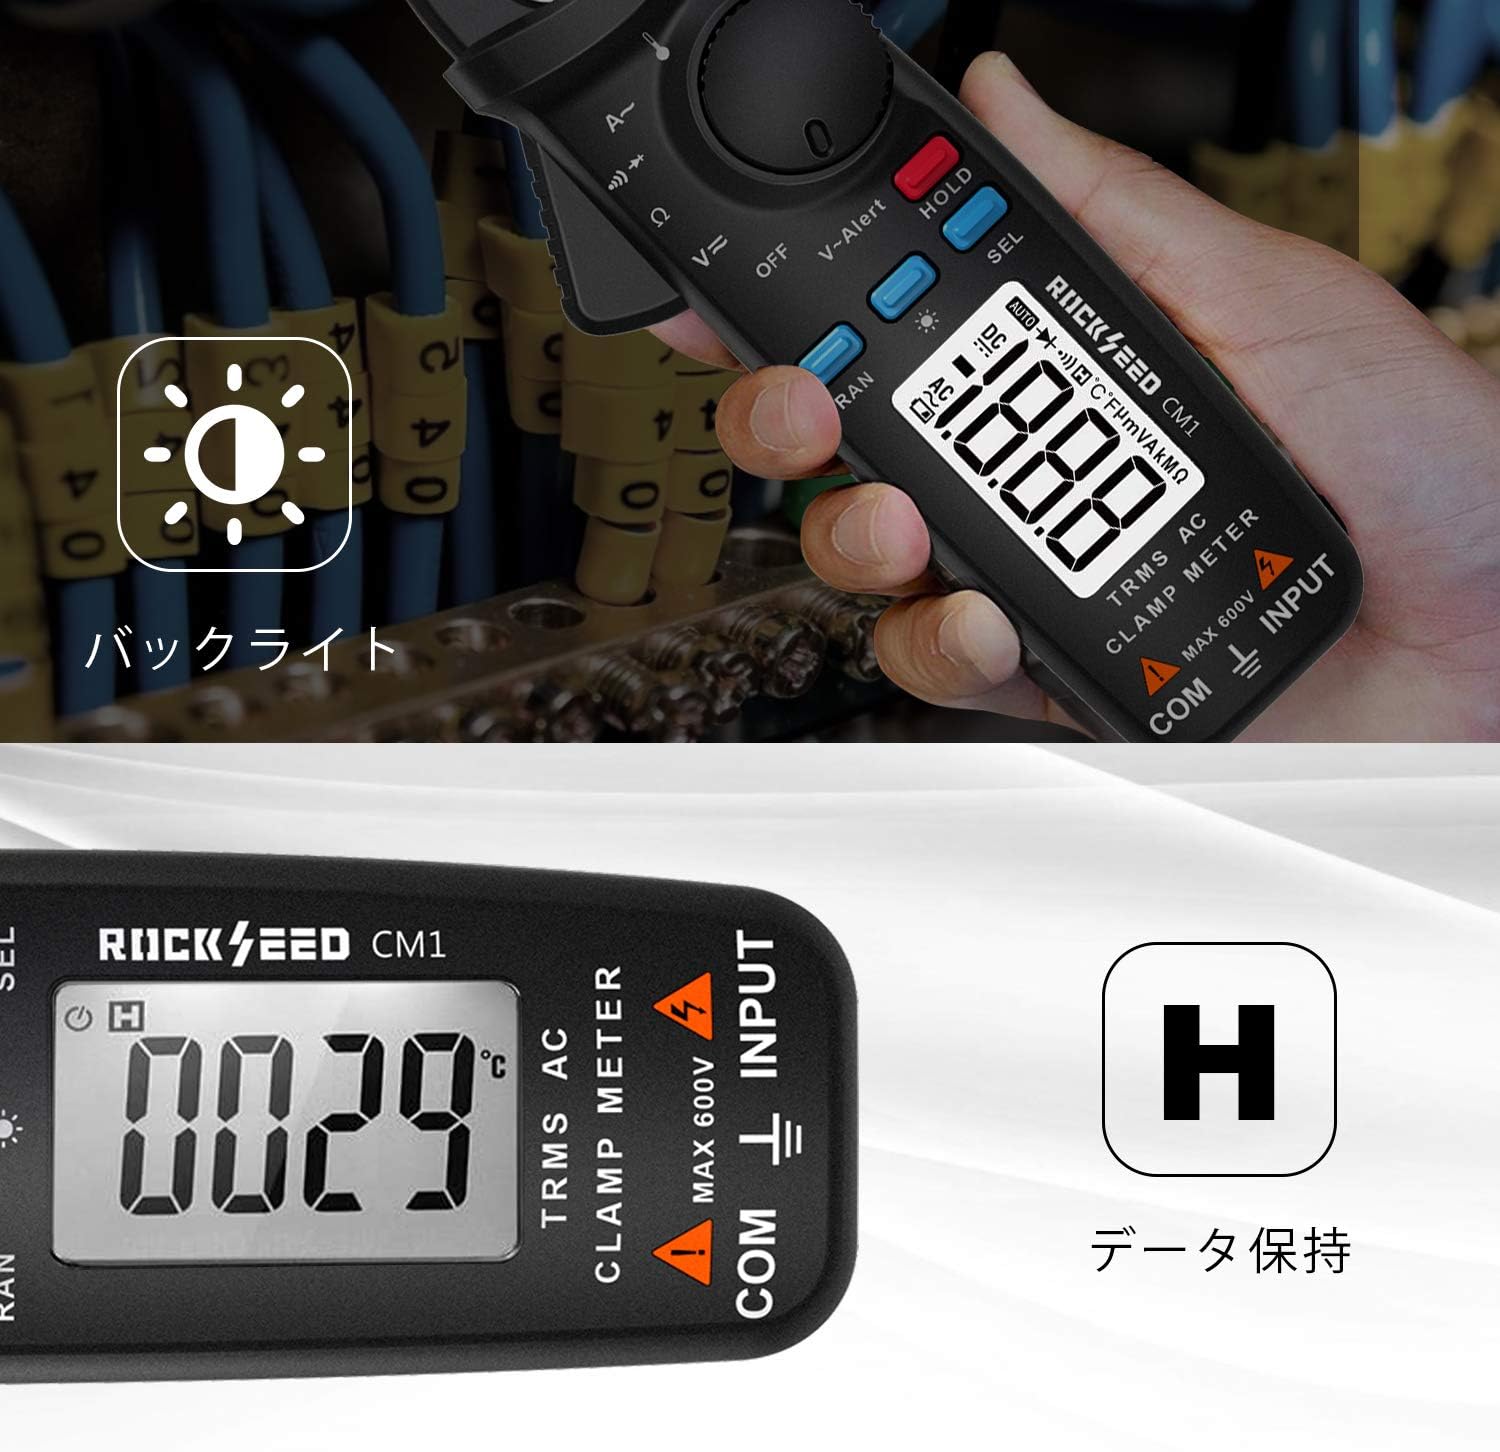
Image 5.8.1: The meter's display is illuminated by its backlight, and the 'H' symbol indicates that the data hold function is active, freezing the displayed reading.
6. Maintenance
6.1 Cleaning
Wipe the meter's case with a damp cloth and mild detergent. Do not use abrasives or solvents. Ensure the meter is completely dry before use.
6.2 Battery Replacement
When the low battery indicator appears on the display, replace the batteries as described in Section 4.1. Remove batteries if the meter is not used for an extended period.
6.3 Storage
Store the meter in its protective cloth pouch in a cool, dry place, away from direct sunlight and extreme temperatures.
7. Troubleshooting
| Problem | Possible Cause | Solution |
|---|---|---|
| Meter does not power on | Dead or incorrectly installed batteries | Check battery polarity; replace batteries. |
| No reading or unstable reading | Incorrect function selected; poor test lead connection; circuit issue | Verify function dial setting; ensure secure test lead connection; check circuit integrity. |
| Clamp jaw reading is zero or incorrect | Multiple conductors in jaw; jaw not fully closed | Ensure only one conductor is enclosed; close jaw completely. |
| Low battery indicator | Batteries are low | Replace batteries immediately. |
8. Specifications
| Feature | Specification |
|---|---|
| Model | CM1 |
| Brand | RockSeed |
| Measurement Type | True-RMS Clamp Meter |
| AC/DC Voltage | Yes |
| AC Current | Yes (up to 200A, 1mA resolution) |
| Resistance | Yes |
| Continuity | Yes |
| Diode Test | Yes |
| Temperature | Yes (with K-Type Thermocouple) |
| NCV (Non-Contact Voltage) | Yes |
| Display | LCD with Backlight |
| Power Source | 2 x 1.5V AAA Batteries (Included) |
| Auto Power Off | Yes (after 15 minutes) |
| Data Hold | Yes |
| Safety Rating | CAT III 600V |
| Material | ABS Plastic |
| Dimensions | Approx. 19.8 x 9 x 4.4 cm |
| Weight | Approx. 140 g |
9. Warranty and Support
The RockSeed CM1 True-RMS Clamp Meter is covered by a TWO-YEAR warranty from the date of purchase. This warranty covers defects in materials and workmanship under normal use.
For technical support, warranty claims, or any product-related questions, please contact RockSeed customer service through the retailer where the product was purchased or refer to the contact information provided on the product packaging or official RockSeed website.