NEEWER S101-300W
Neewer S101-300W Professional Studio Monolight Strobe Flash Light
Model: S101-300W | Brand: NEEWER
1. Introduction
The Neewer S101-300W Studio Monolight is a professional-grade strobe flash designed for studio photography, offering powerful and consistent illumination. This manual provides comprehensive instructions for the safe and effective operation, setup, and maintenance of your S101-300W monolight.

Image: The Neewer S101-300W Studio Monolight, showcasing its compact design and included power cable.
Video: An overview of the Neewer S101-300W Professional Studio Monolight Strobe Light, demonstrating its features and applications in a studio setting.
2. Safety Information
Please read all safety warnings and instructions before using this product to prevent electric shock, fire, or serious injury.
- Do not expose the unit to rain or moisture.
- Do not disassemble or attempt to repair the unit yourself. Refer all servicing to qualified personnel.
- Ensure the power supply voltage matches the requirements specified on the unit.
- Keep the unit away from flammable materials. The modeling lamp can become very hot during operation.
- Allow the modeling lamp to cool down before touching or replacing it.
- Always disconnect the power cord before cleaning or when not in use.
3. Product Overview and Components
Familiarize yourself with the various parts and controls of your S101-300W monolight.
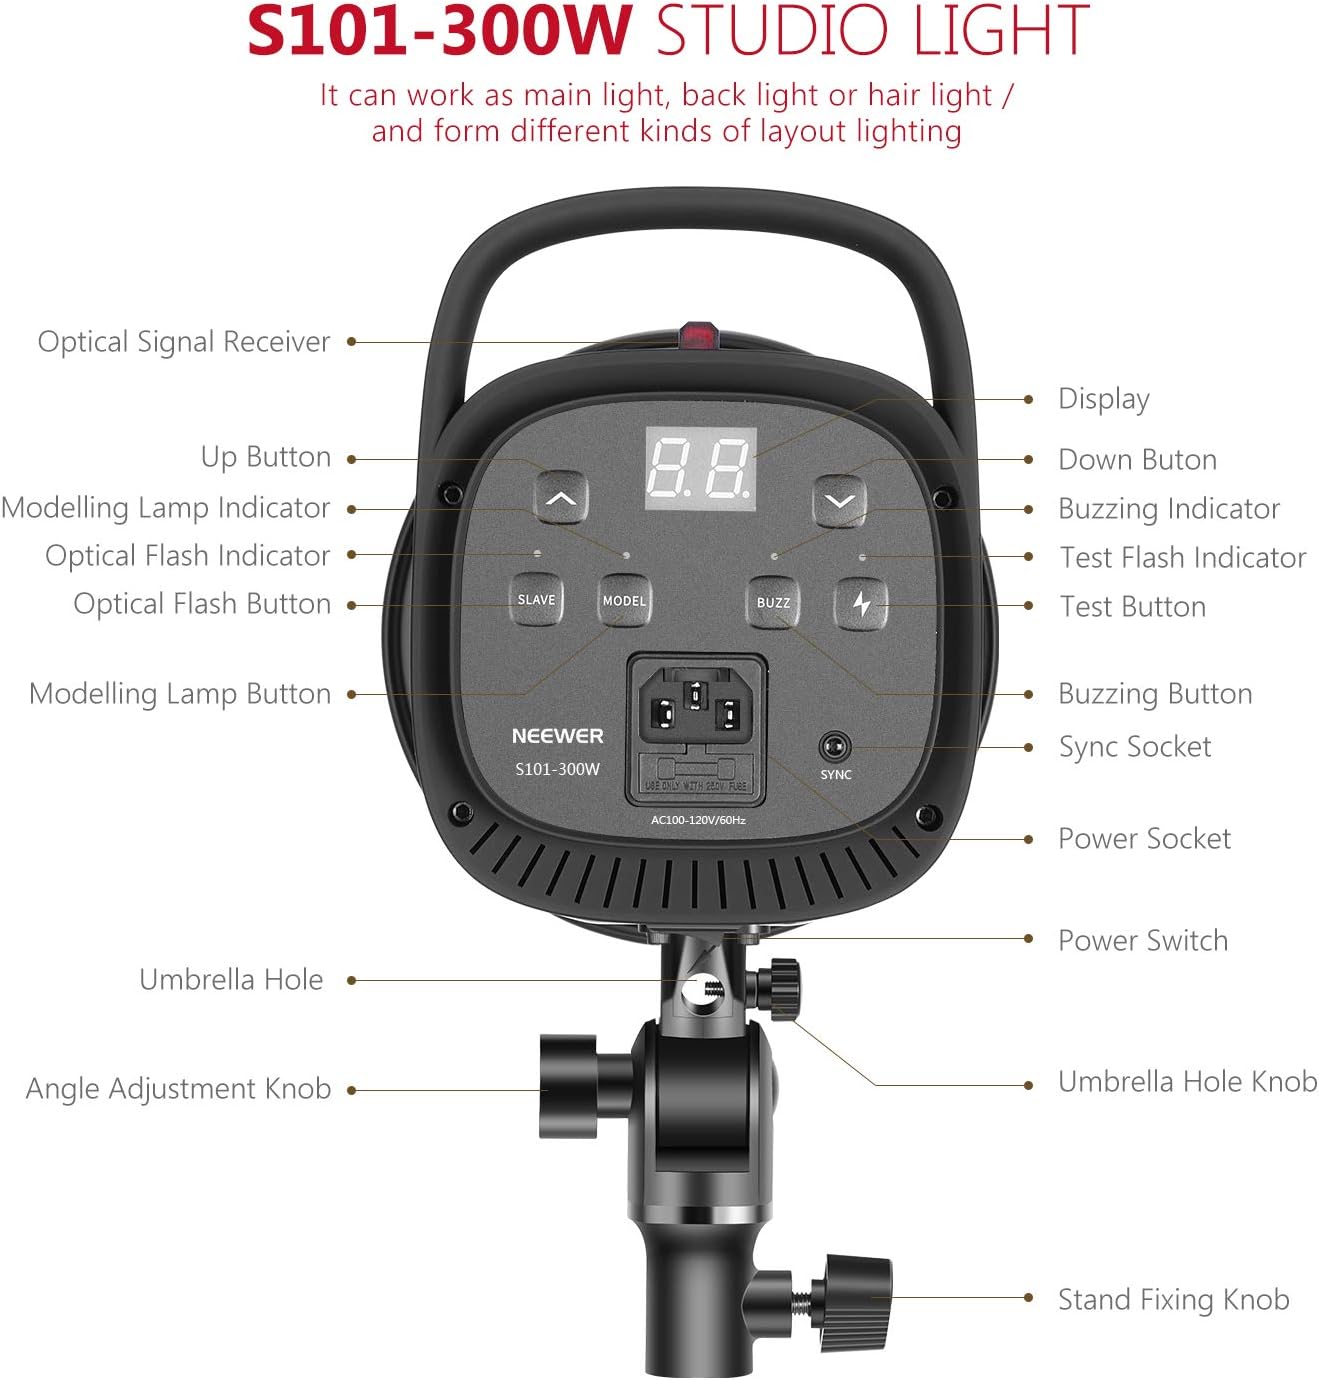
Image: Detailed diagram illustrating the various components and control buttons on the rear panel of the S101-300W monolight.
- Optical Signal Receiver: Detects optical flash signals from a master flash.
- Up Button: Increases flash power or modeling lamp brightness.
- Modelling Lamp Indicator: Shows the status of the modeling lamp.
- Optical Flash Indicator: Lights up when an optical flash is detected.
- Optical Flash Button (SLAVE): Toggles S1/S2 slave modes.
- Modelling Lamp Button (MODEL): Turns the modeling lamp on/off and adjusts brightness.
- Display: Shows current power settings.
- Down Button: Decreases flash power or modeling lamp brightness.
- Buzzing Indicator: Indicates the buzzing sound status.
- Test Flash Indicator: Lights up when the unit is ready to flash.
- Test Button (TEST): Triggers a test flash.
- Buzzing Button (BUZZ): Toggles the buzzing sound on/off.
- Sync Socket: 3.5mm port for wired sync connection.
- Power Socket: Connects the power cord.
- Power Switch: Turns the unit on/off.
- Umbrella Hole: Socket for mounting a soft umbrella.
- Angle Adjustment Knob: Secures the tilt angle of the monolight.
- Stand Fixing Knob: Secures the monolight to a light stand.
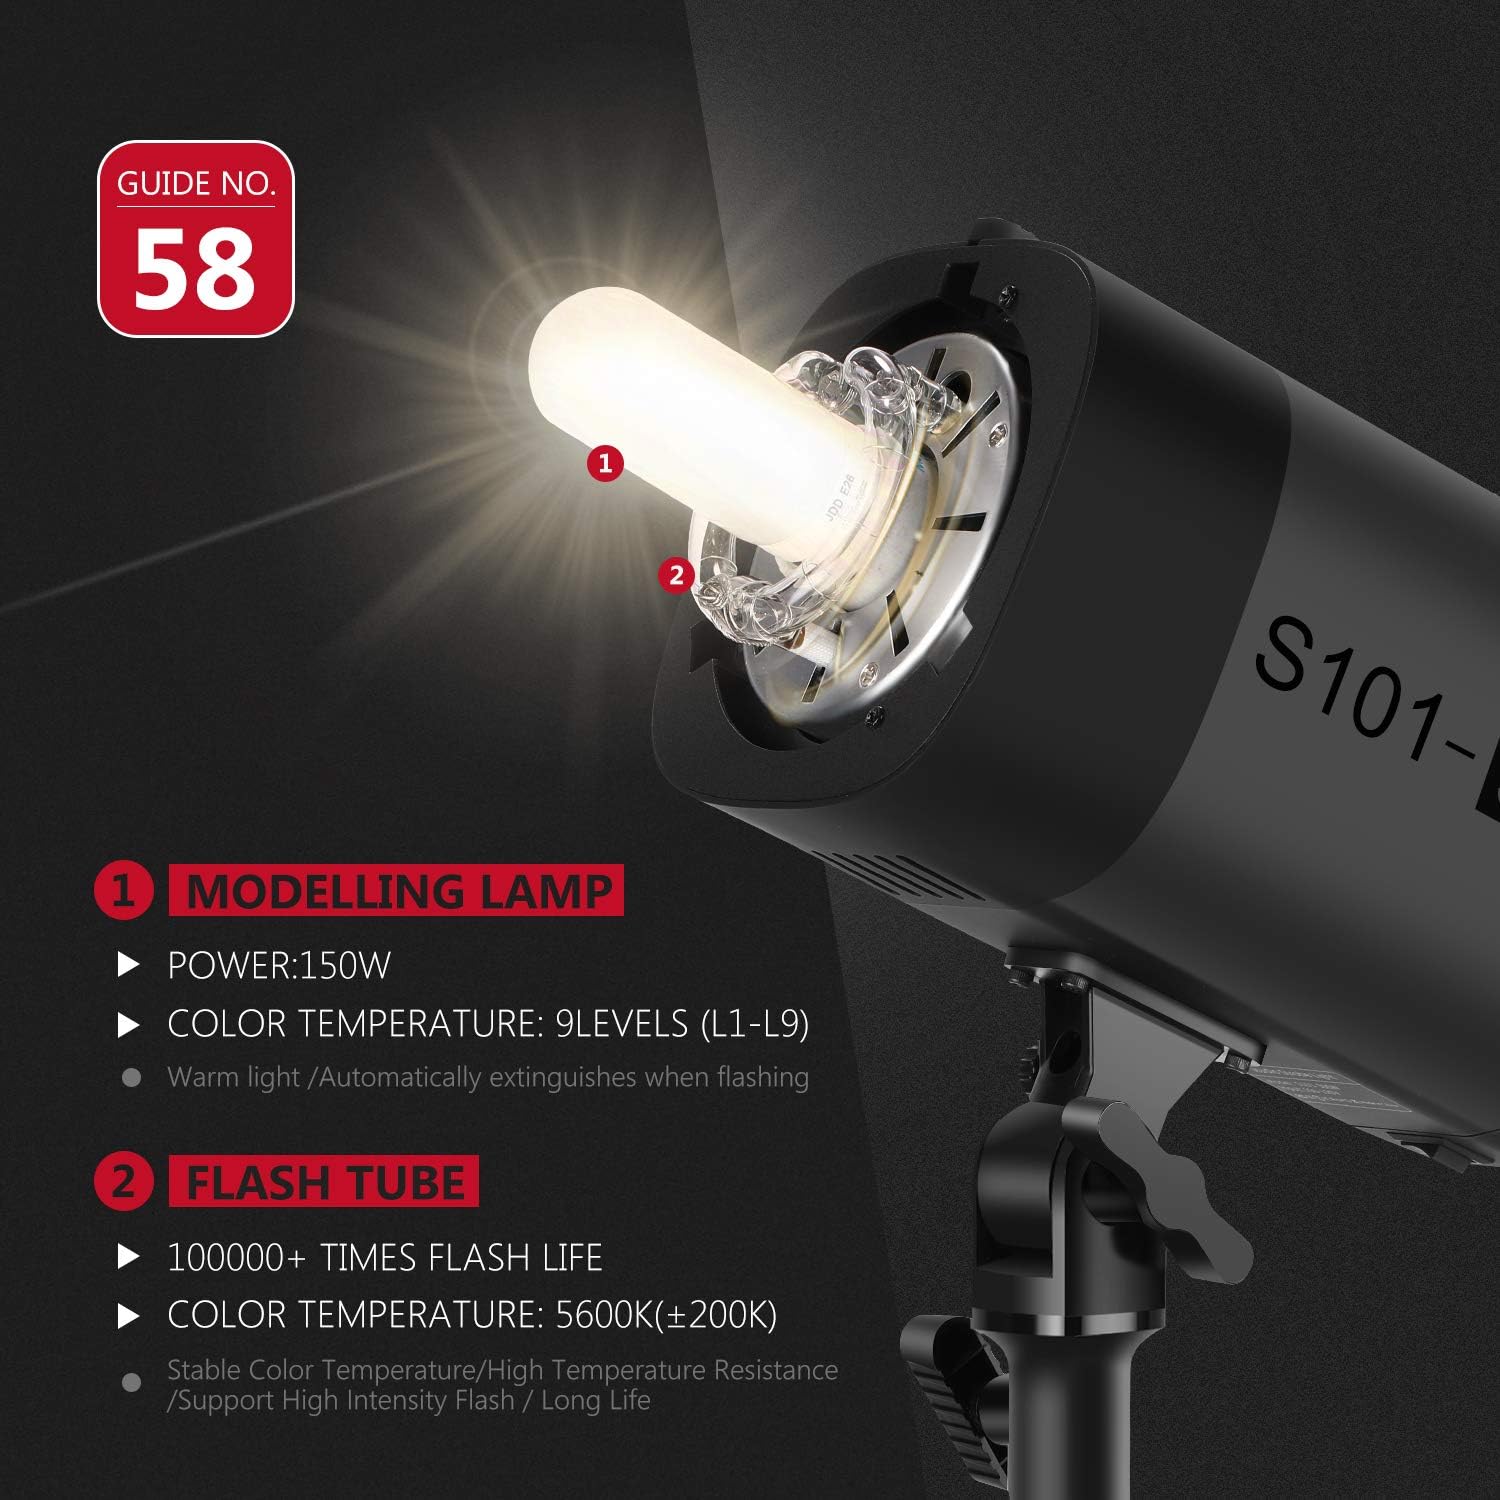
Image: Close-up view of the 150W modeling lamp and flash tube, highlighting their specifications.
4. Setup
4.1 Mounting the Monolight
- Attach the monolight to a compatible light stand using the stand fixing knob. Ensure it is securely tightened.
- Adjust the tilt angle of the monolight using the angle adjustment knob to direct the light as needed.

Image: Demonstration of the 180° angle adjustment feature for precise light positioning.
4.2 Attaching Accessories (Bowens Mount)
The S101-300W features a standard Bowens mount for attaching various light modifiers.
- Align the accessory (e.g., standard reflector, softbox, beauty dish) with the Bowens mount on the front of the monolight.
- Insert the accessory and rotate it clockwise until it clicks into place, securing it firmly.
- To remove, press the release button on the mount and rotate the accessory counter-clockwise.
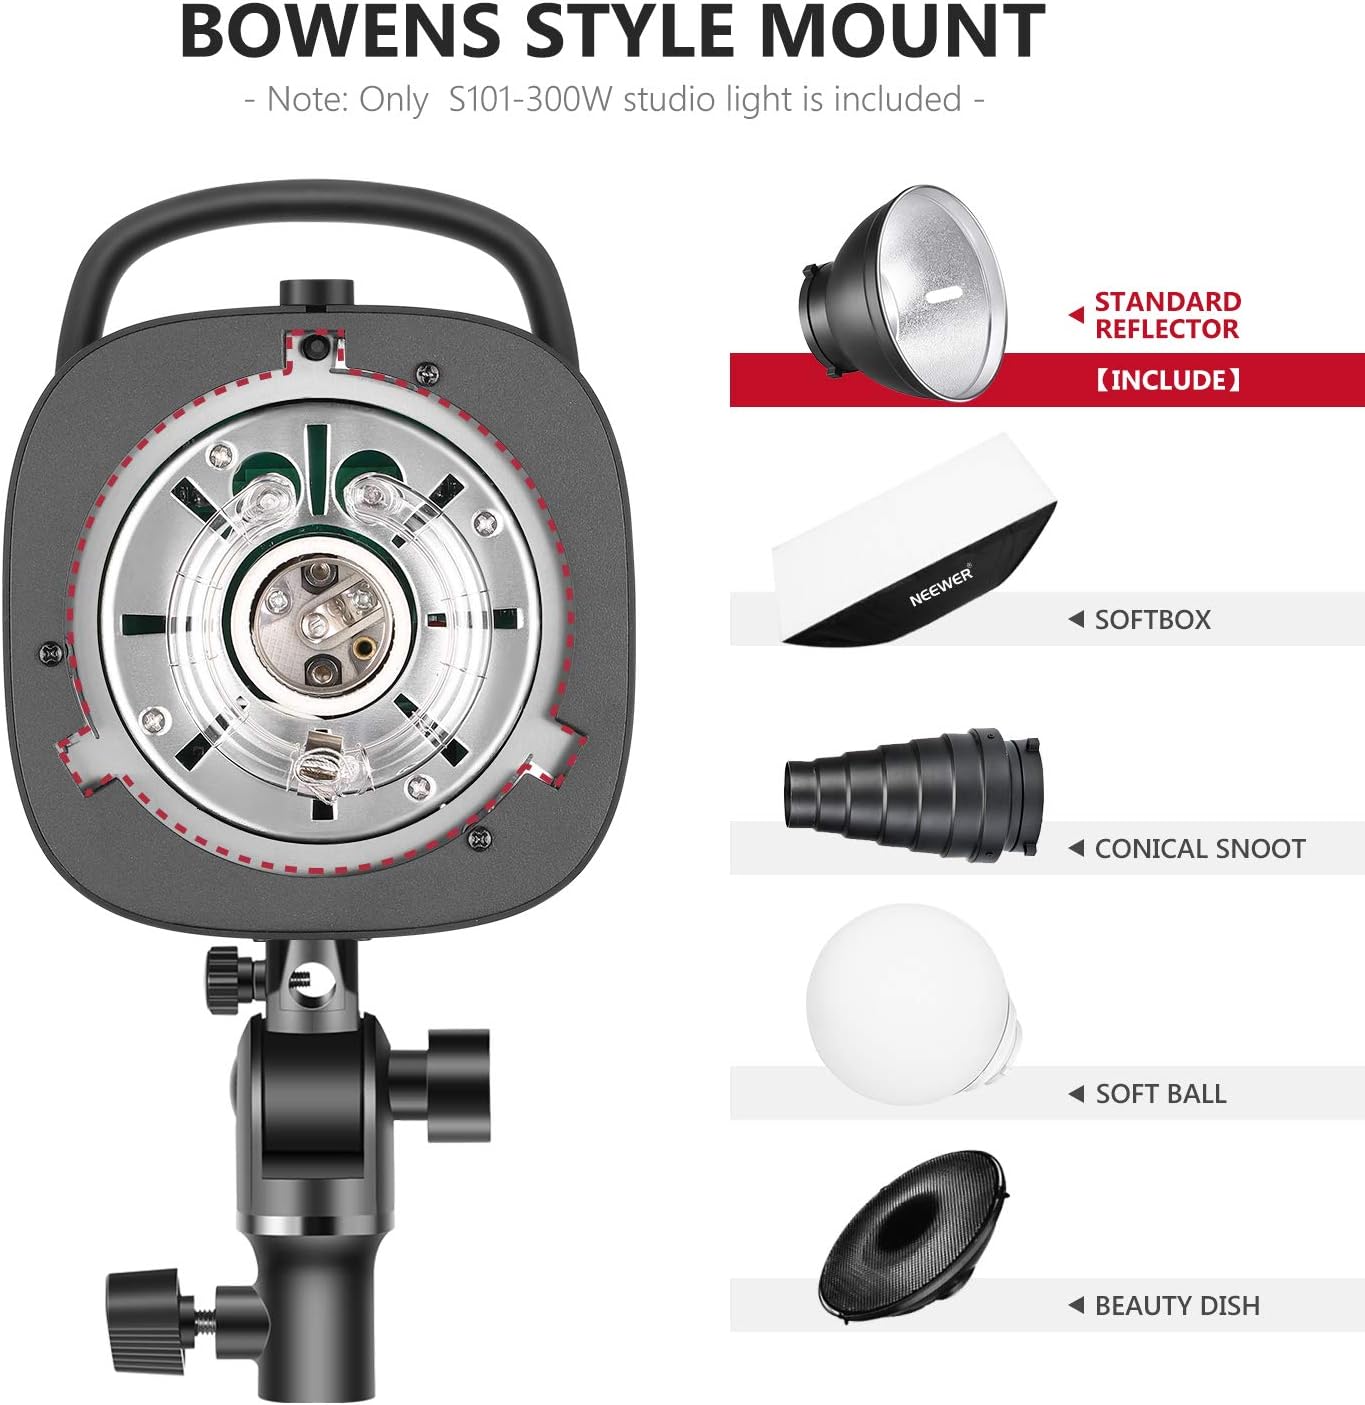
Image: Illustration of the Bowens style mount and compatible light modifiers such as standard reflector, softbox, conical snoot, soft ball, and beauty dish.
4.3 Power Connection
Connect the provided power cord to the power socket on the monolight and then to a suitable AC power outlet.
For use with a soft umbrella, insert the umbrella shaft into the umbrella hole located on the mounting bracket.

Image: Close-up of the umbrella hole, designed to mount a soft umbrella for diffused lighting.
5. Operating Instructions
5.1 Powering On/Off
Flip the Power Switch to the "ON" position to power on the monolight. The display will illuminate. Flip to "OFF" to power down.
5.2 Adjusting Flash Power
Use the Up and Down buttons to adjust the flash output power. The power level is displayed on the screen, ranging from 7.0 (1/8th power) to 10 (1/1 power). The unit will emit a buzzing sound when fully recycled and ready to flash (if buzzing is enabled).
5.3 Modelling Lamp Operation
Press the MODEL button to turn the 150W modeling lamp on or off. Use the Up and Down buttons to adjust its brightness (L1-L9). The modeling lamp automatically extinguishes when the flash fires.
Important: The modeling lamp can become very hot. For safety, it is recommended not to use the modeling lamp for more than 10 minutes continuously, especially with flammable accessories. Allow it to cool down for at least 10 minutes before continued use.
5.4 Flash Modes (S1/S2 Optical Control, Sync Socket)
The S101-300W supports multiple flash triggering modes:
- Manual Control: Trigger the flash directly using the TEST button or a compatible trigger connected via the sync socket.
- S1 Mode (Optical Slave): In S1 mode, the monolight acts as a slave flash. It will trigger simultaneously with the first flash from a master flash unit. This is suitable for manual flash systems.
- S2 Mode (Pre-flash Cancel Slave): In S2 mode, the monolight also acts as a slave but ignores the pre-flash from a master flash unit (common in TTL systems). It will trigger on the second flash.
- 3.5mm Sync Socket: Connect a wired sync cable from your camera or flash trigger to the 3.5mm Sync Socket for reliable wired synchronization.

Image: Visual representation of the multiple flash modes: Manual Control, S1/S2 Optical Control, and 3.5mm Sync Socket.
5.5 Recycle Time and Flash Duration
The monolight has a recycle time of 0.4-2.5 seconds, depending on the flash power setting. The flash duration ranges from 1/2000s to 1/800s, allowing for freezing fast motion.
6. Maintenance
- Cleaning: Use a soft, dry cloth to clean the exterior of the monolight. Do not use abrasive cleaners or solvents.
- Storage: Store the monolight in a cool, dry place, away from direct sunlight and excessive humidity.
- Bulb Replacement: If the modeling lamp or flash tube needs replacement, ensure the unit is unplugged and cooled down. Refer to a qualified technician for flash tube replacement.
7. Troubleshooting
| Problem | Possible Cause | Solution |
|---|---|---|
| Monolight does not power on. | No power supply; faulty power cord; unit malfunction. | Check power cord connection and wall outlet. Try a different power cord. If issue persists, contact support. |
| Flash does not fire. | Not fully recycled; incorrect trigger mode; faulty sync cable/trigger. | Wait for the Test Flash Indicator to light up. Ensure correct S1/S2 mode or proper sync cable connection. Test with the TEST button. |
| Modeling lamp turns off automatically. | Overheating protection. | This is a safety feature. Allow the unit to cool down for at least 10 minutes before reactivating the modeling lamp. Reduce continuous usage time. |
| Inconsistent flash output. | Low battery in external trigger (if used); unit not fully recycled. | Replace trigger batteries. Allow sufficient recycle time between flashes. |
8. Specifications
| Feature | Detail |
|---|---|
| Model | S101-300W (Item model number: 10096969) |
| Flash Power | 300W |
| Color Temperature | 5600K (±200K) |
| Modeling Lamp | 150W (Adjustable L1-L9) |
| Flash Sync Speed | Up to 1/2000s |
| Recycle Time | 0.4-2.5 seconds |
| Mount Type | Bowens Mount |
| Sync Method | Optical (S1/S2), 3.5mm Sync Socket |
| Item Weight | 6.09 pounds (approx. 2.76 kg) |
| Package Dimensions | 14.5 x 11.1 x 7.5 inches (approx. 36.8 x 28.2 x 19.1 cm) |
| Included Components | Monolight, Standard Reflector, Power Cord |
9. Warranty and Support
NEEWER products are designed and manufactured to the highest quality standards. For warranty information and technical support, please refer to the warranty card included with your product or visit the official NEEWER website. Keep your purchase receipt as proof of purchase.
For further assistance, you may contact NEEWER customer service through their official channels.
Ask a question about this manual
Ask about setup, troubleshooting, compatibility, parts, safety, or missing instructions. Manuals+ will review the question and use this page’s manual context to help answer it.