Introduction
The Mitsubishi MRCH2 Wireless Remote Controller is designed to provide precise control over your Mitsubishi Electric indoor units. It allows users to adjust settings such as temperature, operation mode, fan speed, and airflow direction. This controller offers robust programmability, learning capabilities, and internet connectivity through a RedLINK 3.0 gateway, enhancing your climate control experience.
Key features include:
- Wireless thermostat functionality for remote control of Mitsubishi Electric indoor units, compatible with the MIFH2 interface.
- Dual setpoint control with system changeover, offering daily, weekly, and auto-off timer options.
- Ability to set temperature range limits, dependent on the connected system.
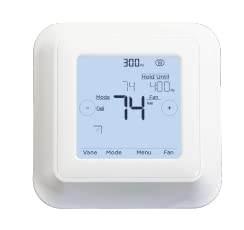
- Backlit, wall-mounted central control with an easy-to-read display.
- Automatic display lock feature.
Setup Instructions
Follow these steps to set up your Mitsubishi MRCH2 Wireless Remote Controller:
- Battery Installation: The MRCH2 controller is battery-powered and requires 2 AA batteries, which are typically included. Open the battery compartment, insert the batteries according to the polarity markings, and close the compartment securely.
- Wall Mounting: Choose a central location on an interior wall, away from direct sunlight, drafts, or heat sources, to ensure accurate temperature readings. Use the provided mounting hardware to securely attach the controller to the wall. Ensure the unit is level for proper operation and aesthetic appeal.
- Wireless Interface Connection: The MRCH2 works in conjunction with the MIFH2 wireless interface. Ensure the MIFH2 unit is properly installed and connected to your Mitsubishi Electric indoor unit via its CN105 connector. The MRCH2 will communicate wirelessly with the MIFH2.
- Initial Power-On and Pairing: Once batteries are installed and the unit is mounted, the display should illuminate. Follow the on-screen prompts to initiate the pairing process with your MIFH2 wireless interface. Refer to the MIFH2 manual for specific pairing instructions if needed.
- Basic Configuration: After successful pairing, you may be prompted to set the current time, date, and initial temperature preferences.
Operating Instructions
The MRCH2 controller provides intuitive control over your HVAC system. The backlit display and touch interface allow for easy adjustments.
- Power On/Off: Use the designated button or on-screen option to turn the system on or off.
- Operation Modes: Select from available modes such as Cool, Heat, Drying, and Fan. The current mode is typically displayed prominently.
- Temperature Setting: Adjust the desired temperature using the up/down arrows or plus/minus icons on the display. The controller supports separate dual set points for heating and cooling modes.
- Fan Speed: Modify the fan speed (e.g., Low, Medium, High, Auto) to suit your comfort needs.
- Airflow Direction: If supported by your indoor unit, adjust the airflow direction for optimal distribution.
- Programmability: Utilize the programmable features (5-1-1 Day, 5-2 Day, or 7-Day) to set schedules for temperature changes throughout the week, optimizing energy use and comfort. Access these settings through the 'Menu' option.
- App Control: For advanced control and remote access, connect your system to a RedLINK 3.0 gateway and use the compatible smartphone application.
Maintenance
Regular maintenance ensures the longevity and optimal performance of your MRCH2 Wireless Remote Controller.
- Battery Replacement: When the low battery indicator appears on the display, replace the 2 AA batteries promptly. Use high-quality alkaline batteries for best performance.
- Cleaning: Gently wipe the display and casing with a soft, dry cloth. Avoid using abrasive cleaners, solvents, or spraying liquids directly onto the unit, as this can damage the electronics or screen.
- Air Filter Maintenance: The system may display alerts such as "REPLACE AIR" or similar messages, indicating that the air filter in your indoor unit requires cleaning or replacement. Refer to your indoor unit's manual for specific instructions on air filter maintenance. Regular filter maintenance is crucial for system efficiency and air quality.
Troubleshooting
If you encounter issues with your MRCH2 controller, try the following troubleshooting steps:
- Controller Not Responding:
- Check the batteries. Replace them if they are low or depleted.
- Ensure the controller is within range of the MIFH2 wireless interface.
- Perform a soft reset by removing the batteries for a few minutes and then reinserting them.
- Inconsistent Temperature Readings or System Behavior:
- Verify that the controller is not exposed to direct sunlight, drafts, or heat sources that could affect its temperature sensor.
- Ensure the MIFH2 wireless interface is functioning correctly and communicating with the indoor unit.
- Check for any error codes displayed on the controller or indoor unit. Consult the indoor unit's manual for error code interpretations.
- Difficulty with Programming:
- Review the 'Operating Instructions' section and the full product manual for detailed programming steps.
- Ensure the correct day and time are set on the controller.
- No Connectivity with App:
- Confirm that your RedLINK 3.0 gateway is properly connected to your home network and the internet.
- Ensure the app is updated to the latest version.
- Check the connection status between the MRCH2, MIFH2, and the RedLINK 3.0 gateway.
If problems persist after attempting these steps, contact customer support.
Specifications
| Feature | Detail |
|---|---|
| Brand | MITSUBISHI |
| Model Number | MRCH2 |
| Controller Type | App Control, Touch |
| Special Features | 5-1-1 Day Programmable, 5-2 Day Programmable, 7-Day Programmable, Humidity Sensor, Phone App Available, Temperature Sensor |
| Color | White |
| Temperature Control Type | Programmable |
| Connectivity Technology | Wireless |
| Power Source | Battery Powered (2 AA batteries included) |
| Display Type | LCD, Backlit |
| Control Method | Remote |
| Connectivity Protocol | RedLINK 3.0 |
| Mounting Type | Wall Mount |
| Item Weight | 3.2 ounces |
| Material Type | Plastic, ABS |
| UPC | 194159003293 |
Warranty Information
The Mitsubishi MRCH2 Wireless Remote Controller comes with a 1-year manufacturer's warranty. This warranty covers defects in materials and workmanship under normal use. Please retain your proof of purchase for warranty claims. For specific terms and conditions, refer to the warranty documentation included with your product or contact Mitsubishi Electric customer support.
Support
For further assistance, technical support, or service inquiries regarding your Mitsubishi MRCH2 Wireless Remote Controller, please contact Mitsubishi Electric customer support. You can typically find contact information on the official Mitsubishi Electric website or in the documentation provided with your product. When contacting support, please have your model number (MRCH2) and proof of purchase readily available.