
Everlast Welders Canada Poweri-TIG200T
Poweri-TIG 200T Digital DC TIG/Stick Welder
User Manual
Model: Poweri-TIG200T | Brand: Everlast Welders Canada
1. Introduction
The Everlast Poweri-TIG 200T is a versatile and portable digital DC TIG/Stick welder designed for a wide range of welding applications. Featuring dual voltage capability (110V/220V), a low 2 Amp start, and advanced pulse frequency control, this unit offers precise and efficient welding performance for both professional and hobbyist use. Its robust design and intuitive controls make it an excellent choice for fabrication, repair, and production tasks.
2. Safety Information
WARNING: Welding can be dangerous. Always follow proper safety procedures to prevent injury or death.
- Always wear appropriate personal protective equipment (PPE), including welding helmet, gloves, protective clothing, and safety shoes.
- Ensure adequate ventilation to avoid inhaling welding fumes.
- Protect yourself and others from electric shock. Do not touch live electrical parts.
- Prevent fire and explosion. Keep flammable materials away from the welding area.
- Arc rays can burn eyes and skin. Use proper shielding.
- This welder is designed for 6011 rods for Stick welding. It is NOT designed for 6010 rods. Using incorrect rods may lead to poor performance or damage.
- Disconnect power before servicing or moving the unit.
For comprehensive safety guidelines, refer to ANSI Z49.1 "Safety in Welding, Cutting, and Allied Processes" and your local safety regulations.
3. Product Features and Benefits
- TIG & Stick Function: Offers both TIG and Stick capabilities with adjustable parameters for versatile welding.
- Pulse Frequency up to 500 Hz: Provides adjustable pulse frequency for maximum heat control and improved weld quality.
- Heavy-Duty, Redesigned High Frequency Start: Reduces maintenance issues while improving arc starting with a low 3A threshold.
- Portable, Industrial Performance: Dual voltage capability (110V/220V), memory for 9 programs, and ergonomic design for easy portability and setup.
- High Switching Speed IGBT Inverter Design: Ensures efficient and stable power delivery.
- Digital Microprocessor: For precise control and consistent performance.
- Simplified, Plug and Play Internal Construction: Enhances reliability and serviceability.
- Precise Control Down to 2 Amps: Ideal for delicate welding tasks.
- Solid, Stable Arc Performance and Feel: Contributes to high-quality welds.
- 35% Duty Cycle at 200 Amps TIG, 160 Amps Stick (240V): Indicates robust performance for extended use.
- Suitable for Gun Smiths: Offers low amp stability for specialized applications.
- Good Choice for Mold Repair and Rebuilding: Versatility for specific industrial needs.
- Intuitive, Simple Control Design: User-friendly interface for ease of operation.

Image: The Poweri-TIG 200T welder with a list of its key features and benefits, highlighting its advanced technology and versatile applications.
4. Included Components
The Poweri-TIG 200T welder comes with a comprehensive set of accessories to get you started. Please verify all components are present upon unboxing.

Image: Overview of the Poweri-TIG 200T welder unit along with all standard included accessories, such as the TIG torch, ground clamp, stick electrode holder, foot pedal, and gas regulator.
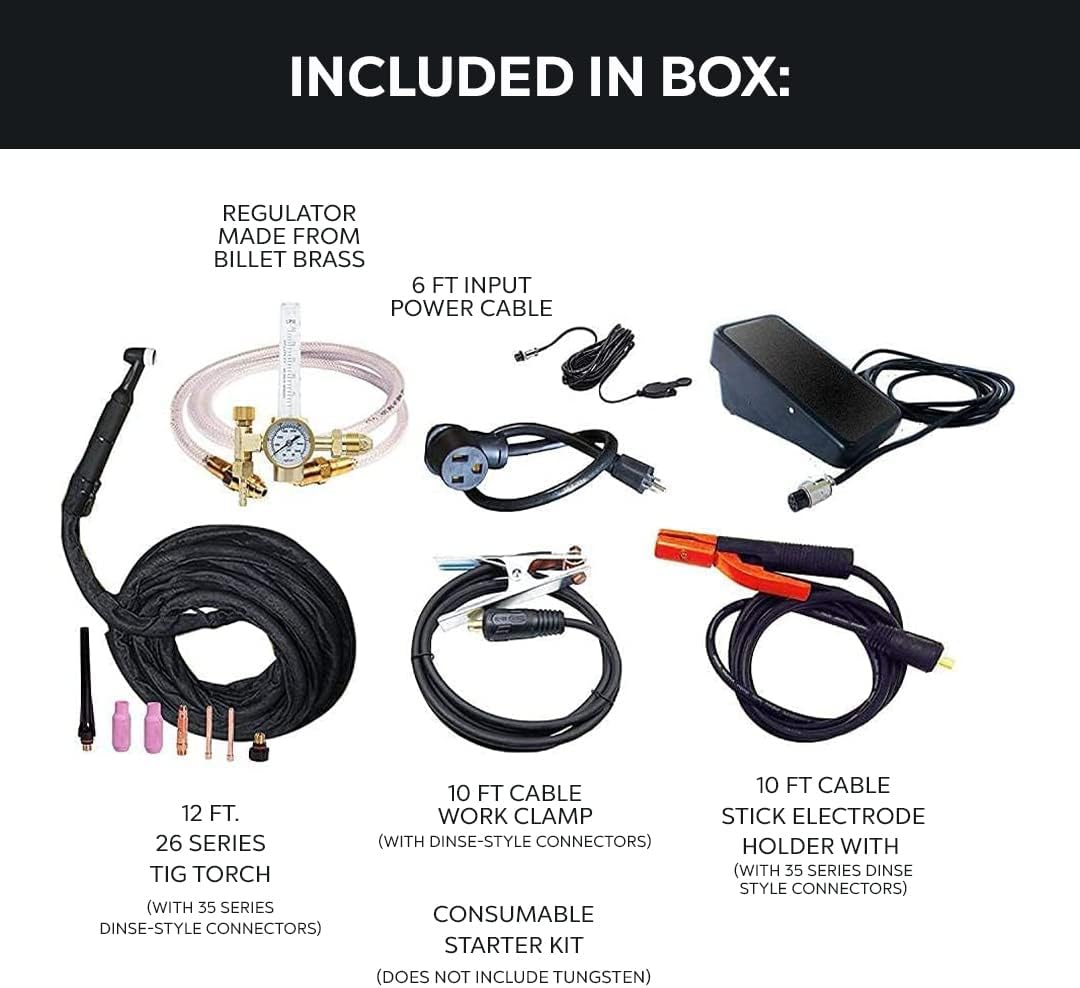
Image: A detailed breakdown of the components included in the box, illustrating the 12 ft. 26 Series TIG torch, 10 ft. cable work clamp, 10 ft. cable stick electrode holder, 6 ft. input power cable, regulator, and consumable starter kit.

Image: Close-up of the foot pedal, used for precise amperage control during TIG welding.

Image: Close-up of the gas regulator, made from billet brass, used to control the flow of shielding gas.
List of Components:
- Poweri-TIG 200T Welder Unit
- 12 ft. 26 Series TIG Torch (with 35 Series Dinse-style connectors)
- 10 ft. Cable Work Clamp (with Dinse-style connectors)
- 10 ft. Cable Stick Electrode Holder (with 35 Series Dinse-style connectors)
- 6 ft. Input Power Cable
- Regulator (made from billet brass)
- Consumable Starter Kit (does not include tungsten)
- Foot Pedal
5. Setup
5.1 Power Connection
The Poweri-TIG 200T features dual voltage capability, allowing operation on both 110V and 220V AC power sources. The unit automatically detects the input voltage.
- Ensure the power source matches the required voltage and amperage for your welding task.
- Connect the provided 6 ft. input power cable to a suitable grounded outlet.
5.2 Gas Connection (TIG Welding)
For TIG welding, an inert shielding gas (typically 100% Argon) is required.
- Attach the provided gas regulator to your Argon gas cylinder. Ensure a tight seal.
- Connect the gas hose from the regulator to the gas inlet fitting on the rear of the welder unit.
- Open the cylinder valve slowly and adjust the flow rate on the regulator to the recommended SCFH (Standard Cubic Feet per Hour) for your application (e.g., 15-25 SCFH for most TIG welding).
5.3 Torch and Ground Clamp Connection
- Connect the TIG torch cable to the appropriate Dinse-style connector on the front panel of the welder. Ensure it is securely twisted into place.
- Connect the ground clamp cable to the other Dinse-style connector on the front panel.
- Attach the ground clamp securely to the workpiece or welding table, ensuring good electrical contact.
5.4 Foot Pedal Connection
- Plug the foot pedal cable into the designated receptacle on the front panel of the welder.
- The foot pedal provides precise amperage control during TIG welding.
6. Operating Instructions
6.1 Control Panel Overview

Image: Detailed view of the Poweri-TIG 200T control panel, showing digital displays for amperage, pulse settings, and various control buttons for TIG and Stick welding modes.
The digital control panel allows for precise adjustment of welding parameters. Familiarize yourself with the following key controls:
- Program Memory: The unit can store up to 9 welding programs for quick recall. Use the "Program" buttons to select and save settings.
- Amperage Display: Shows the current welding amperage.
- Pulse Controls: Adjust Peak Amps, Base Amps, and Pulse Frequency (Hz) for pulsed TIG welding.
- Up Slope (S) / Down Slope (S): Controls the time it takes for the amperage to ramp up at the start of the weld and ramp down at the end.
- Start Amps / End Amps: Sets the initial and final amperage for the weld cycle.
- HF / Lift Arc: Selects between High Frequency (HF) start for non-contact arc initiation or Lift Arc for contact start.
- 2T / 4T: Selects between 2-touch (press and hold for arc) or 4-touch (press to start, press to stop) trigger modes.
- Select Function: Navigates through various adjustable parameters.
- Arc Force % (Stick): Adjusts the short-circuit current for Stick welding to prevent electrode sticking.
- Hot Start Time / Hot Start Amps % (Stick): Provides an initial surge of current for easier arc starting in Stick mode.
6.2 TIG Welding Operation
- Ensure gas cylinder is open and flow rate is set.
- Select TIG mode on the control panel.
- Set desired Peak Amps, Base Amps, Pulse Frequency (if using pulse), Up Slope, Down Slope, Start Amps, and End Amps according to your material and thickness.
- Choose HF or Lift Arc start. HF start is recommended for most applications.
- Select 2T or 4T trigger mode.
- Position the TIG torch over the workpiece.
- Initiate the arc (HF start: press trigger; Lift Arc: touch tungsten to workpiece and lift).
- Control amperage with the foot pedal (if connected and enabled) or by the set panel current.
- Maintain proper arc length and travel speed for a quality weld.
6.3 Stick Welding Operation (MMA)
- Ensure the stick electrode holder is connected and the ground clamp is attached.
- Select Stick mode on the control panel.
- Set the desired amperage for your electrode.
- Adjust Arc Force, Hot Start Time, and Hot Start Amps % as needed for optimal arc stability and starting.
- Important: This welder is limited to 6011 rods for Stick welding. Do not use 6010 rods.
- Strike the electrode against the workpiece to initiate the arc.
- Maintain a consistent arc length and travel speed.
7. Maintenance
Regular maintenance ensures the longevity and optimal performance of your Poweri-TIG 200T welder.
- Cleaning: Periodically clean the exterior of the unit with a dry, soft cloth. Use compressed air to blow out dust and debris from the cooling vents, ensuring the unit is unplugged.
- Cable Inspection: Regularly inspect all cables (power, torch, ground) for cuts, fraying, or damaged insulation. Replace damaged cables immediately.
- Torch Consumables: Inspect and replace TIG torch consumables (collets, collet bodies, nozzles, tungsten electrodes) as they wear out. Worn consumables can negatively affect arc stability and weld quality.
- Gas Regulator: Check the gas regulator for leaks and ensure gauges are functioning correctly.
- Storage: Store the welder in a clean, dry environment when not in use.
8. Troubleshooting
This section provides solutions to common issues you might encounter. For problems not listed here, contact Everlast Welders Canada customer support.
| Problem | Possible Cause | Solution |
|---|---|---|
| Welder does not power on. | No power from outlet; tripped circuit breaker; loose power cable. | Check power outlet; reset circuit breaker; ensure power cable is securely connected. |
| No arc in TIG mode. | No shielding gas; gas flow too low; poor ground connection; incorrect tungsten setup; HF start issue. | Check gas cylinder and regulator; ensure proper gas flow; verify ground clamp connection; check tungsten type and stick-out; ensure HF is enabled. |
| Poor arc stability in Stick mode. | Incorrect electrode type (e.g., 6010); insufficient amperage; improper arc force setting; poor ground. | Ensure using 6011 rods; adjust amperage; increase Arc Force %; check ground connection. |
| Overheating/Thermal overload. | Exceeded duty cycle; blocked cooling vents; high ambient temperature. | Allow unit to cool down; clear any obstructions from vents; operate in a cooler environment. |
| Inconsistent weld quality. | Improper settings; worn consumables; contaminated workpiece; inconsistent travel speed. | Review and adjust welding parameters; replace worn torch parts; clean workpiece thoroughly; practice consistent technique. |
9. Specifications
| Attribute | Value |
|---|---|
| Model Number | Poweri-TIG200T |
| Manufacturer | Everlast Power Equipment |
| Amperage Capacity | 200 Amps |
| Power Source | AC (Dual Voltage 110V/220V) |
| Item Weight | 25 pounds |
| Product Dimensions | 15 x 7 x 11 inches |
| Material | Stainless Steel |
| Color | Green |
| Duty Cycle (240V) | 35% at 200 Amps TIG, 160 Amps Stick |
| Start Amperage | Low 2 Amp Start |
| Pulse Frequency | Up to 500 Hz |
| Program Memory | 9 Programs |
10. Warranty and Support
For information regarding the warranty of your Poweri-TIG 200T welder, please refer to the warranty card included with your product or visit the official Everlast Welders Canada website. For technical support, parts, or service inquiries, please contact Everlast Welders Canada customer service directly.
You can typically find contact information on the manufacturer's website or in the product packaging.
Ask a question about this manual
Ask about setup, troubleshooting, compatibility, parts, safety, or missing instructions. Manuals+ will review the question and use this page’s manual context to help answer it.