1. Introduction
Thank you for choosing the BAORUN P9 Dog Hair Trimmer. This electric pet grooming machine is designed for efficient and quiet grooming of your pets. Please read this manual carefully before use to ensure proper operation and maintenance.

Image 1.1: The BAORUN P9 Dog Hair Trimmer on its charging base, showcasing its sleek design and digital display.
2. Package Contents
Please check the package to ensure all items are present:
- 1 x BAORUN P9 Dog Hair Trimmer
- 1 x Charging Adapter (universal voltage 110-240V)
- 1 x Charging Base
- 4 x Limiting Combs (3mm, 6mm, 9mm, 12mm)
- 1 x Cleaning Brush
- 1 x Original Package Box

Image 2.1: All components included in the BAORUN P9 Dog Hair Trimmer package, including the clipper, charging base, adapter, cleaning brush, and four guide combs.
3. Setup
3.1 Charging the Trimmer
- Connect the charging adapter to the charging base.
- Plug the adapter into a power outlet (110-240V).
- Place the trimmer onto the charging base. The LED display will indicate charging status.
- A full charge takes approximately 3 hours and provides up to 4 hours of working time.
Note: The trimmer can be used while connected to the power adapter if the battery runs out during grooming.

Image 3.1: The BAORUN P9 Dog Hair Trimmer connected directly to its power adapter for charging or continuous use.
3.2 Attaching Guide Combs
The trimmer comes with four limiting combs (3mm, 6mm, 9mm, 12mm) to achieve desired hair lengths.
- Ensure the trimmer is turned off.
- Align the chosen guide comb with the trimmer blade.
- Push the comb firmly until it clicks into place.
- To remove, gently push the comb upwards from the back while holding the trimmer.
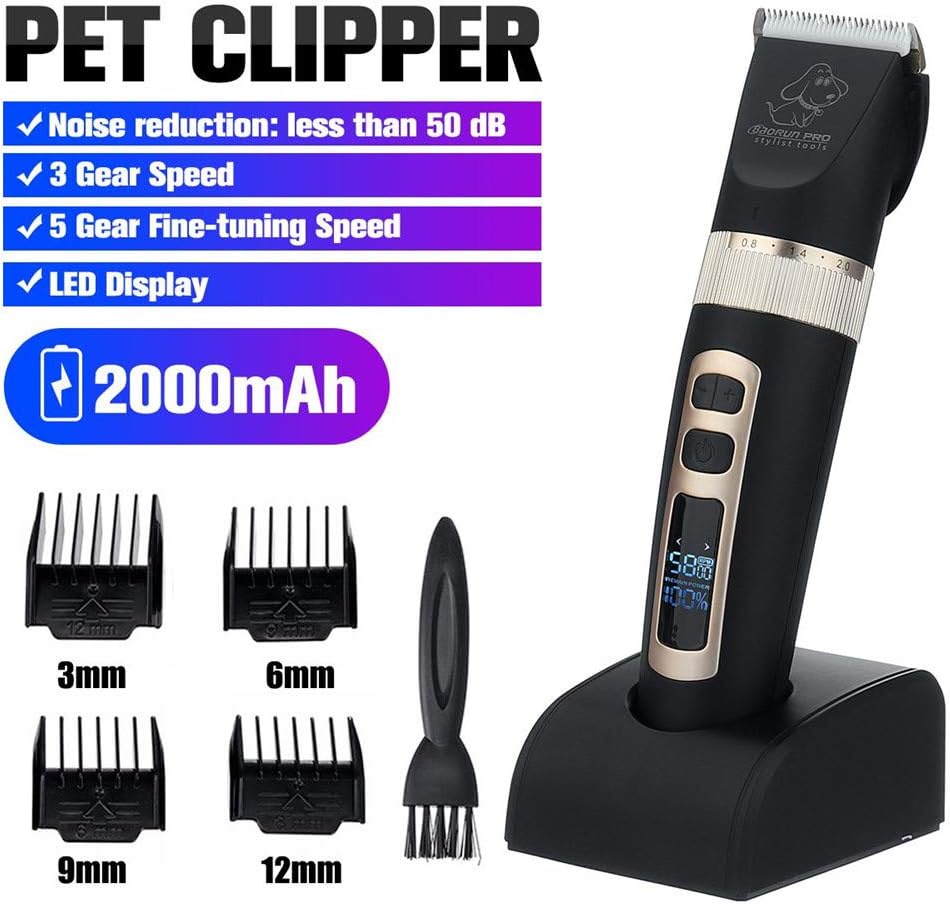
Image 3.2: The BAORUN P9 Dog Hair Trimmer displayed with its set of four guide combs (3mm, 6mm, 9mm, 12mm) and the cleaning brush.
3.3 Adjusting Blade Length
The trimmer features a 5-speed fine-tuning blade adjustment for precise cutting lengths without a comb, ranging from 0.8mm to 2.0mm.
- Rotate the ring located just below the blade to select the desired cutting length.
- The available settings are typically 0.8mm, 1.1mm, 1.4mm, 1.7mm, and 2.0mm.
4. Operating Instructions
4.1 Powering On/Off
Press the power button located on the front of the trimmer to turn it on or off.
4.2 Adjusting Speed Settings
The trimmer offers three speed settings to accommodate different pet hair types:
- 5000 RPM: Suitable for soft pet hair and first-time users.
- 5800 RPM: Ideal for medium and slightly hard pet hair.
- 6500 RPM: Recommended for hard pet hair or when more power is needed.
Use the speed adjustment buttons (usually '+' and '-') to cycle through the available speeds. The current speed will be displayed on the LED screen.

Image 4.1: A close-up view of the BAORUN P9 Dog Hair Trimmer's LED display, showing the current RPM (5800) and remaining battery percentage (100%).
4.3 Grooming Your Pet
- Ensure your pet's coat is clean, dry, and free of tangles. Brush the coat thoroughly before trimming.
- Select the appropriate guide comb and blade length for the desired cut.
- Turn on the trimmer and select a suitable speed.
- Hold the trimmer at a slight angle and move it smoothly against the direction of hair growth.
- Use short, even strokes. Be extra careful around sensitive areas such as ears, paws, and face.
- The trimmer operates with low vibration and a noise level below 50 dB, which helps keep pets calm during grooming.

Image 4.2: This image highlights key features of the BAORUN P9 Pet Clipper, including noise reduction (less than 50 dB), 3 gear speeds, 5 gear fine-tuning speed, LED display, and a 2000mAh battery. It also shows a visual comparison of a dog's coat before and after grooming.
5. Maintenance
5.1 Cleaning the Blades
Regular cleaning ensures optimal performance and extends the life of your trimmer.
- Turn off the trimmer and remove any attached guide comb.
- The blade head can be detached for thorough cleaning. Gently push the blade assembly forward to remove it.
- Rinse the detached blade head under running water. The blades are waterproof.
- Use the provided cleaning brush to remove any trapped hair from the blades and inside the trimmer head.
- After cleaning, ensure the cutter head is completely dry.
- Apply a few drops of lubricating oil (not included, but recommended for blade longevity) to the blades to reduce friction and wear.
- Reattach the blade head by aligning it and pushing it back until it clicks into place.

Image 5.1: The washable cutter head of the BAORUN P9 Dog Hair Trimmer being rinsed under water, demonstrating its easy-to-clean design. Remember to dry and lubricate after washing.
5.2 Storage
Store the trimmer in a cool, dry place, away from direct sunlight and out of reach of children and pets. Ensure the trimmer is fully charged before long-term storage to maintain battery health.
6. Troubleshooting
If you encounter issues with your BAORUN P9 trimmer, please refer to the following common solutions:
- Trimmer not turning on: Ensure the battery is charged. Connect the trimmer to the power adapter and try again.
- Poor cutting performance:
- Clean the blades thoroughly to remove any trapped hair or debris.
- Apply lubricating oil to the blades.
- Ensure the blade length adjustment is set correctly.
- Check if the blades are dull. If so, replacement blades may be needed.
- Unusual noise or vibration: Turn off the trimmer and inspect the blade assembly for any obstructions or damage. Ensure the blade is properly seated.
- Battery not charging: Check the charging adapter and cable for damage. Ensure the trimmer is correctly placed on the charging base or the cable is securely connected.
If the problem persists, please contact customer support.
7. Specifications
| Model | P9 |
| Brand | BAORUN |
| Blade Material | Ceramic, Titanium, Stainless Steel |
| Motor Voltage | 3V |
| Motor Speed | Up to 6500 RPM |
| Battery Type | 2000mAh Lithium |
| Charging Time | Approx. 3 hours |
| Working Time | Up to 4 hours |
| Input Voltage | 110-240V (Universal) |
| Guide Combs | 3mm, 6mm, 9mm, 12mm |
| Adjustable Blade Length | 0.8mm - 2.0mm (5 settings) |
| Noise Level | Less than 50 dB |
8. Warranty and Support
For warranty information or technical support, please refer to the product packaging or contact your retailer/seller directly. Keep your purchase receipt as proof of purchase.