1. Product Overview
The PARKSIDE PERFORMANCE PWSAP 20-Li B2 is a powerful and efficient 20V cordless angle grinder designed for various grinding and cutting tasks. It features a durable brushless motor for extended lifespan and performance, housed in a robust aluminum die-cast casing. The tool is part of the PARKSIDE X 20 V Team series, ensuring battery compatibility across a range of tools.

Figure 1: PARKSIDE PERFORMANCE PWSAP 20-Li B2 Cordless Angle Grinder with battery and handle attached.
Key Features:
- Brushless Motor: Efficient, powerful, and wear-resistant for prolonged tool life.
- Robust Housing: Solid aluminum die-cast construction.
- 3-Position Front Handle: Ergonomic design for versatile handling.
- Lithium-Ion Battery: Features a charge indicator (battery and charger sold separately).
- Electronic Soft Start: Ensures a smooth and controlled start-up.
- Quick Stop Function: For enhanced safety and control.
- Tool-Free Adjustable Protective Guard: Allows for quick and easy adjustments.
- Quick Clamping Nut: Facilitates tool-free disc changes.
- Spindle Lock: For easy and secure disc replacement.
- Compatibility: Suitable for all standard discs up to Ø 125 mm and PARKSIDE X 20 V Team batteries.
2. Safety Instructions
Always adhere to general power tool safety warnings and instructions to prevent electric shock, fire, and serious injury. Keep this instruction manual for future reference.
General Power Tool Safety Warnings:
- Work Area Safety: Keep work area clean and well-lit. Cluttered or dark areas invite accidents. Do not operate power tools in explosive atmospheres, such as in the presence of flammable liquids, gases, or dust.
- Electrical Safety: Avoid body contact with earthed or grounded surfaces. Do not expose power tools to rain or wet conditions.
- Personal Safety: Always wear eye protection. Use personal protective equipment such as dust masks, non-skid safety shoes, hard hats, or hearing protection when appropriate. Stay alert, watch what you are doing, and use common sense when operating a power tool.
- Tool Use and Care: Do not force the power tool. Use the correct power tool for your application. Disconnect the plug from the power source and/or remove the battery pack before making any adjustments, changing accessories, or storing power tools.
- Service: Have your power tool serviced by a qualified repair person using only identical replacement parts. This will ensure that the safety of the power tool is maintained.
Specific Safety Warnings for Angle Grinders:
- Guard Safety: Always use the protective guard. Ensure the guard is securely attached and positioned for maximum safety.
- Accessory Compatibility: Ensure the accessory's rated speed is at least equal to the maximum speed marked on the power tool.
- Proper Handling: Hold the tool firmly with both hands. Always use the auxiliary handle provided.
- Kickback Prevention: Be aware of kickback, which is a sudden reaction to a pinched or snagged rotating wheel. Always maintain a firm grip on the tool and position your body and arm to allow you to resist kickback forces.
- Material Safety: Do not use the tool for cutting wood. Avoid cutting materials that can generate flammable dust.
3. Components and Controls
Familiarize yourself with the various parts of your angle grinder before operation.

Figure 2: Side view of the angle grinder, showing the main body and battery slot.
- Main Handle: Ergonomic grip for control.
- On/Off Switch: Activates and deactivates the tool.
- Spindle Lock Button: Engages the spindle to facilitate disc changes.
- Protective Guard: Shields against sparks and debris.
- Spindle: Where the grinding/cutting disc is mounted.
- Quick Clamping Nut: Secures the disc without additional tools.
- Auxiliary Handle Connection Points: Three positions for attaching the front handle.
- Battery Slot: For inserting the 20V lithium-ion battery.
- Battery Release Button: To remove the battery.

Figure 3: Auxiliary handle attachment points for optimal user comfort and control.
4. Setup
Proper setup ensures safe and efficient operation of your angle grinder.
4.1. Charging the Battery
Before first use, fully charge the battery. Use only the recommended PARKSIDE X 20 V Team charger.
- Connect the charger to a power outlet.
- Slide the battery into the charger until it clicks into place.
- Monitor the charge indicator lights on the battery and charger.
- Once fully charged, remove the battery from the charger.
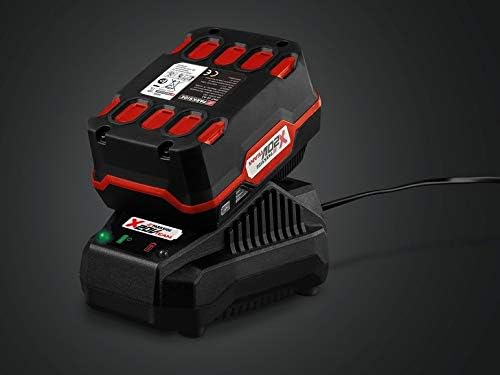
Figure 4: Battery charging on the dedicated fast charger.
4.2. Installing the Battery
- Ensure the tool is switched off.
- Align the battery with the battery slot on the tool.
- Slide the battery into the slot until it clicks securely into place.
- To remove, press the battery release button and slide the battery out.
4.3. Attaching the Auxiliary Handle
The auxiliary handle can be attached in three different positions for optimal control and comfort, depending on the application.
- Screw the auxiliary handle into one of the three threaded holes on the gear head.
- Tighten it firmly by hand.

Figure 5: Auxiliary handle and wrench for disc changes.
4.4. Adjusting the Protective Guard
The protective guard can be adjusted quickly without tools.
- Loosen the clamping lever on the protective guard.
- Rotate the guard to the desired position to protect against sparks and debris.
- Tighten the clamping lever firmly.
4.5. Installing/Changing Grinding/Cutting Discs
Always ensure the tool is switched off and the battery is removed before changing discs.
- Press and hold the spindle lock button.
- Unscrew the quick clamping nut counter-clockwise. If necessary, use the included wrench.
- Remove the old disc (if applicable).
- Place the new disc onto the spindle, ensuring it is centered.
- Screw the quick clamping nut clockwise until the disc is securely fastened. No additional tools are typically required for tightening.
- Release the spindle lock button.
5. Operating
Follow these steps for safe and effective operation of your angle grinder.
5.1. Switching On and Off
- To Switch On: Slide the On/Off switch forward. The electronic soft start feature will ensure a gradual increase in speed.
- To Switch Off: Release the On/Off switch. The quick stop function will rapidly halt the disc rotation.
5.2. General Operation Guidelines
- Always hold the angle grinder firmly with both hands, using the auxiliary handle.
- Allow the disc to reach full speed before making contact with the workpiece.
- Apply moderate pressure. Excessive pressure can reduce efficiency and damage the disc or motor.
- Move the tool smoothly and consistently across the workpiece.
- Be aware of sparks and debris. Ensure the protective guard is correctly positioned.
- The tool is suitable for standard discs up to Ø 125 mm. It can also be used with cup brushes and circular brushes.

Figure 6: Angle grinder in use, demonstrating cutting action on metal.
6. Maintenance
Regular maintenance ensures the longevity and optimal performance of your angle grinder.
6.1. Cleaning
- Always remove the battery before cleaning.
- Keep the ventilation openings clean to prevent motor overheating. Use a soft brush or compressed air.
- Wipe the tool's exterior with a soft, damp cloth. Do not use harsh chemicals or abrasive cleaners.
- Clean the protective guard regularly to ensure clear visibility.
6.2. Storage
- Store the tool in a dry, secure place, out of reach of children.
- Remove the battery from the tool before storage.
- Store batteries in a cool, dry place, away from direct sunlight and extreme temperatures.
- The included carrying case provides excellent protection for storage and transport.

Figure 7: Carrying case for the angle grinder, ideal for storage and transport.
7. Troubleshooting
This section addresses common issues you might encounter with your angle grinder.
| Problem | Possible Cause | Solution |
|---|---|---|
| Tool does not start. | Battery not inserted correctly or discharged. | Ensure battery is fully charged and correctly inserted. |
| Reduced power or speed. | Battery low or disc worn/incorrect. | Charge battery. Replace worn disc. Ensure correct disc type for material. |
| Excessive vibration. | Disc improperly mounted or damaged. | Check disc for damage and proper mounting. Replace if damaged. |
| Tool overheats. | Blocked ventilation slots or continuous heavy load. | Clean ventilation slots. Allow tool to cool down. Reduce load. |
8. Specifications
| Specification | Value |
|---|---|
| Model Number | PWSAP 20-Li B2 |
| Brand | PARKSIDE PERFORMANCE |
| Voltage | 20 V |
| Battery Type | Lithium-ion (max. 20 V / 4 Ah recommended) |
| No-load Rotation Speed | 10,000 rpm |
| Max. Disc Diameter | 125 mm |
| Spindle Thread | M14 (SPINDLE LOCK) |
| Material | Aluminum Die-cast (housing) |
| Color | Black |
| Power | 8E+1 (80W) |
9. Warranty and Support
Warranty information for your PARKSIDE PERFORMANCE PWSAP 20-Li B2 Cordless Angle Grinder is typically provided with your purchase documentation. Please refer to the warranty card or contact the manufacturer's customer service for details regarding warranty coverage, terms, and conditions.
Customer Support:
For technical assistance, spare parts, or service inquiries, please contact the official PARKSIDE customer support channels. Contact information can usually be found on the product packaging, the manufacturer's website, or your purchase receipt.