Introduction
Welcome to your Kenwood FDP03 Food Processor manual. This guide provides essential information for the safe operation, assembly, use, and maintenance of your multi-functional appliance. Please read these instructions thoroughly before first use and retain them for future reference.
Important Safety Instructions
Always follow basic safety precautions when using electrical appliances to reduce the risk of fire, electric shock, and/or injury to persons.
- Read all instructions before operating the appliance.
- Keep the appliance and its cord out of reach of children.
- Unplug the appliance from the outlet when not in use, before assembling or disassembling parts, and before cleaning.
- Do not immerse the motor unit in water or any other liquid. Clean with a damp cloth only.
- Use only attachments and accessories specified by the manufacturer.
- Avoid contact with moving parts. Ensure the appliance is completely stopped before removing the lid or bowl.
- Do not process hot liquids in the blender to prevent scalding. Allow hot ingredients to cool before blending.
- Ensure the lid is securely locked in place before operating the food processor or blender.
- Do not operate any appliance with a damaged cord or plug, or after the appliance malfunctions or has been damaged in any manner.
Components Overview
Your Kenwood FDP03 Food Processor comes with several components designed for various food preparation tasks. Familiarize yourself with each part:
- Motor Unit: The base containing the motor and control dial.
- Food Processor Bowl: Main processing bowl with a 2-liter capacity (1.2-liter working capacity).
- Lid with Feeder Tube: Covers the food processor bowl and allows ingredients to be added during operation.
- Pusher: Used to push ingredients through the feeder tube.
- Chopping Blade: For chopping, mincing, and pureeing.
- Dough Blade (Plastic Blade): For kneading bread and pastry mixes.
- Blender Jug: 1.8-liter capacity for blending liquids.
- Blender Lid: Covers the blender jug.
- Interchangeable Discs:
- Grating Disc (Insert): For coarse grating.
- Slicing Disc (Insert): For fine slicing.
- Chip Stick Disc (Insert): For thick chip slices.
- Emulsifying Disc: For whisking and emulsifying.
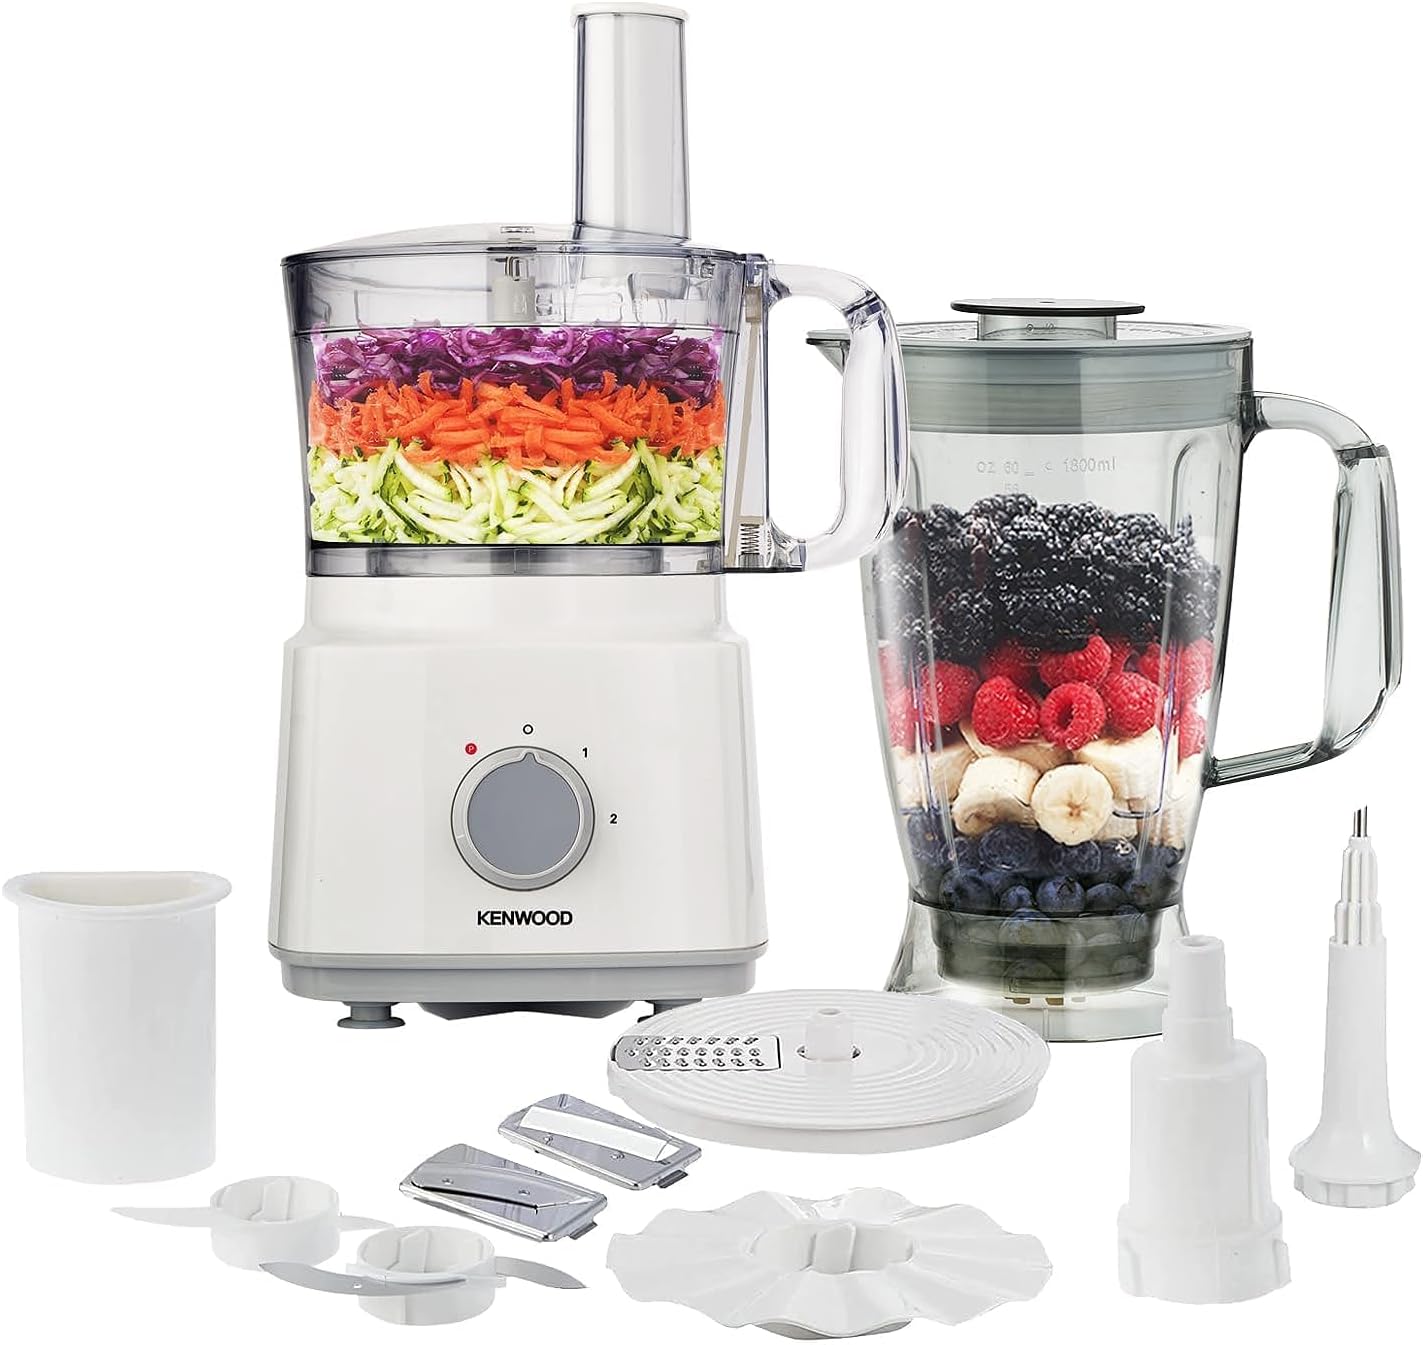
This image displays the complete Kenwood FDP03 Food Processor system, showcasing the motor unit, food processor bowl, blender jug, and all included accessories such as chopping blades, dough blade, and interchangeable discs for grating, slicing, and making chip sticks.
Assembly and Setup
Food Processor Assembly
- Place the motor unit on a stable, flat surface.
- Fit the food processor bowl onto the motor unit, aligning the handle with the safety interlock switch. Turn clockwise until it locks into place.
- Insert the desired blade (chopping or dough) or disc onto the central spindle in the bowl. Ensure it sits firmly.
- Place the lid onto the bowl, aligning the lid tab with the bowl handle. Turn clockwise until it locks into place. The appliance will not operate unless the lid is correctly locked.
- Insert the pusher into the feeder tube of the lid.

This image shows the Kenwood FDP03 Food Processor fully assembled with the food processor bowl, lid, and pusher in place, ready for operation.
Blender Assembly
- Ensure the motor unit is unplugged.
- Place the blender jug onto the motor unit, aligning the jug's base with the motor unit's drive. Turn clockwise until it locks into place.
- Add ingredients to the blender jug. Do not exceed the maximum fill line.
- Secure the blender lid onto the jug. Ensure the filler cap is also in place.

This image illustrates the Kenwood FDP03 Blender attachment assembled on the motor unit, with the jug filled with various fruits, demonstrating its readiness for blending.
Operating Instructions
General Operation
The Kenwood FDP03 Food Processor is equipped with a 750W motor, offering two speed settings and a pulse function for precise control.
- Speed Settings: Turn the control dial to '1' for low speed or '2' for high speed, suitable for continuous processing.
- Pulse Function: Turn the dial to 'P' for short bursts of maximum power. This is ideal for controlling consistency or for processing delicate ingredients. Release the dial to stop.

This detailed diagram visually explains the key features of the Kenwood FDP03 Food Processor, including its 1.8L blender attachment, 2L bowl capacity (1.2L working capacity), 2 speed settings with pulse function, 750W power, and the various interchangeable discs (grating, chip stick, slicer, emulsifying) and blades (chopper, plastic) for diverse food preparation.
Using the Food Processor
The food processor bowl has a 2-liter total capacity and a 1.2-liter working capacity, suitable for preparing various ingredients.
- Chopping/Mincing: Use the chopping blade. Add ingredients to the bowl. Use pulse or speed '1' for short bursts until desired consistency is achieved.
- Kneading Dough: Use the dough blade. Add flour and other dry ingredients, then gradually add liquids through the feeder tube while the machine is running on speed '1'. Process until a dough ball forms.
- Grating/Slicing/Chip Sticks: Insert the appropriate disc. Place ingredients into the feeder tube and use the pusher to guide them through while the machine is running on speed '2'.
- Emulsifying/Whisking: Use the emulsifying disc. Add liquids or eggs to the bowl. Process on speed '2' until light and frothy.
Using the Blender
The blender attachment has a 1.8-liter capacity, ideal for smoothies, shakes, and soups.
- Add ingredients to the blender jug. Ensure the lid is securely fastened.
- Select speed '1' or '2' for continuous blending, or use the 'P' (pulse) function for controlled blending.
- For best results, process liquids and soft ingredients first, then add harder items.
Maintenance and Cleaning
Regular cleaning is essential for maintaining the performance and hygiene of your Kenwood FDP03 Food Processor.
- Always unplug the appliance before cleaning.
- Motor Unit: Wipe the motor unit with a damp cloth. Do not immerse it in water or any other liquid.
- Bowls, Lids, Blades, and Discs: Wash these parts in warm, soapy water. Rinse thoroughly and dry immediately. Alternatively, most removable parts are dishwasher safe (refer to your product manual for specific dishwasher compatibility).
- Handle blades and discs with extreme care as they are very sharp. Always hold them by the plastic hub.
- For stubborn food residue, soak the parts in warm, soapy water before cleaning.
Troubleshooting
If you encounter any issues with your Kenwood FDP03 Food Processor, refer to the table below for common problems and solutions.
| Problem | Possible Cause | Solution |
|---|---|---|
| Appliance does not start | Not plugged in; Bowl/lid not correctly assembled; Safety interlock not engaged. | Check power connection; Ensure bowl and lid are securely locked in place. |
| Motor stops during operation | Overload protection activated; Too much food in the bowl/jug. | Unplug, reduce the amount of food, wait a few minutes, then restart. |
| Poor processing results (e.g., uneven chopping) | Incorrect blade/disc used; Too much or too little food; Ingredients too large. | Ensure correct attachment is used; Adjust food quantity; Cut ingredients into smaller pieces. |
| Leakage from blender jug | Lid not properly sealed; Jug not correctly assembled on base. | Ensure lid is tightly closed; Re-seat the jug firmly onto the motor unit. |
Specifications
Technical details for the Kenwood FDP03 Food Processor:
| Manufacturer | Kenwood |
| Model Number | FDP03.COWH |
| Power | 750 Watts |
| Voltage | 220 Volts |
| Food Processor Bowl Capacity | 2 Liters (1.2 Liters working capacity) |
| Blender Capacity | 1.8 Liters |
| Number of Speeds | 2 + Pulse |
| Material | Plastic |
| Product Dimensions (L x W x H) | 20 x 19 x 36.5 cm |
| Item Weight | 1.78 Kilograms |
| Special Features | Safety Lock |

This image illustrates the physical dimensions of the Kenwood FDP03 Food Processor, indicating its height of 36.5 cm, length of 20 cm, and width of 19 cm.
Warranty and Support
This Kenwood FDP03 Food Processor comes with an international warranty. For specific warranty terms, conditions, and support, please refer to the warranty card included with your product or visit the official Kenwood website. Keep your proof of purchase for warranty claims.


