Introduction
Welcome to your National Geographic Hobby Rock Tumbler Kit. This manual provides essential instructions for setting up, operating, and maintaining your rock tumbler to transform rough rocks into beautifully polished gemstones. Follow these steps carefully to achieve the best results and ensure safe operation.
Safety Information
- This product is recommended for children 8 years and older, with adult supervision.
- Always operate the tumbler on a stable, level surface.
- Keep the tumbler away from water or damp environments to prevent electrical hazards.
- Ensure the barrel lid is securely fastened before starting the tumbler to prevent leaks and spills.
- Do not attempt to open the barrel or touch moving parts while the tumbler is operating.
- Read all instructions thoroughly before initial use.
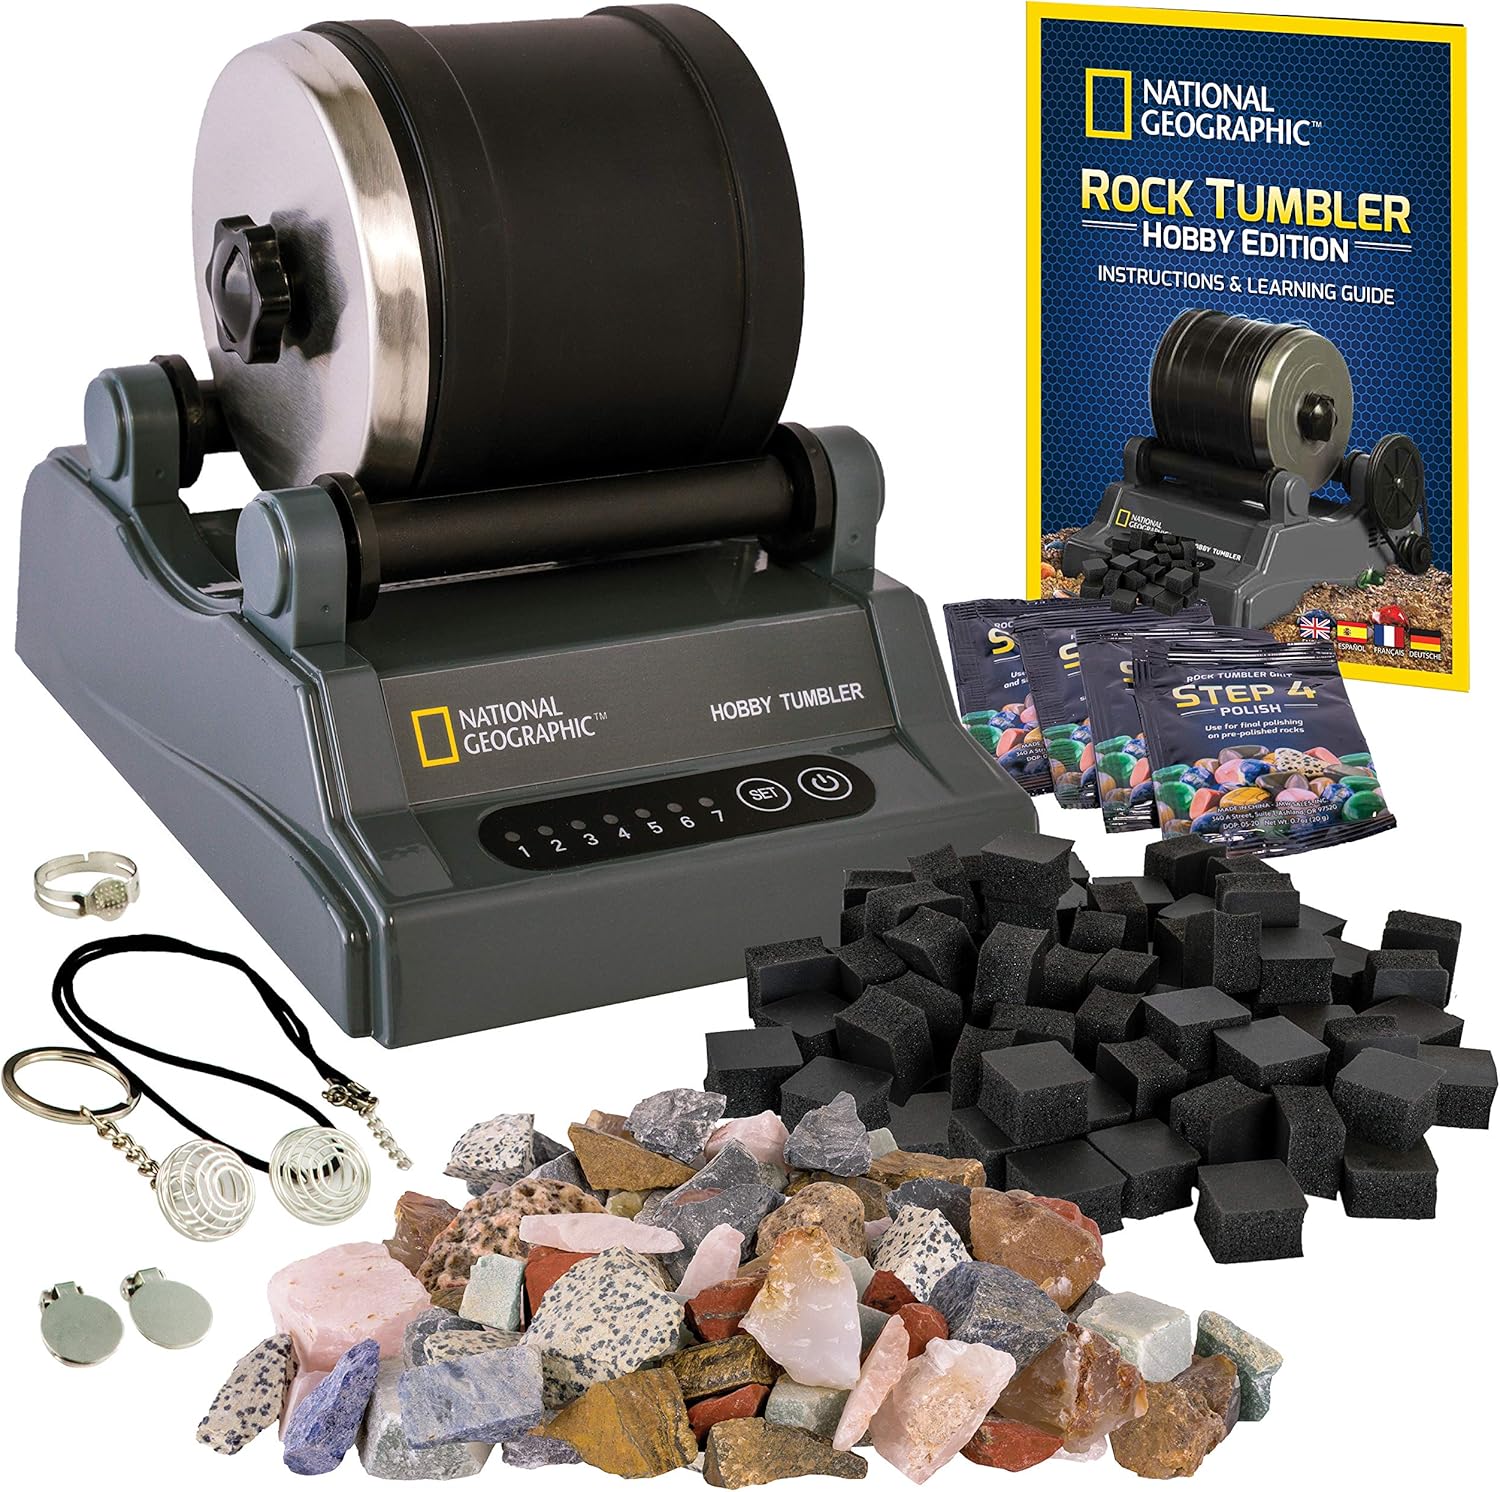
What's in the Box
Your National Geographic Hobby Rock Tumbler Kit includes the following components:
- Heavy-Duty Tumbling Machine with 7-Day Timer
- 1-Pound (450g) Capacity Rubber Barrel with Stainless-Steel Lid
- Rough Rocks (1/2 pound, assorted types)
- Tumbler Grit (4 stages: Coarse, Medium, Fine, Polish)
- GemFoam Polishing Foam
- Strainer
- Jewelry Settings (5 pieces)
- Instruction & Learning Guide
- Extra Drive Belt
Setup Instructions
1. Unpacking
Carefully remove all components from the packaging. Inspect all parts for any damage. If any parts are missing or damaged, contact customer support.
2. Placement
Place the rock tumbler on a stable, flat, and dry surface. Ensure there is adequate space around the unit for ventilation. Be aware that the tumbler can produce noise during operation, so consider placing it in an area where noise will not be a disturbance, such as a garage or basement.
3. Power Connection
Connect the power adapter to the tumbler's power input port and then plug the adapter into a standard electrical outlet. The power indicator lights should illuminate.
Operating Instructions: The Tumbling Process
The rock tumbling process involves several stages, each using a different grit to gradually smooth and polish the rocks. Each stage typically lasts 6-8 days.
Stage 1: Coarse Grind
- Load Rocks: Place your rough rocks into the rubber barrel. Do not fill the barrel more than two-thirds full to ensure proper tumbling action.
- Add Coarse Grit: Add the entire packet of 'Step 1 Coarse Grit' to the barrel.
- Add Water: Fill the barrel with water until it just covers the rocks.
- Seal Barrel: Securely attach the stainless-steel lid, followed by the outer black lid. Ensure a tight seal to prevent any leakage.
- Start Tumbling: Place the sealed barrel onto the tumbler base. Press the power button and set the timer for 7 days. Allow the tumbler to run continuously.


Subsequent Stages (Medium, Fine, Polish)
- Rinse Thoroughly: After each stage, carefully empty the barrel into the included strainer. Rinse the rocks and the inside of the barrel thoroughly under running water to remove all traces of the previous grit. It is crucial to prevent grit contamination between stages.
- Repeat Process: Repeat steps 1-5 for each subsequent grit stage (Step 2 Medium Grit, Step 3 Fine Grit, Step 4 Polish).
- GemFoam for Final Polish: For the final polishing stage (Step 4), after adding the polish grit and water, add the GemFoam polishing foam to the barrel. This innovative foam enhances the shine of your polished rocks.

Jewelry Creation
Once your rocks are polished to your satisfaction, use the included jewelry settings to create unique necklaces, keychains, or other accessories. Follow the instructions in the learning guide for attaching the settings.

Official Product Videos
Watch these official videos for visual guidance on using your rock tumbler and its accessories:
Video: National Geographic Rock Tumbling Accessories. This video demonstrates the use of various accessories for rock tumbling, including different grits and media.
Video: NATIONAL GEOGRAPHIC Hobby Rock Tumbler 2 Kit. This video provides an overview of the National Geographic Hobby Rock Tumbler Kit, showcasing its features and how it operates.
Maintenance
Cleaning
After each tumbling stage, it is essential to thoroughly clean the barrel and the rocks to remove all traces of the previous grit. Any residual grit can contaminate the next stage and prevent proper polishing. Wipe down the tumbler base with a dry cloth to keep it free of dust and debris.
Drive Belt Inspection
Periodically inspect the drive belt for signs of wear, cracking, or stretching. If the belt appears worn, replace it with the spare drive belt included in your kit. To replace, simply remove the old belt and carefully stretch the new belt over the motor pulley and the barrel roller. A small amount of silicone-based lubricant can be applied to the belt to ensure smooth operation and extend its lifespan.
Troubleshooting
Excessive Noise
The rock tumbling process inherently generates some noise. The rubber barrel is designed to be quieter than plastic alternatives. Ensure the barrel is properly seated on the rollers and that the tumbler is on a stable surface. If the noise is unusually loud or grinding, check for any obstructions or misaligned parts. Placing the tumbler in a garage or basement can help mitigate noise levels.

Leaking Barrel
If the barrel is leaking, ensure both the inner stainless-steel lid and the outer black lid are securely and tightly fastened. Check the rubber gasket inside the lid for proper placement and any signs of damage. A damaged gasket may need to be replaced.
Tumbler Stops or Runs Intermittently
First, check the power connection to ensure it is secure. Verify that the drive belt is correctly positioned and not slipping or broken. If the issue persists, it may indicate a motor or internal component issue. Refer to the warranty and support section for further assistance.
Rocks Not Polishing Properly
Ensure you are using the correct amount of rocks and grit for each stage, as specified in the instructions. Thorough rinsing between grit stages is critical to prevent contamination. The tumbling duration for each stage may need to be adjusted based on the hardness and initial roughness of your specific rocks. Harder or very rough rocks may require longer tumbling times in the coarse grit stage.
Specifications
| Product Dimensions | 13.11 x 5 x 8.15 inches |
| Item Weight | 4.18 pounds |
| Item Model Number | NGHOBBYTUMBLER2 |
| Manufacturer Recommended Age | 8 years and up |
| Manufacturer | JMW Sales, Inc. |
Warranty and Support
The National Geographic Hobby Rock Tumbler Kit is manufactured by JMW Sales, Inc. (operating as Blue Marble). For any product-related inquiries, technical support, or warranty claims, please refer to the contact information provided in your product packaging or visit the official Blue Marble website. Your purchase helps support the global nonprofit National Geographic Society in its work to protect and illuminate our world through exploration, research, and education.


