1. Product Overview
The VEICK Resistance Band Set (Model HDS-EB01) provides a versatile solution for strength training, fitness, yoga, Pilates, and physical therapy. Designed for both men and women, this portable set allows for effective workouts at home, outdoors, or while traveling.
Package Contents:
- 5 Tube Resistance Bands: Each 48-inch long band offers a specific resistance level:
- Yellow: 10 lbs (Extra Light)
- Blue: 20 lbs (Light)
- Green: 30 lbs (Medium)
- Black: 40 lbs (Heavy)
- Red: 50 lbs (Extra Heavy)
- 2 Soft Cushioned Handles: For comfortable grip during exercises.
- 2 Ankle Straps: For lower body exercises.
- 1 Door Anchor: To secure bands to a door frame for various exercises.
- 1 Exercise Guidance: A manual with exercise suggestions.
- 1 Carrying Bag: For convenient storage and portability.

Image 1: Complete VEICK Resistance Band Set including bands, handles, ankle straps, door anchor, and carrying bag.

Image 2: Detailed view of the full package contents, including exercise bands, handles, travel carry bag, door anchor, ankle straps, and instruction manual.
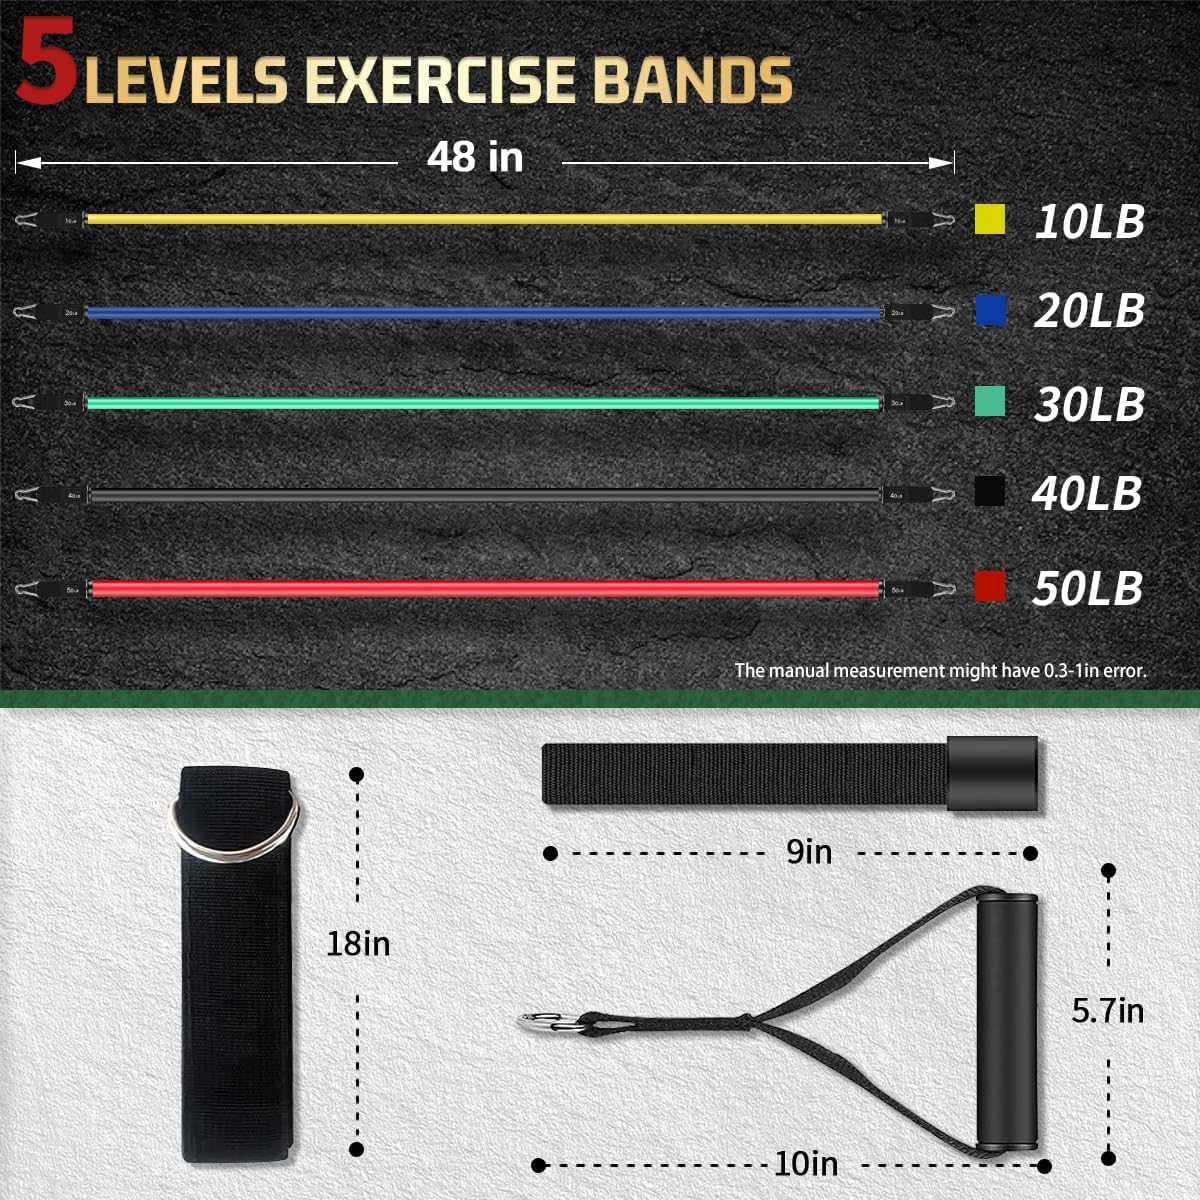
Image 3: Illustration of the five resistance bands, each 48 inches long, with their corresponding weight levels: Yellow (10LB), Blue (20LB), Green (30LB), Black (40LB), and Red (50LB).
2. Setup and Assembly
Attaching Bands to Handles/Ankle Straps:
- Select the desired resistance band(s). Each band has a metal carabiner clip at both ends.
- Locate the D-rings on the soft cushioned handles or ankle straps.
- Open the carabiner clip on the resistance band and securely attach it to the D-ring of the handle or ankle strap. Ensure the clip is fully closed.
- For increased resistance, multiple bands can be clipped onto a single handle or ankle strap.
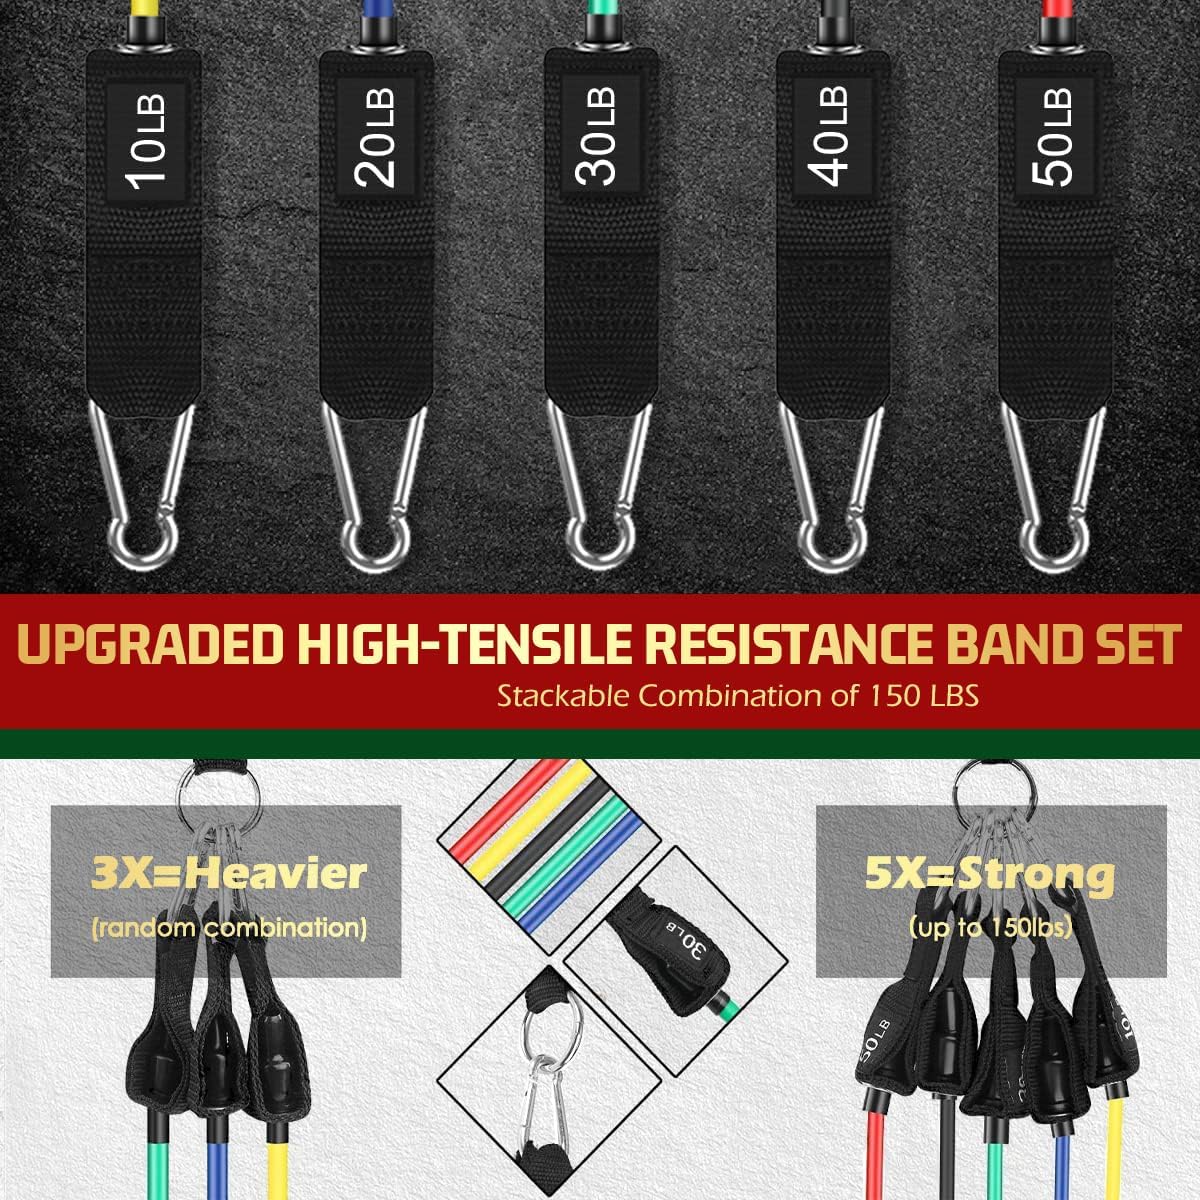
Image 4: Illustration demonstrating how to connect multiple resistance bands to a single handle to achieve stacked resistance levels up to 150 LBS.
Image 5: Close-up view of a resistance band securely connected to a handle via a carabiner clip.
Using the Door Anchor:
- Open a sturdy door.
- Place the foam stopper end of the door anchor on the side of the door that closes towards you, at the desired height (top, middle, or bottom).
- Close the door firmly, ensuring the foam stopper is on the opposite side of the door from where you will be exercising. The door anchor's strap should be visible on your side.
- Attach the carabiner clip(s) of your chosen resistance band(s) to the loop of the door anchor strap.
- Always pull the bands away from the door, ensuring the door remains securely closed during your workout.
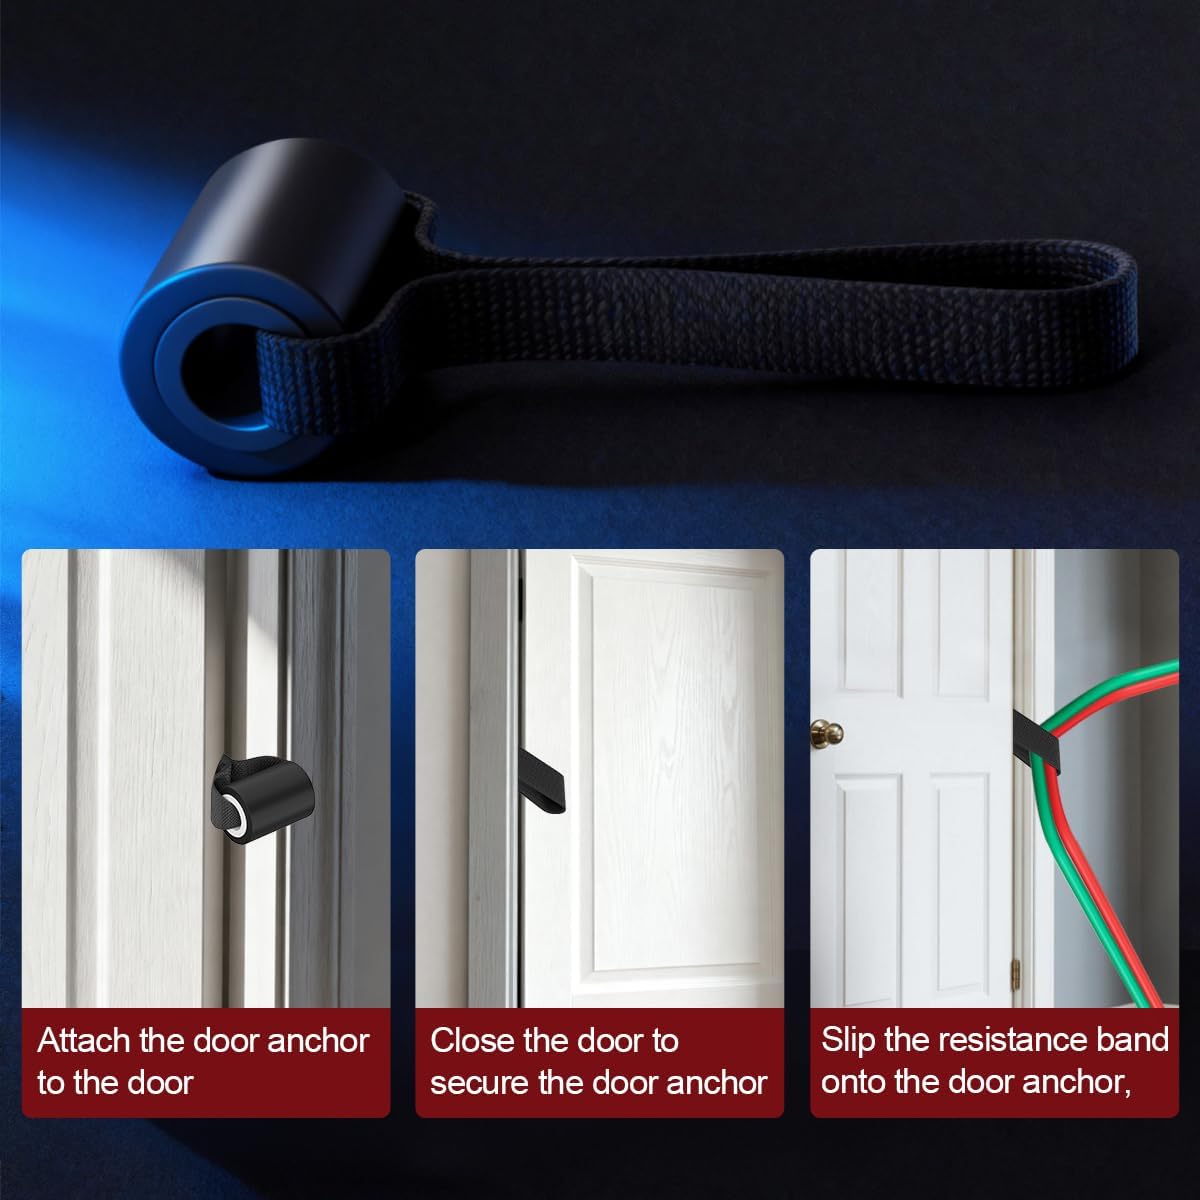
Image 6: Step-by-step guide on how to properly attach and secure the door anchor for resistance band exercises.
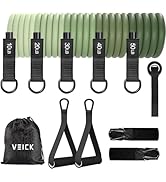
Image 7: Close-up view of the door anchor, highlighting its foam stopper and durable strap.
3. Operating and Usage
The VEICK Resistance Band Set is designed for a wide range of exercises targeting various muscle groups. Always ensure proper form and control during your workouts.
General Exercise Guidelines:
- Warm-up: Always perform a light warm-up before starting your resistance band workout.
- Choose Resistance: Select the appropriate band(s) based on your fitness level and the exercise. Start with lighter resistance and gradually increase as your strength improves.
- Controlled Movements: Perform exercises with slow, controlled movements. Avoid jerky motions.
- Breathing: Exhale during the exertion phase and inhale during the recovery phase of each exercise.
- Cool-down: Finish your workout with a cool-down and stretching.
Example Exercises:
The included Exercise Guidance provides detailed instructions for various movements. Here are a few examples:
- Bicep Curl: Stand on the band with feet shoulder-width apart, hold handles with palms facing forward. Curl hands towards shoulders.
- Triceps Extension: Anchor the band overhead (using door anchor or by hand), hold handle, and extend arm downwards.
- Chest Press: Anchor the band behind you (using door anchor), hold handles, and press forward.
- Squat: Stand on the band, hold handles at shoulder height, and perform a squat.
- Leg Adductor: Attach an ankle strap, anchor the band to a low point, and perform leg adduction movements.

Image 8: Visual guide illustrating various exercises that can be performed with the resistance bands, including bicep curls, side lateral raises, triceps extensions, hip exercises, ab twists, leg adductors, stomach curls, squats, and upper back rows.

Image 9: Examples of resistance band usage in various settings: home, travel, outdoor, physical therapy, and gym environments.
4. Maintenance and Care
Proper care will extend the lifespan of your VEICK Resistance Bands.
- Cleaning: Wipe bands with a damp cloth after each use. Avoid harsh chemicals or abrasive cleaners.
- Storage: Store bands in the provided carrying bag in a cool, dry place away from direct sunlight and extreme temperatures.
- Inspection: Regularly inspect bands for any signs of wear, tears, or damage before each use. Discontinue use if any damage is observed.
- Avoid Sharp Objects: Keep bands away from sharp objects or rough surfaces that could cause nicks or tears.
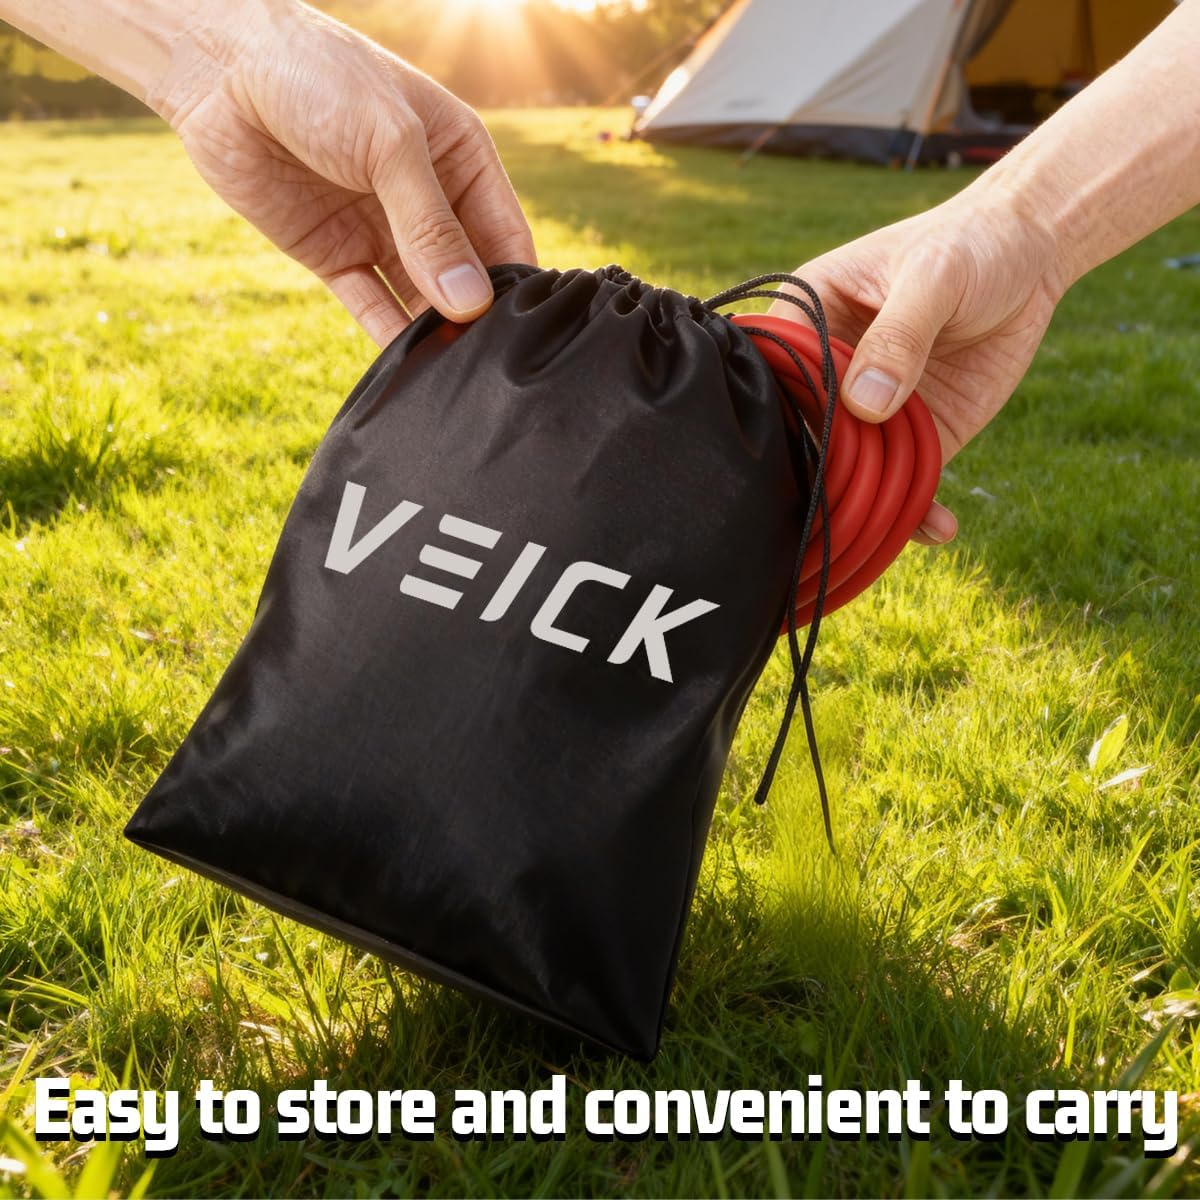
Image 10: The included black carrying bag with the VEICK logo, designed for easy storage and portability of the resistance band set.
5. Troubleshooting
If you encounter any issues with your VEICK Resistance Bands, please refer to the following common solutions:
- Reduced Resistance: Ensure bands are properly attached and not stretched beyond their intended length. If bands feel permanently stretched or less resistant, they may need replacement.
- Bands Slipping: Double-check that carabiner clips are fully closed and securely fastened to handles, ankle straps, or the door anchor. Ensure the door anchor is firmly secured within the door frame.
- Discomfort during use: Adjust your grip on the handles or reposition ankle straps for comfort. If discomfort persists, consult the exercise guidance or a fitness professional.
6. Specifications
| Feature | Detail |
|---|---|
| Brand | VEICK |
| Model Number | HDS-EB01 |
| Material | Natural Rubber |
| Color | Colorful (Yellow, Blue, Green, Black, Red) |
| Item Weight (Set) | 0.64 Kilograms (approx. 1.4 lbs) |
| Resistance Levels | 10 lbs, 20 lbs, 30 lbs, 40 lbs, 50 lbs (up to 150 lbs combined) |
| Band Length | 48 inches (each) |
| Special Features | Adjustable, Lightweight, Stackable, Portable |
| Recommended Uses | Home workouts, Gym, Travel, Physical Therapy, Yoga, Pilates, Strength Training |
7. Warranty and Support
The VEICK Resistance Band Set comes with a 1 Year Manufacturer Warranty.
For warranty claims, product support, or any questions regarding your resistance band set, please contact VEICK customer service through the retailer where the product was purchased or visit the official VEICK store online.
VEICK Store: Visit the VEICK Store on Amazon