1. Introduction
Thank you for choosing the MIFXIN 24-Egg Automatic Incubator. This device is designed for efficient and reliable hatching of various poultry eggs, including chicken, duck, quail, goose, parrot, and pigeon eggs. It features automatic temperature control, humidity monitoring, and egg turning to optimize the hatching process. Please read this manual thoroughly before operation to ensure proper use and maintenance of your incubator.
2. Safety Information
To prevent injury or damage to the incubator, please observe the following safety precautions:
- Always connect the incubator to a grounded 110V power outlet.
- Do not immerse the incubator or its electrical components in water or any other liquid.
- Keep the incubator away from direct sunlight, drafts, and extreme temperature fluctuations.
- Ensure proper ventilation around the unit during operation.
- Do not allow children to operate the incubator without adult supervision.
- Unplug the incubator from the power source before cleaning or performing any maintenance.
- Handle eggs carefully to avoid damage.
3. Product Overview
The MIFXIN 24-Egg Automatic Incubator is designed for ease of use and optimal hatching conditions. Below are key components and their functions:

Figure 3.1: Front view of the 24-Egg Automatic Incubator, showing its capacity and design.

Figure 3.2: Detailed view of the control panel and water filling hole.
- Digital Display Panel: Shows temperature, humidity, and incubation days.
- Control Buttons: For setting temperature, humidity, and other parameters.
- Automatic Egg Turner: Rotates eggs every 2 hours to ensure even heating.
- Transparent Lid: Allows observation of the incubation process without interruption.
- Water Filling Hole: Convenient access for adding water to maintain humidity.
- Heating Element: Provides 360-degree heating for consistent temperature.
- Fan: Circulates air for uniform heat and humidity distribution.

Figure 3.3: The incubator is suitable for hatching eggs from a wide range of poultry and birds.
4. Setup
Follow these steps for initial setup of your incubator:
- Unpack: Carefully remove all components from the packaging. Ensure all parts listed in the package contents are present.
- Placement: Place the incubator on a stable, level surface in a room with a consistent ambient temperature (ideally between 20-25°C / 68-77°F). Avoid direct sunlight or drafts.
- Water Addition: Locate the water filling hole. Use the provided water bottle to add water to the water channels at the bottom of the incubator. Ensure the water level is adequate to maintain humidity. Do not overfill.
- Egg Trays: Ensure the egg turning trays are correctly installed. The incubator comes with trays designed to hold up to 24 standard chicken/duck eggs.
- Power Connection: Connect the power cord to the incubator and then plug it into a 110V grounded electrical outlet. The digital display will light up.
- Pre-heating: Allow the incubator to run for at least 20-30 minutes to stabilize the internal temperature and humidity before placing eggs inside.

Figure 4.1: The incubator with egg trays installed.
5. Operating Instructions
Operating the incubator involves setting the correct parameters and monitoring the hatching process.
5.1 Setting Temperature and Humidity
- The incubator comes with factory default settings. For most chicken eggs, the ideal temperature is around 37.5°C (99.5°F).
- To adjust the temperature, press the 'Setting' key. Use the 'Adding' (+) and 'Decreasing' (-) keys to set the desired temperature. Press 'Setting' again to confirm.
- Humidity is maintained by adding water to the channels. The ideal humidity for most eggs is 50-60% during incubation and 65-75% during the last 3 days (hatching period). Monitor the humidity display and add water as needed.
5.2 Placing Eggs
- Once the incubator has stabilized, carefully place fertilized eggs into the egg turning trays. Ensure the larger end of the egg is slightly elevated.
- Close the lid securely.
5.3 Automatic Egg Turning
- The incubator is equipped with an automatic egg turning mechanism that rotates the eggs every 2 hours. This is crucial for preventing the embryo from sticking to the shell and for proper development.
- You do not need to manually turn the eggs during the incubation period.
5.4 Hatching Period
- Approximately 3 days before the expected hatch date (e.g., day 18 for chicken eggs), remove the egg turning trays.
- Place the eggs directly on the grid at the bottom of the incubator.
- Increase the humidity to 65-75% by adding more water to the channels.
- Do not open the incubator frequently during hatching, as this can cause temperature and humidity drops, negatively impacting the hatch.
6. Maintenance
Proper maintenance ensures the longevity and hygiene of your incubator.
- Cleaning: After each hatch, unplug the incubator and allow it to cool. Remove the egg trays and bottom grid. Clean all surfaces with a mild disinfectant solution and a soft cloth. Ensure all parts are completely dry before reassembly or storage.
- Water Channels: Regularly clean the water channels to prevent algae or bacterial growth.
- Storage: When not in use, store the incubator in a clean, dry place, away from direct sunlight and extreme temperatures.
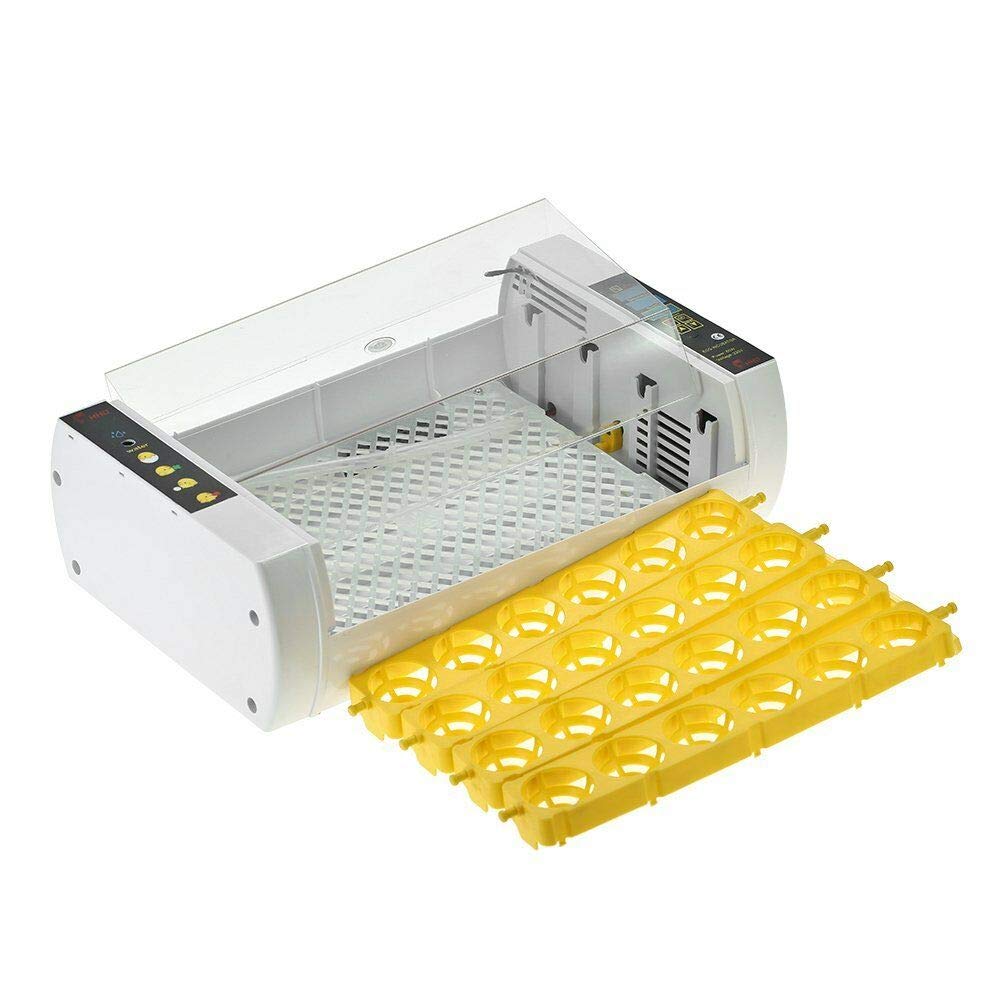
Figure 6.1: Incubator with egg trays removed for cleaning or during the hatching phase.
7. Troubleshooting
If you encounter issues with your incubator, refer to the following common problems and solutions:
| Problem | Possible Cause | Solution |
|---|---|---|
| Incubator not powering on | No power supply; loose connection | Check power cord connection; try a different outlet. |
| Temperature fluctuations | Room temperature unstable; lid not sealed properly | Move incubator to a stable environment; ensure lid is closed tightly. |
| Humidity too low | Insufficient water in channels | Add more water to the water channels. |
| Humidity too high | Too much water; high ambient humidity | Reduce water in channels; ensure proper ventilation in the room. |
| Eggs not turning | Egg turning motor malfunction; obstruction | Check for obstructions; contact customer support if motor is faulty. |
| Alarm sounding | Temperature/humidity outside set range | Adjust temperature/humidity to desired levels. |
8. Specifications
Technical specifications for the MIFXIN 24-Egg Automatic Incubator:
| Parameter | Value |
|---|---|
| Item Type | Incubator |
| Egg Capacity | 24 Eggs (Chicken/Duck) |
| Input Voltage | 110V |
| Power (W) | 60W |
| Plug Type | US Plug |
| Adjustable Temperature | 20-50°C (68-122°F) |
| Temperature Accuracy | ±0.1°C |
| Display | LED Digital Display |
| Size | 45 x 18 x 30 cm (18 x 7 x 12 inches) |
| Weight | 2.2 kg |
| Certification | CE Certified |
9. Warranty and Support
For warranty information and customer support, please refer to the documentation provided with your purchase or contact the seller directly. Keep your purchase receipt as proof of purchase for any warranty claims.