VITOPAL PR 8ST4
User Manual: ACEMIC PR/8-ST4 Portable Wireless Microphone
Model: PR 8ST4
Introduction
The ACEMIC PR/8-ST4 is a portable wireless microphone system designed for wind instruments such as saxophones, trumpets, trombones, and tubas. It features PLL synthesized technology for stable frequency transmission, antenna diversity for extended range, and an LCD display for easy monitoring of RF/AF levels and channel information. This manual provides detailed instructions for setup, operation, maintenance, and troubleshooting to ensure optimal performance of your device.
Package Contents
Please verify that all items listed below are included in your package:
- 1 x Receiver
- 1 x Microphone
- 1 x Audio cable
- 1 x Power Adapter
- 1 x User Manual
- 1 x Aluminium box
Note: A 1.5V AA battery is required for the transmitter and is not included in the package.

Image: Overview of the ACEMIC PR/8-ST4 wireless microphone system components, including the receiver, microphone, audio cable, power adapter, user manual, and the aluminum carrying case.
Product Features
- PLL Synthesized: Pre-set 100 selectable frequencies for stable and interference-free operation.
- Antenna Diversity: Guarantees maximum range up to 80 meters (approximately 262 feet) for reliable signal reception.
- LCD Display: Clearly shows RF level, AF level, current channel, and frequency for easy monitoring.
- Patented Design: Features a rubber cover to protect the wind instrument during attachment.
- Instrument Specific Design: Optimized for use with saxophones, trumpets, trombones, and tubas.
Setup Guide
1. Receiver Setup
- Placement: Place the receiver on a stable, flat surface, away from large metal objects or other electronic devices that may cause interference.
- Connect Power: Connect the provided power adapter to the DC 9V/500mA input on the receiver and plug it into a standard electrical outlet.
- Connect Audio Output: Connect one end of the 6.35mm audio cable to the "Audio Output" jack on the receiver. Connect the other end to the input of your mixer, amplifier, or audio interface.
- Extend Antennas: Fully extend the two antennas on the receiver for optimal signal reception.
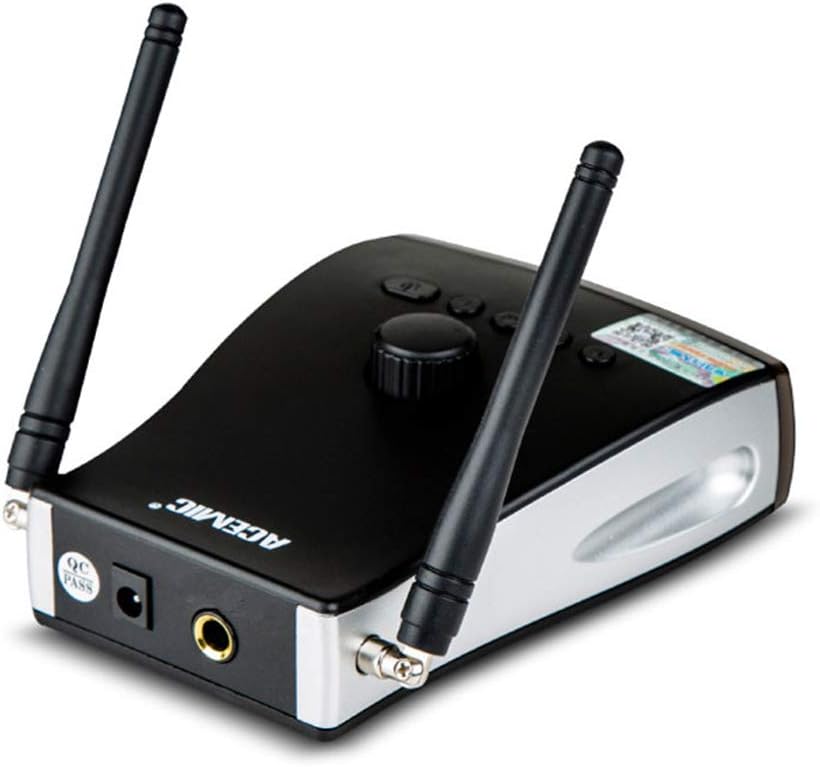
Image: Rear view of the ACEMIC PR/8-ST4 receiver, highlighting the power input and 6.35mm audio output jack, along with the antenna connections.
2. Microphone (Transmitter) Setup
- Install Battery: Open the battery compartment on the microphone transmitter. Insert one 1.5V AA battery, ensuring correct polarity (+/-). Close the compartment securely.
- Attach to Instrument: Carefully attach the microphone's clip to the bell of your saxophone or other compatible wind instrument. Ensure the microphone head is positioned to capture sound effectively without obstructing playing. The rubber cover helps protect the instrument's finish.
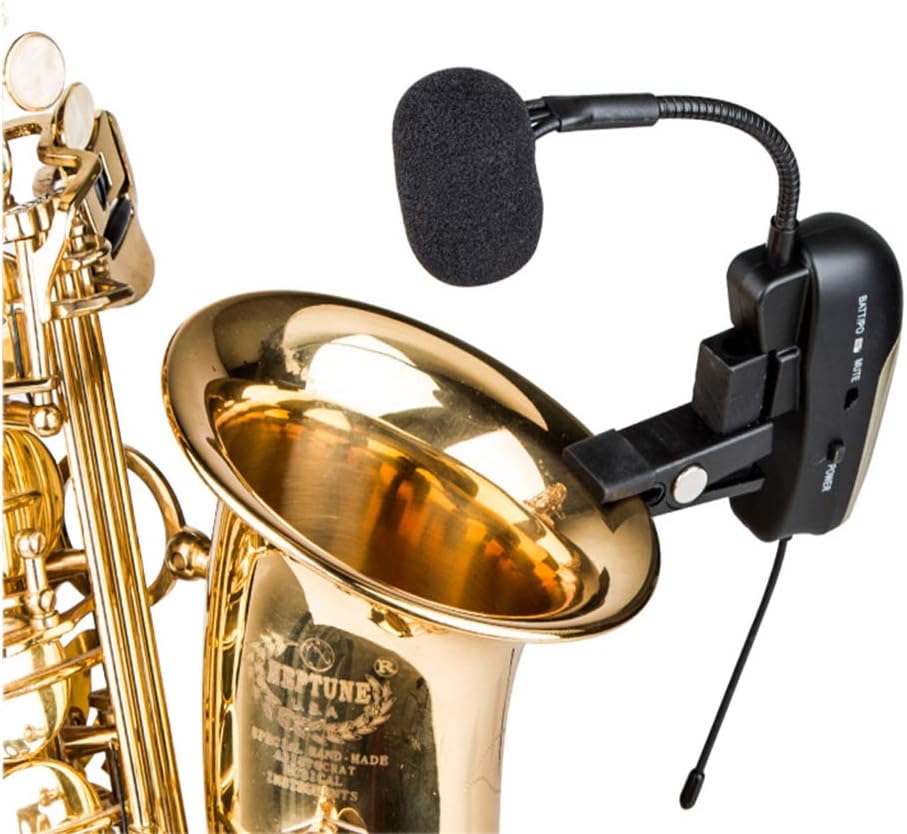
Image: The ACEMIC PR/8-ST4 microphone transmitter securely clipped onto the bell of a saxophone, demonstrating its intended use and placement.
Operating Instructions
- Power On Receiver: Press the power button on the receiver. The LCD display should illuminate.
- Power On Microphone: Press and hold the power button on the microphone transmitter until the indicator light turns on.
- Frequency Pairing: The receiver and transmitter should automatically pair. If they do not, or if you experience interference, you may need to manually select a frequency. Refer to the "Frequency Selection" section below.
- Adjust Volume: Adjust the volume knob on the receiver to achieve the desired output level for your mixer or amplifier. Start with a low volume and gradually increase it to avoid sudden loud sounds.
- Echo Effect (if applicable): If your model includes an echo effect, there will be a dedicated control on the microphone or receiver. Adjust this to your preference.
- Mute Function: The microphone transmitter may have a mute switch. Use this to temporarily silence the microphone without turning it off.
- Power Off: To power off, press and hold the power button on both the microphone transmitter and the receiver until their indicators turn off.
Frequency Selection
The ACEMIC PR/8-ST4 offers 100 selectable frequencies. If you encounter interference or wish to change the operating channel:
- On the receiver, locate the frequency selection buttons (usually "UP" and "DOWN" or "SET").
- Press the "SET" button (or equivalent) to enter frequency selection mode.
- Use the "UP" and "DOWN" buttons to cycle through available frequencies. Observe the LCD display for changes.
- Once a desired frequency is selected, the receiver will automatically transmit this frequency to the microphone for pairing. Ensure the microphone is powered on and within range for successful synchronization.
- Confirm successful pairing by checking the RF/AF indicators on the receiver.
Maintenance
- Cleaning: Use a soft, dry cloth to clean the surfaces of the receiver and microphone. Do not use liquid cleaners or abrasive materials.
- Battery Replacement: When the battery indicator on the microphone transmitter shows low power, replace the AA battery promptly to ensure uninterrupted performance. Always use fresh, high-quality batteries.
- Storage: When not in use for extended periods, remove the battery from the microphone transmitter to prevent leakage. Store the system in its original aluminum box in a cool, dry place, away from direct sunlight and extreme temperatures.
- Handling: Handle the microphone and receiver with care. Avoid dropping them or subjecting them to strong impacts.
Troubleshooting
| Problem | Possible Cause | Solution |
|---|---|---|
| No sound output from receiver. |
|
|
| Interference or poor sound quality. |
|
|
| Microphone not pairing with receiver. |
|
|
Specifications
| Category | Parameter | Value |
|---|---|---|
| Comprehensive Performance | Modulation Mode | FM |
| Dynamic Range | >100dB | |
| Frequency Response | 60Hz-17KHz±3dB | |
| Total Harmonic Distortion | <0.5% at 1KHz | |
| Signal/Noise Ratio | ≥108dB | |
| Receiver | Receive Sensitivity | -110dBm (sinad ≥30dB) |
| Signal/Noise Ratio | >105dB | |
| Power Supply | DC9V/ 500mA | |
| Transmitter | RF Power | 10mW |
| Microphone Type | Condenser | |
| Directivity | Cardioid | |
| Deviation | ±48KHz | |
| Antenna | 1/4 wave Length wire type | |
| Battery Voltage | 1.5V (1x1.5V AA Battery) | |
| General | Power Consumption | Approx. 10 hours (battery-dependent) |
| Material | Microphone Clip | Rubber |
Warranty and Support
For warranty information and technical support, please refer to the documentation provided with your purchase or contact the manufacturer, ACEMIC, or the seller, VITOPAL, directly. Details regarding specific warranty periods and service procedures are typically outlined in the product's warranty card or on the manufacturer's official website.
Please retain your proof of purchase for any warranty claims.
Ask a question about this manual
Ask about setup, troubleshooting, compatibility, parts, safety, or missing instructions. Manuals+ will review the question and use this page’s manual context to help answer it.