1. Introduction
The Musical Fidelity M6si500 is a high-performance, high-powered stereo integrated amplifier designed to deliver exceptional audio reproduction. It features a robust dual-mono design, providing 500 watts per channel into 8 ohms, ensuring it can effortlessly drive a wide range of loudspeakers. This amplifier incorporates a separate preamplifier section with two independent monobloc power amplifiers, effectively functioning as a separates system within a single chassis. With its outstanding technical performance, incredible load driving ability, and solid build quality, the M6si500 is engineered for discerning audio enthusiasts.
2. Important Safety Instructions
Please read and follow all safety instructions before operating this product to prevent injury or damage.
- Power Source: Connect the amplifier only to a power supply of the type described in this manual or marked on the unit.
- Ventilation: Ensure adequate ventilation. Do not block any ventilation openings. Install in accordance with the manufacturer's instructions.
- Heat: Do not install near any heat sources such as radiators, heat registers, stoves, or other apparatus (including amplifiers) that produce heat.
- Water and Moisture: Do not use this apparatus near water. Do not expose to dripping or splashing.
- Cleaning: Clean only with a dry cloth.
- Servicing: Do not attempt to service this product yourself. Refer all servicing to qualified service personnel.
- Grounding: This appliance must be earthed.
3. Package Contents
Carefully unpack your M6si500 amplifier. The package should contain the following items:
- Musical Fidelity M6si500 Integrated Amplifier
- Power Cable
- Remote Control (with batteries)
- User Manual (this document)
4. Product Overview
4.1 Front Panel
The front panel provides access to essential controls and indicators for operating the M6si500 amplifier.

This image displays the front panel of the M6si500 amplifier, featuring the central volume knob, input selection buttons, power controls, and the digital display.

A detailed view of the M6si500's front panel, showing the input selection buttons (Balanced, CD, Tuner, Aux/HT, Tape), the large volume control, and the power/standby/mute buttons.
- Power Button: Toggles the amplifier between standby and operational modes.
- STBY (Standby) Indicator: Illuminates when the unit is in standby.
- MUTE Button: Mutes or unmutes the audio output.
- Input Selectors: Buttons for BALANCED, CD, TUNER, AUX/HT, and TAPE inputs. Press to select the desired audio source.
- Volume Control: Large rotary knob to adjust the output volume level.
- Display: Shows the currently selected input and volume level.
- IR Receiver: Receives commands from the remote control.
4.2 Rear Panel
The rear panel houses all the input and output connections for your audio system.
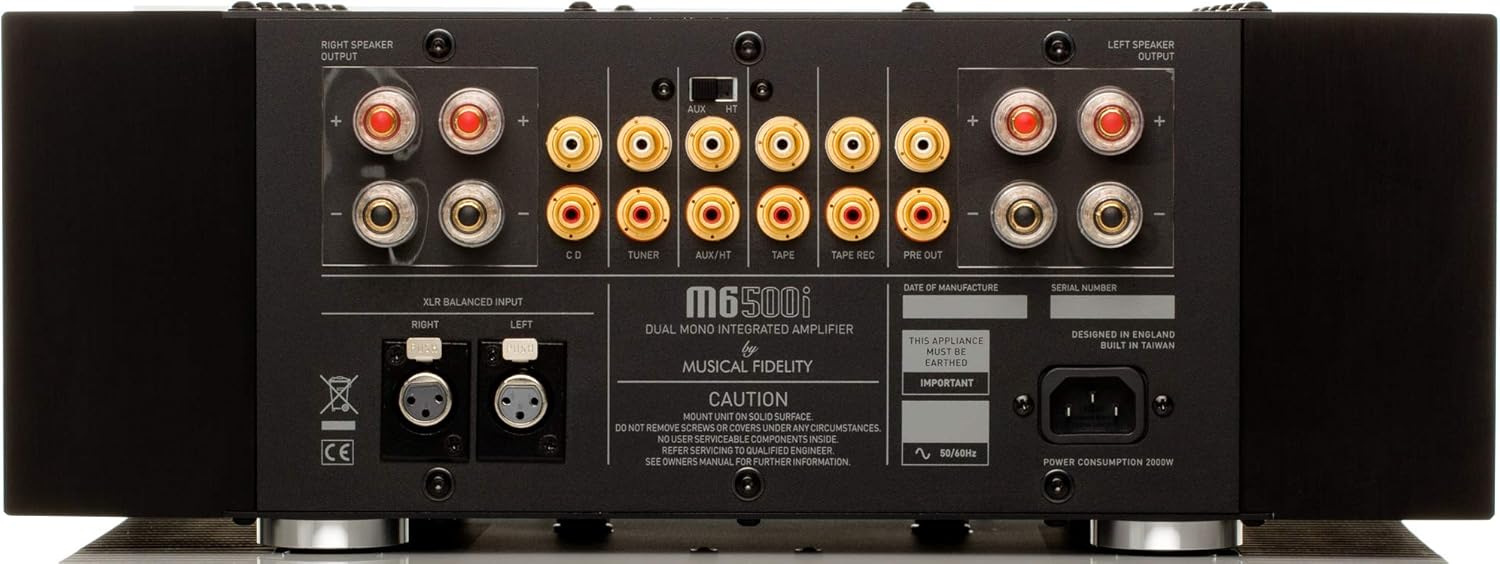
This image shows the rear panel of the M6si500, detailing the various input and output connections, including speaker terminals, RCA inputs, XLR balanced input, and power inlet.
- Speaker Outputs: Binding posts for connecting left and right loudspeakers.
- RCA Inputs: Unbalanced stereo inputs for CD, Tuner, Aux/HT, and Tape source components.
- XLR Balanced Input: Balanced stereo input for high-quality source components.
- Pre Out (RCA): Unbalanced stereo output for connecting to an external power amplifier or subwoofer.
- Fixed Out (RCA): Unbalanced stereo output with a fixed line level, suitable for recording devices.
- Power Inlet: IEC connector for the detachable power cable.
4.3 Internal Design
The M6si500 features a sophisticated internal architecture designed for optimal performance and reliability.
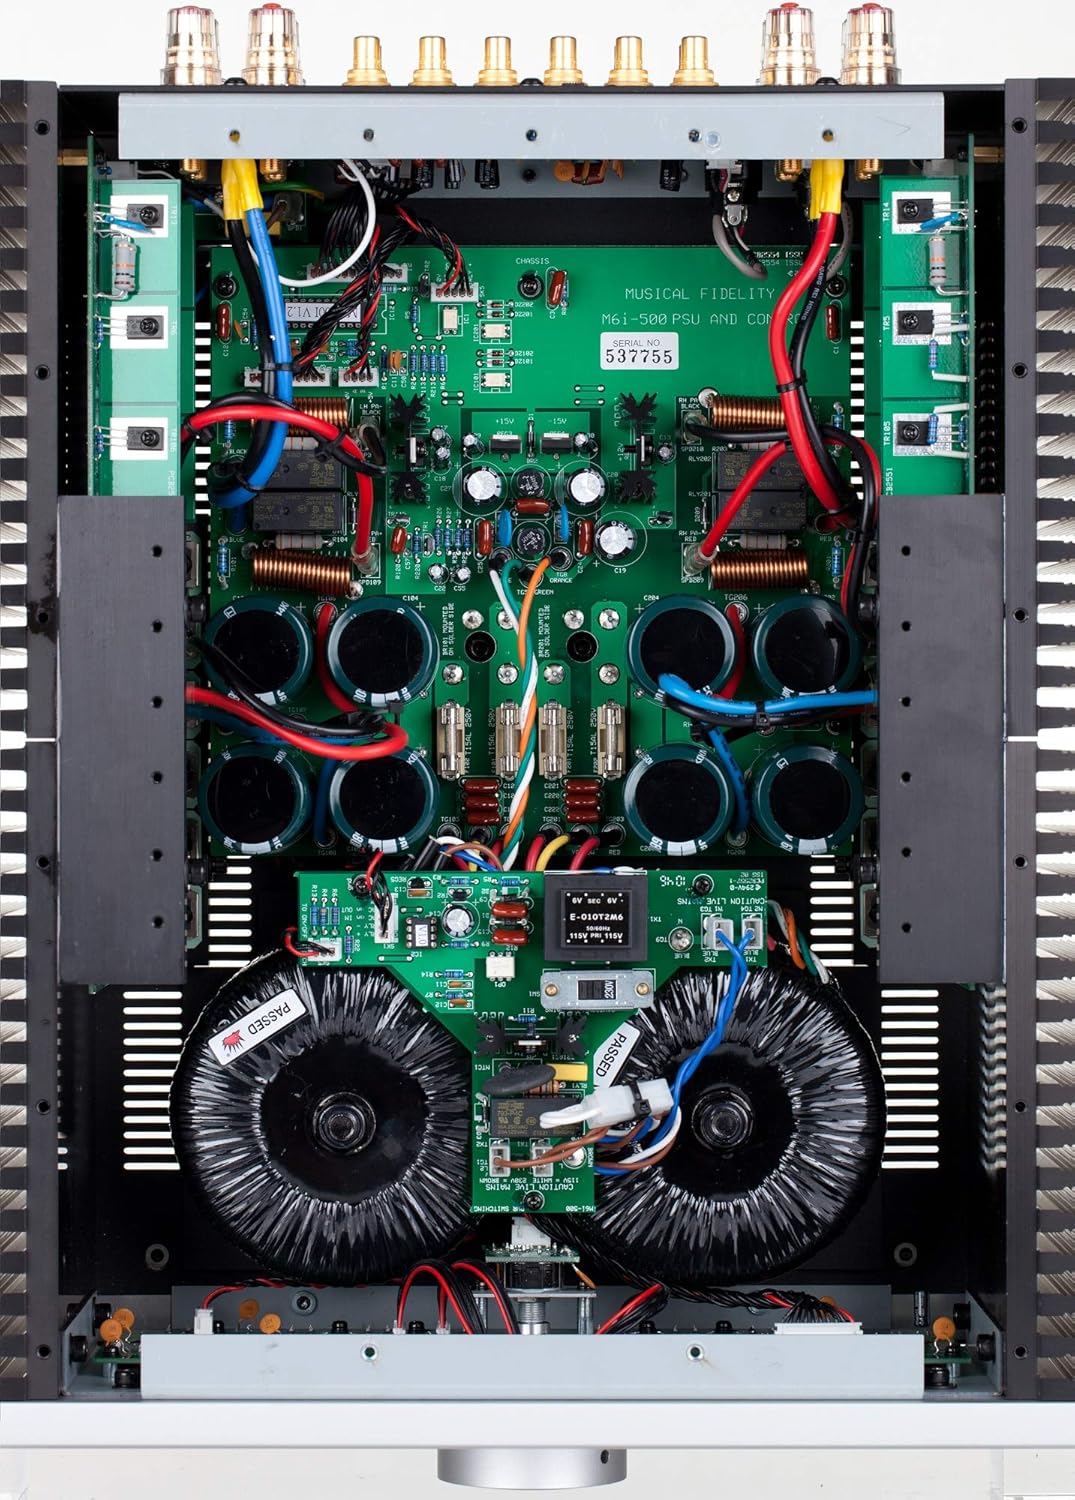
An overhead view of the M6si500's internal components, revealing the dual-mono design with separate transformers and circuit boards for each channel, showcasing the high-quality engineering.
Internally, the M6si500 is configured as a genuine dual-mono design. Each power amplifier section has its own dedicated heat sink and separate transformer, ensuring independent and stable power delivery. The preamplifier section also benefits from its own power-supply winding. The input sockets are connected directly to the main preamplifier circuit board, minimizing signal path length and ensuring ultra-low impedance. Each channel incorporates 12 large bipolar transistors, providing substantial current delivery for dynamic audio reproduction.
5. Setup and Connections
Follow these steps to set up your M6si500 amplifier.
- Placement: Position the amplifier on a stable, level surface. Ensure there is ample space around the unit for proper ventilation, especially around the side heat sinks. Avoid placing it in an enclosed cabinet without sufficient airflow.
- Speaker Connection: Connect your loudspeakers to the corresponding LEFT and RIGHT speaker output terminals on the rear panel. Ensure correct polarity (+ to + and – to –) for each speaker. Use high-quality speaker cables for optimal performance.
- Source Component Connection: Connect your audio source components (e.g., CD player, tuner, streamer) to the appropriate RCA or XLR input sockets on the rear panel. For balanced sources, use the XLR input. For home theater integration, use the AUX/HT input.
- Power Connection: Once all audio connections are made, connect the supplied power cable to the IEC inlet on the rear panel and then to a suitable AC power outlet.
6. Operating Instructions
Basic operation of your M6si500 amplifier.
- Powering On/Off: Press the POWER button on the front panel or remote control to switch the amplifier from standby to operational mode. Press it again to return to standby.
- Input Selection: Press the desired input selector button (BALANCED, CD, TUNER, AUX/HT, TAPE) on the front panel or remote control to choose your audio source. The selected input will be shown on the front display.
- Volume Adjustment: Rotate the large VOLUME knob on the front panel clockwise to increase volume and counter-clockwise to decrease it. Alternatively, use the volume up/down buttons on the remote control.
- Mute Function: Press the MUTE button on the front panel or remote control to temporarily silence the audio output. Press it again to restore the sound.
- Home Theater Bypass: The AUX/HT input can be configured for home theater bypass. When selected, this input bypasses the M6si500's preamplifier section, allowing an external home theater processor to control the volume for that input. Refer to your home theater processor's manual for specific setup.
7. Care and Maintenance
Proper care will ensure the longevity and performance of your amplifier.
- Cleaning: Disconnect the power cable before cleaning. Use a soft, dry, lint-free cloth to wipe the exterior surfaces. Do not use liquid cleaners, aerosols, or abrasive materials.
- Ventilation: Regularly check that the ventilation openings are clear of dust and debris to prevent overheating.
- Avoid Liquids: Never allow liquids to enter the amplifier. If liquid spills occur, immediately disconnect power and contact qualified service personnel.
- Environmental Conditions: Avoid exposing the unit to extreme temperatures, humidity, or direct sunlight.
8. Troubleshooting
If you encounter any issues, refer to the table below for common problems and their solutions.
| Problem | Possible Cause | Solution |
|---|---|---|
| No power | Power cable not connected; Power outlet faulty; Amplifier in standby. | Ensure power cable is securely connected. Test power outlet with another device. Press the POWER button. |
| No sound output | Incorrect input selected; Mute function active; Speaker cables disconnected; Source component not playing or faulty. | Select the correct input. Press MUTE. Check speaker cable connections. Verify source component operation. |
| Distorted sound | Volume too high; Poor cable connections; Faulty source component; Speaker impedance mismatch. | Reduce volume. Check all cable connections. Test with a different source. Ensure speakers are compatible. |
| Remote control not working | Batteries depleted; Obstruction between remote and amplifier; Remote not pointed at IR receiver. | Replace batteries. Remove obstructions. Point remote directly at the IR receiver on the front panel. |
9. Technical Specifications
Detailed specifications for the Musical Fidelity M6si500 Integrated Amplifier.
- Power Output: 500 Watts per channel into 8 Ohms (27dBW)
- THD (+ noise): <0.01% typical, 20Hz to 20 kHz
- Signal to Noise Ratio: >100dB ‘A’-weighted
- Frequency Response: +0, –0.1dB, 10Hz to 20 kHz
- Inputs:
- 4 x line level RCA / phono (1 with home theatre bypass)
- 1 x balanced XLR
- Outputs:
- 1 x RCA pre out
- 1 x RCA fixed out
- Dimensions (WxHxD): 440 x 160 x 460 mm
- Weight (unpacked / packed): 30kg / 35kg
- Model Number: M6si500
- Manufacturer: Musical Fidelity
10. Warranty and Customer Support
Musical Fidelity products are designed and manufactured to the highest quality standards. This product is covered by a limited warranty. For specific warranty terms and conditions, please refer to the warranty card included with your product or visit the official Musical Fidelity website. For technical support, service, or inquiries, please contact your authorized Musical Fidelity dealer or distributor. Contact information can typically be found on the manufacturer's website.