VITOPAL ST-2
ACEMIC ST-2 Ultra-cardioid Condenser Wired Saxophone Microphone
Model: ST-2 | Brand: VITOPAL

Image: Overview of the ACEMIC ST-2 microphone system, including the microphone, control unit, and cleaning cloth.
Introduction
This manual provides detailed instructions for the proper setup, operation, and maintenance of your ACEMIC ST-2 Ultra-cardioid Condenser Wired Saxophone Microphone. Designed specifically for wind instruments such as saxophones, tubas, trumpets, and other brass instruments, the ST-2 offers high-quality sound capture with its ultra-cardioid polar pattern. Please read this manual thoroughly before using the microphone to ensure optimal performance and longevity.
Features
- High-Quality Condenser Cartridge: Equipped with an RT 14mm condenser cartridge for clear and accurate sound reproduction.
- Ultra-cardioid Polar Pattern: Specifically designed to focus on the sound source while minimizing background noise, ideal for live performances and studio recordings of wind instruments.
- Instrument-Specific Design: Optimized for saxophone, tuba, trumpet, and other brass wind instruments.
- Durable Construction: Features rubber protection and vibration protection to ensure stability and longevity during use.
- Adjustable Gooseneck: The flexible gooseneck allows for precise positioning of the microphone to capture the desired sound.
- Battery Powered Operation: Can be powered by a 1.5V AA battery for convenient use (battery not included).
- Versatile Power Options: Supports Phantom 48V or DC 1V-10V working voltage.
- Long Cable: Includes a 5-meter cable with mini XLR to 6.35mm connector for flexible setup.
What's in the Box
Upon opening the package, please verify that all components are present and in good condition:
- ACEMIC ST-2 Instrument Microphone
- Connection Cable (5m, mini XLR to 6.35mm)
- User Manual (this document)
Note: A 1.5V AA battery is required for battery-powered operation and is not included in the package.
Setup Instructions
- Power Source Selection:
The ST-2 microphone can be powered in two ways:
- 1.5V AA Battery: If using battery power, open the battery compartment on the control unit and insert one 1.5V AA battery, ensuring correct polarity.
- Phantom Power (48V) or DC 1V-10V: If your mixer or audio interface provides phantom power, you can use this option. Ensure the power switch on the microphone's control unit is set to the appropriate position (e.g., "PO" for phantom power or "BATT" for battery, depending on the unit's labeling).
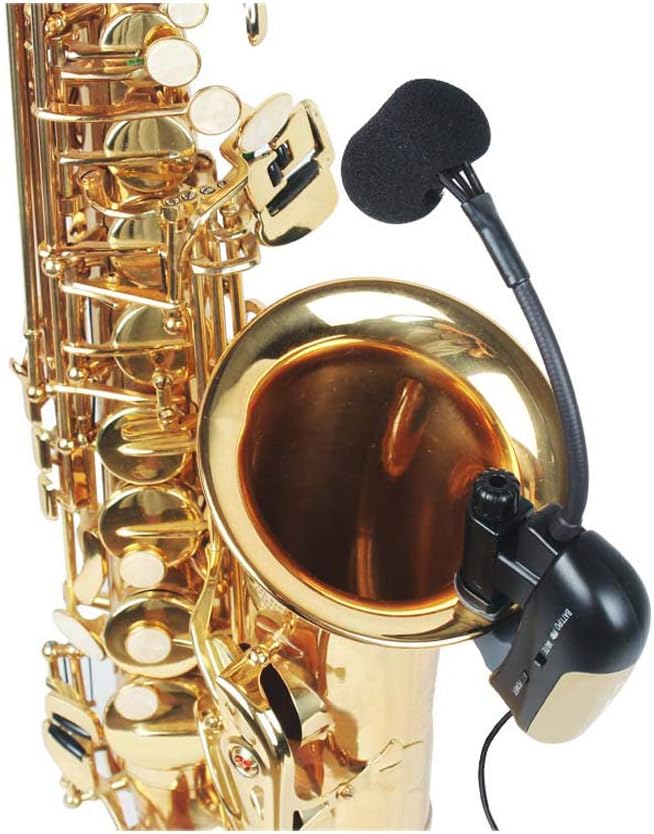
Image: The control unit of the ACEMIC ST-2 microphone, showing the battery compartment and power selection switch. Ensure the switch is set correctly for your chosen power source (battery or phantom power).
- Mounting the Microphone:
Attach the microphone's clip to the bell or a suitable part of your wind instrument. The rubber protection ensures a secure fit without damaging the instrument's finish.

Image: The ACEMIC ST-2 microphone securely clipped onto the bell of a saxophone, demonstrating its intended mounting position for instrument recording.
- Positioning the Gooseneck:
Adjust the flexible gooseneck to position the microphone capsule optimally relative to the instrument's sound source. Experiment with different angles and distances to achieve the desired tone and minimize key noise.

Image: A close-up view of the ACEMIC ST-2 microphone's condenser capsule, highlighting its compact design and the flexible gooseneck connection.
- Connecting to Audio Equipment:
Connect the 6.35mm (1/4 inch) jack of the microphone cable to the input of your mixer, amplifier, audio interface, or other compatible audio recording device. Ensure the connection is secure.
Operating Instructions
- Powering On:
Once connected and powered, switch the microphone's control unit to the "ON" position. If using battery power, ensure the battery is fresh. If using phantom power, ensure it is enabled on your connected device.
- Adjusting Gain:
Adjust the input gain on your mixer or audio interface. Start with a low gain setting and gradually increase it until you achieve a strong signal without clipping (distortion). The ST-2 features an ultra-cardioid polar pattern, which is highly directional, so precise positioning is key to capturing the instrument's sound effectively.
- Monitoring Sound:
Monitor the sound through headphones or speakers to ensure optimal sound quality. Make fine adjustments to the microphone's position and your equipment's settings as needed.
- Powering Off:
After use, switch the microphone off. If using battery power, consider removing the battery for long periods of disuse to prevent leakage.
Maintenance
- Cleaning: Use a soft, dry cloth to wipe down the microphone body and cable. Do not use liquid cleaners or solvents, as they may damage the microphone.
- Storage: Store the microphone in a dry, cool place, away from direct sunlight and extreme temperatures. Keep it in its original packaging or a protective case when not in use to prevent dust accumulation and physical damage.
- Battery Replacement: If using battery power, replace the AA battery when the sound quality degrades or the power indicator (if present) shows low battery. Always dispose of used batteries responsibly.
- Cable Care: Avoid kinking or sharply bending the cable. Store it neatly coiled to prevent internal wire damage.
Troubleshooting
| Problem | Possible Cause | Solution |
|---|---|---|
| No sound output |
|
|
| Distorted sound |
|
|
| Weak or noisy signal |
|
|
Specifications
| Parameter | Value |
|---|---|
| Element | Condenser |
| Polar Pattern | Ultra-cardioid (Unidirectional) |
| Cartridge Size | Φ9.7*5.0mm |
| Sensitivity | -47dB ± 2dB |
| Frequency Response | 20-20 KHz |
| Output Impedance | ≤680 KΩ |
| Working Voltage | Phantom 48V or DC 1V-10V |
| Signal-to-Noise Ratio | >58dB |
| Cable Length | 5m |
| Connectivity Technology | XLR (via mini XLR to 6.35mm cable) |
| Power Source | Battery Powered (1.5V AA) or Phantom Power |
| Microphone Form Factor | Gooseneck |
| Compatible Devices | Headphone, Personal Computer, Radio, Television (via appropriate interfaces) |
Warranty and Support
For warranty information and technical support, please contact the seller or manufacturer directly. Keep your purchase receipt as proof of purchase. General support inquiries can often be resolved by referring to the troubleshooting section of this manual or by visiting the VITOPAL/ACEMIC official website for further resources.
Manufacturer: ACEMIC
Brand: VITOPAL
Ask a question about this manual
Ask about setup, troubleshooting, compatibility, parts, safety, or missing instructions. Manuals+ will review the question and use this page’s manual context to help answer it.