
NDS 500.SCS-4
NDS Smart Charger - 12V/4A Battery Charger User Manual
Model: 500.SCS-4 | Brand: NDS
1. Introduction
The NDS Smart Charger 12V/4A is an advanced, intelligent battery charger designed for optimal charging and maintenance of 12-volt batteries. This manual provides essential information for the safe and efficient operation of your charger, ensuring long-term performance and battery health. Please read this manual thoroughly before using the device.
2. Safety Information
Always observe the following safety precautions to prevent injury or damage to the charger or battery:
- Use the charger only for 12V lead-acid, Gel, or AGM batteries. Do not attempt to charge other battery types.
- Ensure proper ventilation during charging. Batteries can emit explosive gases.
- Avoid open flames, sparks, or smoking near the battery or charger.
- Wear eye protection and gloves when handling batteries.
- Do not expose the charger to rain or excessive moisture.
- Disconnect the charger from the power outlet before making or breaking connections to the battery.
- Keep out of reach of children.
- If the power cord is damaged, it must be replaced by the manufacturer or a qualified service agent to avoid a hazard.
3. Product Overview
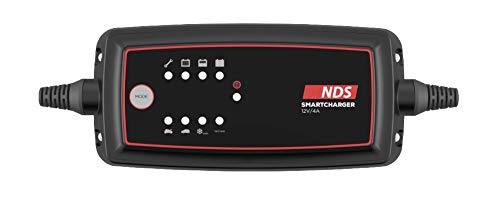
The NDS Smart Charger features a compact design with a clear indicator panel. The main body is black with a red border around the display area. On the display, there are several indicator lights and a "MODE" button. The top row of indicators includes icons for a wrench (maintenance/error), a battery with a plus sign (charging), and a full battery (charged). Below these are corresponding LED indicators. On the bottom row, there are icons for different battery types or charging modes, such as a car battery and a snowflake (cold weather mode), each with its own indicator light. A red power indicator light is also visible. The charger has robust cables extending from both ends.
Controls and Indicators:
- MODE Button: Used to select different charging programs/modes.
- Wrench/Error Indicator: Illuminates to indicate a fault or maintenance requirement.
- Charging Indicator: Shows the charging progress (e.g., blinking for charging, solid for fully charged).
- Full Battery Indicator: Illuminates when the battery is fully charged.
- Battery Type/Mode Indicators: Lights up to show the currently selected charging mode (e.g., standard, cold weather).
- Power Indicator: Indicates the charger is connected to power.
4. Setup
- Prepare the Battery: Ensure the battery terminals are clean and free of corrosion. If charging a wet cell battery, check the fluid levels and top up with distilled water if necessary (do not overfill).
- Connect to Battery:
- Connect the red (+) clamp to the positive (+) battery terminal.
- Connect the black (-) clamp to the negative (-) battery terminal.
- For batteries installed in a vehicle, connect the black (-) clamp to the vehicle chassis away from the battery and fuel line if the negative terminal is grounded to the chassis.
- Connect to Power: Plug the charger's AC power cord into a suitable electrical outlet (100-240V AC). The power indicator light on the charger should illuminate.
- Select Charging Mode: Press the "MODE" button to cycle through the available charging programs until the desired mode is selected (e.g., standard charging, cold weather charging). Refer to the charger's display for mode indicators.
5. Operating Instructions
Once connected and the mode is selected, the charger will automatically begin the charging process. The charging indicator lights will show the progress.
- Charging Process: The charger will analyze the battery condition and initiate the appropriate charging stage. This may include desulfation, soft start, bulk charge, absorption, and float/maintenance.
- Monitoring: Observe the indicator lights. A blinking charging light typically indicates active charging, while a solid light may indicate a full charge or maintenance mode.
- Completion: When the battery is fully charged, the "Full Battery" indicator will illuminate, and the charger will switch to a maintenance (float) mode to prevent overcharging.
- Disconnecting: First, unplug the charger from the AC power outlet. Then, disconnect the black (-) clamp from the battery (or chassis), followed by the red (+) clamp from the battery terminal.
6. Maintenance
Regular maintenance ensures the longevity and optimal performance of your NDS Smart Charger:
- Cleaning: Clean the charger casing with a soft, dry cloth. Do not use abrasive cleaners or solvents.
- Cable Inspection: Periodically inspect the charging cables and clamps for any signs of damage, fraying, or corrosion. Replace if damaged.
- Storage: Store the charger in a cool, dry place when not in use. Keep it away from direct sunlight and extreme temperatures.
7. Troubleshooting
| Problem | Possible Cause | Solution |
|---|---|---|
| Charger not turning on. | No power from outlet; loose connection; faulty charger. | Check power outlet; ensure all connections are secure; contact support if still no power. |
| Wrench/Error indicator is on. | Incorrect battery connection (reverse polarity); battery fault; charger fault. | Verify correct polarity (+ to +, - to -); check battery condition; disconnect and reconnect. |
| Battery not charging. | Battery is deeply discharged or damaged; incorrect mode selected. | Ensure battery is within charger's capacity; try different mode; battery may need professional assessment. |
| Charger gets hot. | Normal during charging; poor ventilation; overloaded. | Ensure adequate ventilation; if excessively hot, disconnect and contact support. |
8. Specifications
| Brand | NDS |
| Model Number | 500.SCS-4 |
| Input Voltage | 12 Volt |
| Output Voltage | 12 Volt |
| Rated Current | 4 Ampere |
| Color | Black |
| Item Weight | 2 Kilograms |
| Batteries Required | No |
| First Available Date | March 31, 2020 |
9. Warranty and Support
For warranty information or technical support regarding your NDS Smart Charger, please refer to the documentation included with your purchase or contact NDS customer service directly. Keep your proof of purchase for any warranty claims.
For further assistance, you may visit the official NDS website or contact their authorized service centers.
Related documents500.SCS-4


Ask a question about this manual
Ask about setup, troubleshooting, compatibility, parts, safety, or missing instructions. Manuals+ will review the question and use this page’s manual context to help answer it.