Introduction
The Soundcraft EPM series emphasizes quality construction and audio performance. This mixer console features an easy-to-understand control surface, designed to be uncluttered by unnecessary facilities. Soundcraft has incorporated new technologies and ideas into this cost-effective range. Surface mount technology is utilized throughout, employing close-tolerance components for high accuracy and repeatable settings for EQ and gain controls.
A key feature for signal monitoring is the PEAK LED. This indicator uses multipoint signal take-offs to detect overload conditions across various parts of the channel strip. The LED illuminates with increasing brightness as the signal approaches its peak point, providing a clear visual warning.

Figure 1: Front panel view of the Soundcraft EPM8 mixer console, showing all controls and inputs.
Safety Information
- Electrical Grounding: This equipment must be earthed to prevent electrical shock. Ensure proper grounding connections are made.
- Fuse Replacement: Replace fuses only with the same type and rating (e.g., T1AL-250V FUSE) to maintain safety and proper operation.
- Risk of Electric Shock: Do not open the unit. There are no user-serviceable parts inside. Refer all servicing to qualified personnel.
- Environmental Conditions: Do not expose the unit to rain or moisture. Operate in a dry environment to prevent damage and electrical hazards.
- FCC Compliance: This device complies with Part 15 of the FCC Rules. Operation is subject to the following two conditions: (1) This device may not cause harmful interference, and (2) this device must accept any interference received, including interference that may cause undesired operation.

Figure 2: Rear panel detail showing the mains power input and fuse holder, with grounding and fuse replacement warnings.

Figure 3: Rear panel overview displaying safety warnings, input/output connection types, and manufacturing details.
Setup
1. Power Connection
Connect the provided power cord to the mains input socket on the rear of the EPM8 mixer. Ensure the power source matches the voltage requirements (90-240VAC ~ 50-60Hz). Always connect the mixer to a properly grounded outlet.

Figure 4: Side view of the EPM8 mixer showing the power cable connected to the rear input.
2. Input and Output Connections
- Mono Inputs: Use XLR-type or 1/4" metal jack connector sockets for mono input channels. TRS insert sockets are available on all mono inputs for external processing.
- Stereo Inputs: The EPM8 includes two stereo input channels.
- Auxiliary Buses: Utilize the two configurable auxiliary buses for monitor sends or effects sends.
- Main Outputs: Connect your main speakers or recording devices to the mix output.
- Playback/Record: RCA phono stereo playback inputs and record outputs are provided for external playback devices and recording.
- Headphone Output: Connect headphones for monitoring.
3. Rack Mounting
The Soundcraft EPM8 is designed to be easily rack mountable. Refer to the optional rack mount kit instructions for proper installation.
4. Rockville PRO-D7 KIT Microphones
This bundle includes the Rockville PRO-D7 KIT 7-piece drum microphone set. Connect these microphones to the XLR inputs of the EPM8 mixer. The kit includes microphones optimized for bass drums, snare drums, and condenser overhead microphones. Ensure proper placement for optimal sound capture.
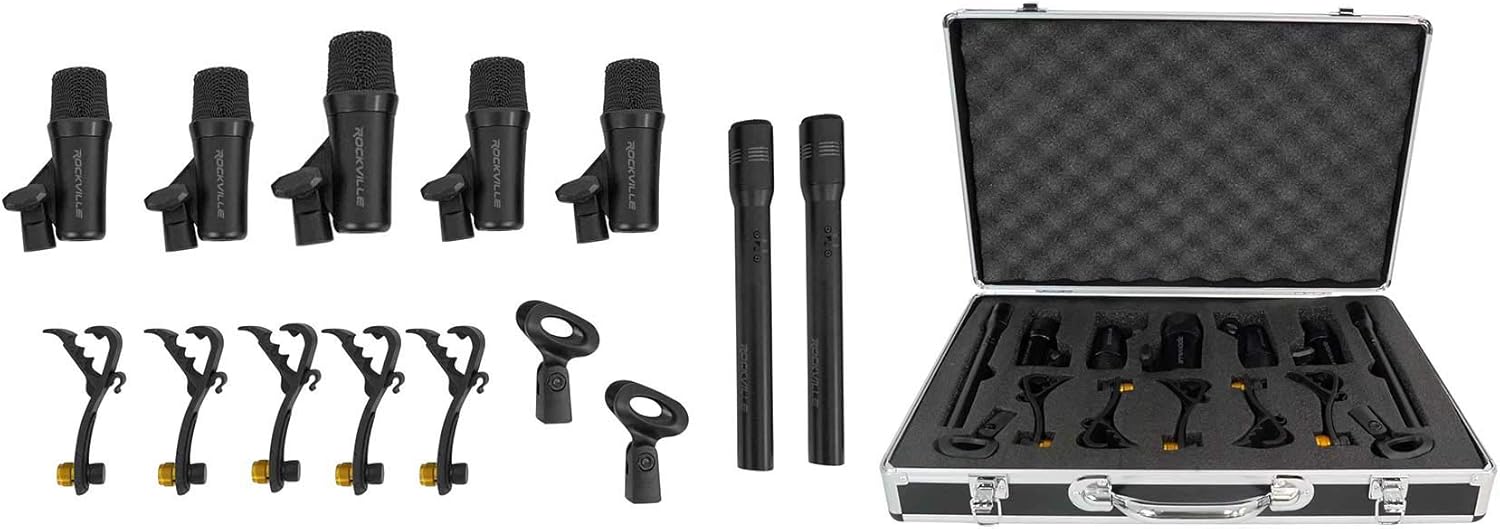
Figure 5: The Rockville PRO-D7 KIT drum microphone set, including various microphones and mounting hardware.
Operating Instructions
1. Channel Controls (Mono Inputs)
- Gain Control: Adjust the input sensitivity for each microphone or line-level source. Set this to achieve a strong signal without clipping.
- 3-Band EQ: Each mono input features a 3-band equalizer with a swept mid-range control for precise tone shaping.
- Auxiliary Sends: Use the two auxiliary send controls to route signal to external effects processors or monitor mixes. These are configurable as pre-fader or post-fader.
- Pan Control: Position the signal within the stereo field.
- Mute Button: Silences the channel output.
- PFL/Solo Button: Pre-Fader Listen (PFL) or Solo allows monitoring the channel's signal independently through headphones without affecting the main mix.
- Channel Fader: Controls the level of the channel in the main mix. The EPM8 features 60mm faders.
2. Stereo Input Controls
Stereo input channels feature 2-band EQ and dedicated level controls.
3. Master Section
- Aux Masters: Control the overall level of the auxiliary sends.
- Mix Output Faders: Control the overall level of the main stereo mix.
- Ten-Segment LED Metering: Provides visual feedback of the output signal level.
- Headphone Output: Adjust the headphone level for monitoring.
4. Phantom Power
The EPM8 provides global 48V phantom power for condenser microphones. Activate this feature only when using microphones that require phantom power. Ensure dynamic microphones are not connected when phantom power is engaged, unless they are designed to handle it.
5. PEAK LED Monitoring
The unique PEAK LED on each channel indicates when the signal is approaching overload. Adjust the gain control to keep the PEAK LED from illuminating constantly or brightly, ensuring a clean signal path.
Maintenance
- Cleaning: Use a soft, dry cloth to clean the exterior of the mixer. Avoid using liquid cleaners or solvents, as these can damage the finish and internal components.
- Ventilation: Ensure that the mixer's ventilation openings are not obstructed to prevent overheating.
- Fuse Replacement: If the mixer fails to power on, check the mains fuse located near the power input. Replace it only with a fuse of the identical type and rating (e.g., T1AL-250V FUSE). Disconnect the power cord before attempting fuse replacement.
- Storage: When not in use for extended periods, store the mixer in a dry, dust-free environment.
Troubleshooting
- No Power:
- Check if the power cord is securely connected to both the mixer and a working power outlet.
- Verify the power outlet is active.
- Inspect and replace the mains fuse if blown (refer to Maintenance section).
- No Sound Output:
- Ensure all channel faders and master mix faders are raised.
- Check that input sources are connected correctly and are active.
- Verify that the main outputs are connected to active speakers or amplifiers.
- Confirm that no channels or the main mix are muted.
- Distorted Sound:
- Reduce the input gain on the affected channel to prevent the PEAK LED from illuminating brightly.
- Lower the master output level if the main meters are consistently in the red.
- Check all cables for damage or improper connection.
- Hum or Noise:
- Ensure all equipment is properly grounded.
- Use balanced cables (XLR or TRS) where possible.
- Separate audio cables from power cables to reduce interference.
Specifications
| Brand | Soundcraft |
| Model | EPM8 |
| Number of Channels | 8 Mono + 2 Stereo |
| Product Dimensions (D x W x H) | 7.6" x 17.9" x 17.2" |
| Item Weight | 15.4 Pounds |
| Connectivity Technology | Auxiliary |
| Power Source | Corded Electric (90-240VAC ~ 50-60Hz) |
| Frequency Response (PRO-D7 KIT) | 30Hz - 12KHz |
| Output Connector Type | RCA, TRS, TS, XLR |
| Audio Input | RCA, XLR |
| EQ (Mono Inputs) | 3-band with swept mid |
| EQ (Stereo Inputs) | 2-band |
| Faders | 60mm |
| Phantom Power | Global 48V |
Warranty and Support
The Soundcraft EPM8 mixer console is manufactured by Soundcraft. For detailed warranty information, technical support, or service inquiries, please visit the official Soundcraft website or contact their customer support directly. Keep your purchase receipt as proof of purchase for any warranty claims.
For information regarding the Rockville PRO-D7 KIT microphones, please refer to the documentation provided with that specific product or contact Rockville support.


