1. Introduction
The Vonyx 2.1 Live Sound System 1600W is the ultimate solution for those seeking powerful and balanced sound at any event. Featuring an 18" SMWBA18 active subwoofer and two 12" SL12 speakers, this system delivers exceptional performance across low, mid, and high frequencies, creating an immersive and professional audio experience.
The active subwoofer includes an integrated amplifier that provides deep and tight bass, ideal for live music, DJ sets, and events. This amplifier also powers the SL12 speakers, optimizing power distribution and ensuring balanced sound. The 12" SL12 speakers complement the system with clear mid and high-frequency reproduction, offering distortion-free audio even at high volumes.
The system comes ready to use, with all necessary cables to connect the speakers to the subwoofer. Ideal for live events, parties, weddings, presentations, and venues, this professional sound system stands out for its power and versatility. Its robust construction ensures durability and reliability, allowing use in various environments without compromising quality. Simply connect your mixer, computer, CD player, or any compatible audio source and enjoy powerful, clear sound.
2. Safety Instructions
- Electrical Safety: Always connect the unit to a grounded power outlet. Do not expose the unit to rain or moisture. Disconnect power before cleaning or servicing.
- Ventilation: Ensure adequate ventilation around the unit. Do not block ventilation openings.
- Placement: Place the unit on a stable, level surface. Avoid placing it near heat sources or in direct sunlight.
- Handling: Handle the speakers with care. Avoid dropping or subjecting them to strong impacts.
- Cables: Use only specified cables. Ensure cables are not pinched or walked upon.
- Servicing: Do not attempt to repair the unit yourself. Refer all servicing to qualified personnel.
3. Package Contents
Please check that all items are present upon unpacking:
- 1x Vonyx SMWBA18 Active Subwoofer
- 2x Vonyx SL12 Passive Satellite Speakers
- Speaker Cables (for connecting satellite speakers to subwoofer)
- Power Cable
- User Manual
4. Setup
4.1 Component Identification

Figure 1: Vonyx SMWBA18 Active Subwoofer. This large black speaker enclosure features a protective metal grille and side handles for portability.

Figure 2: Vonyx SL12 Passive Satellite Speaker. A tall, black speaker with a metal grille, designed to be paired with the active subwoofer.
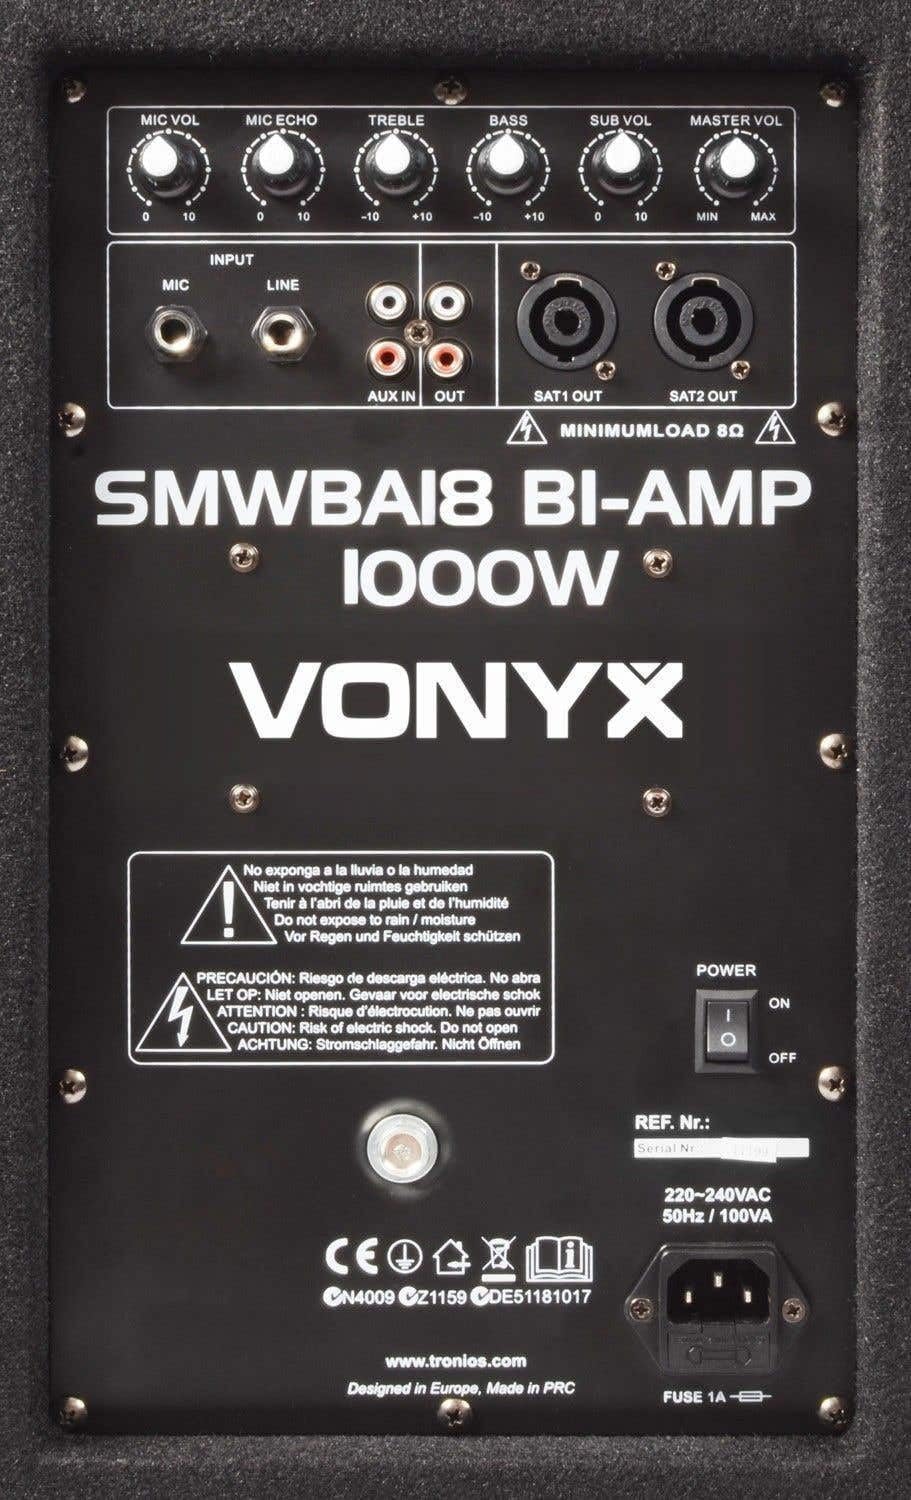
Figure 3: Rear control panel of the SMWBA18 Active Subwoofer, showing input/output ports and various control knobs.

Figure 4: Speaker cable with a Speakon connector on one end and a 1/4-inch (6.35mm) jack connector on the other, used for connecting satellite speakers.
4.2 Speaker Placement
- Place the SMWBA18 active subwoofer on a stable, flat surface, preferably on the floor for optimal bass response.
- Position the two SL12 satellite speakers to the left and right of the subwoofer, facing the audience. For best sound dispersion, consider using speaker stands (often sold separately) to elevate the satellite speakers to ear level.

Figure 5: Two speaker stands, typically used to elevate satellite speakers for improved sound projection. These may be sold separately.

Figure 6: Bottom view of a speaker, illustrating the integrated pole mount socket for use with speaker stands.
4.3 Connections
- Connect Satellite Speakers: Use the provided speaker cables to connect the SL12 satellite speakers to the 'SAT1 OUT' and 'SAT2 OUT' Speakon outputs on the rear panel of the SMWBA18 subwoofer (refer to Figure 3).
- Connect Audio Source: Connect your audio source (mixer, laptop, CD player, etc.) to the 'INPUT' section on the subwoofer's rear panel. You can use the XLR/TRS combo jack for balanced inputs or RCA jacks for unbalanced inputs.
- Connect Power: Ensure the power switch on the subwoofer is in the 'OFF' position. Connect the power cable to the subwoofer's power inlet and then to a suitable grounded electrical outlet.
5. Operating Instructions
5.1 Powering On/Off
- To power on, ensure all connections are secure, then flip the 'POWER' switch on the rear panel of the subwoofer to the 'ON' position.
- To power off, turn down the 'MASTER VOL' knob completely, then flip the 'POWER' switch to the 'OFF' position.
5.2 Controls (Refer to Figure 3)
- MIC VOL: Adjusts the volume of the connected microphone.
- MIC ECHO: Controls the echo effect for the microphone input.
- TREBLE: Adjusts the high-frequency response of the system.
- BASS: Adjusts the low-frequency response of the system.
- SUB VOL: Controls the volume level of the active subwoofer.
- MASTER VOL: Adjusts the overall output volume of the entire system.
- INPUT: Connect your audio source here (XLR/TRS combo or RCA).
- AUX IN: Additional auxiliary input for various audio devices.
- OUT: RCA output for connecting to other audio equipment.
- SAT1 OUT / SAT2 OUT: Speakon outputs for connecting the passive SL12 satellite speakers.
5.3 Basic Operation
- Turn on your audio source (mixer, laptop, etc.).
- Slowly increase the 'MASTER VOL' knob to your desired listening level.
- Adjust 'SUB VOL', 'TREBLE', and 'BASS' controls to fine-tune the sound to your preference and the acoustics of the environment.
- If using a microphone, connect it to the 'INPUT' and adjust 'MIC VOL' and 'MIC ECHO' as needed.
6. Maintenance
- Cleaning: Use a soft, dry cloth to clean the exterior surfaces of the speakers. Do not use abrasive cleaners or solvents.
- Storage: When not in use for extended periods, store the system in a dry, dust-free environment.
- Inspection: Periodically check all cables and connections for signs of wear or damage.
- Ventilation: Ensure the ventilation openings on the subwoofer are clear of dust and debris to prevent overheating.
7. Troubleshooting
| Problem | Possible Cause | Solution |
|---|---|---|
| No power | Power cable disconnected; Power switch off; Blown fuse | Check power cable connection; Turn power switch on; Replace fuse (refer to qualified technician) |
| No sound | Volume knobs too low; Input cable disconnected; Incorrect input selected; Satellite speakers not connected | Increase MASTER VOL and SUB VOL; Check all audio input/output cables; Ensure satellite speakers are properly connected to the subwoofer |
| Distorted sound | Volume too high; Input signal too strong; Damaged speaker/cable | Reduce MASTER VOL or input source volume; Check cables for damage; Contact support if distortion persists |
| Low volume | Volume knobs too low; Weak input signal | Increase MASTER VOL, SUB VOL, and input source volume; Ensure input source is providing a strong signal |
8. Specifications
| Feature | Specification |
|---|---|
| Brand | Vonyx |
| Product Model Number | SL12 + SMWBA18 |
| Output Watts | 600 Watts (RMS, total system) |
| Frequency Response | 30000 Hz (Upper limit, system response) |
| Number of Channels | 2 |
| Connectivity Technology | Wired |
| Connector Type | RCA, XLR/TRS Combo, Speakon |
| Power Source | AC (Direct to electricity) |
| Material | Wood |
| Product Weight | 27.9 Kilograms (Total system) |
| Product Dimensions (L x W x H) | 10 x 10 x 10 centimeters (Individual component dimensions may vary) |
| Mounting Type | Floor Mount |
| Compatible Devices | Mixers, Laptops, CD Players, and more |
| Recommended Uses | Mobile DJ, Restaurants, Bars, Small Events, Conferences, Schools, Outdoor Events |
9. Warranty and Support
Product Warranty: This Vonyx product comes with a 2-year product warranty, ensuring coverage against manufacturing defects from the date of purchase. The availability of spare parts in the EU is also guaranteed for 2 years.
Customer Support: For technical assistance, troubleshooting beyond this manual, or warranty claims, please contact your retailer or the official Vonyx customer support channel. Refer to the Vonyx website for the most up-to-date contact information.