Introduction
Thank you for choosing the Mumusuki 4-inch Retro Mechanical Alarm Clock. This manual provides essential information for setting up, operating, and maintaining your new alarm clock. Please read these instructions carefully to ensure proper use and longevity of the product.
Product Overview
The Mumusuki Retro Mechanical Alarm Clock features a classic twin-bell design, an analog display, and a night light function for visibility in low light. It is designed for tabletop use and operates primarily with battery power, with manual wind-up mechanisms for setting time and alarm.

Image: Front view of the Mumusuki 4-inch Retro Mechanical Alarm Clock, showcasing its classic design with twin bells and an analog dial.
Setup
1. Battery Installation
- Locate the battery compartment on the back of the clock.
- Open the battery cover.
- Insert two (2) AA batteries (not included), ensuring correct polarity (+/-).
- Close the battery cover securely.

Image: Rear view of the alarm clock, highlighting the battery compartment and adjustment knobs.
2. Initial Placement
Place the alarm clock on a flat, stable surface such as a bedside table or desk. Ensure it is away from direct sunlight or extreme temperatures.
Operating Instructions
The clock operates on battery power. The 'Manual Wind Up' aspect refers to the traditional mechanical method of setting the time and alarm using the knobs on the back.
1. Setting the Current Time
- Locate the time adjustment knob on the back of the clock (typically the larger knob).
- Rotate the knob in either direction until the hour and minute hands display the correct current time.
2. Setting the Alarm Time
- Locate the alarm adjustment knob on the back of the clock (typically the smaller knob).
- Rotate this knob to set the desired alarm time. The small alarm hand on the clock face will move to indicate the set alarm time.
- To activate the alarm, slide the "ON/OFF" switch (usually located near the alarm set knob) to the "ON" position.
- To deactivate the alarm, slide the "ON/OFF" switch to the "OFF" position.
3. Using the Night Light
The clock features a night light function. To activate it, press the button located on the back of the clock (often a small circular button). The light will illuminate the clock face for a short period, allowing you to read the time in the dark.

Image: The alarm clock with its night light activated, showing the illuminated clock face for nighttime visibility.
Maintenance
1. Cleaning
Wipe the clock with a soft, dry cloth. Do not use abrasive cleaners or solvents, as these may damage the finish. Avoid exposing the clock to water or excessive moisture.
2. Battery Replacement
When the clock's performance diminishes (e.g., alarm weakens, timekeeping becomes inaccurate), it is time to replace the batteries. Follow the battery installation steps outlined in the "Setup" section.
Troubleshooting
- Clock not running or running slowly:
- Check if batteries are installed correctly and are not depleted. Replace if necessary.
- Alarm not sounding:
- Verify that the alarm "ON/OFF" switch is in the "ON" position.
- Confirm the alarm time is set correctly.
- Check battery power.
- Time moving too fast or too slow:
- Locate the small adjustment pin on the back of the clock.
- Shift the pin towards the "(-)" mark if the time is running too fast.
- Shift the pin towards the "(+)" mark if the time is running too slow. Make small adjustments and observe for a day before further changes.
- Night light not working:
- Check battery power.
Specifications
| Brand | Mumusuki |
| Model Number | B0867YBWC5 |
| Color | Black |
| Display Type | Analog |
| Style | Retro |
| Special Feature | Alarm, Night Light |
| Product Dimensions | 4.7"W x 6.3"H |
| Power Source | Battery Powered (Requires 2x AA batteries for operation) |
| Material | Plastic |
| Item Weight | 9.5 ounces (0.27 Kilograms) |
| Batteries Included | No (Requires 2x AA batteries) |
| Operation Mode | Mechanical, Manual |
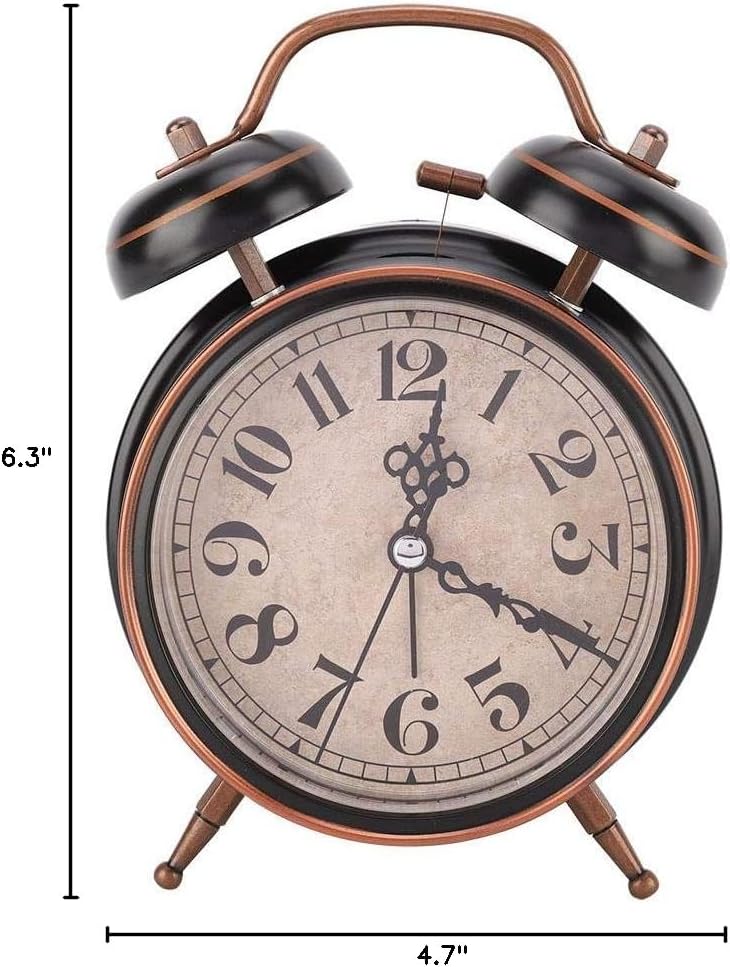
Image: The alarm clock with its dimensions indicated, showing a height of 6.3 inches and a width of 4.7 inches.
Warranty and Support
Specific warranty information for this product is not provided in the available data. For support or inquiries, please refer to the retailer or manufacturer's contact information where the product was purchased.