1. Introduction
Thank you for choosing the SVAVO Automatic Wall-Mounted Touchless Soap Dispenser, Model V-410. This device is designed to provide a hygienic and convenient handwashing experience through its infrared sensor technology. With a generous 600ml capacity and a non-drip design, it is suitable for various liquid soaps and locations, including bathrooms, kitchens, hotels, and offices.

Image 1.1: The SVAVO Automatic Touchless Soap Dispenser in operation, dispensing liquid soap.
2. Important Safety Information
Please read all instructions carefully before using the dispenser. Retain this manual for future reference.
- Do not immerse the dispenser in water or other liquids.
- Ensure the battery compartment is securely closed to prevent water ingress.
- Use only the specified battery type (4 x AA batteries). Do not mix old and new batteries or different types of batteries.
- Remove batteries if the dispenser will not be used for an extended period.
- Keep the sensor area clean and unobstructed for optimal performance.
- Avoid using highly corrosive liquids or abrasive cleaners on the dispenser.
- This product is intended for indoor use only.
3. Package Contents
Verify that all items are present in the package:
- SVAVO Automatic Touchless Soap Dispenser Unit (Model V-410)
- Wall Mounting Hardware (screws, wall anchors)
- User Manual
4. Product Features
- Touchless Operation: Equipped with a smart motion infrared sensor for sanitary, hands-free dispensing.
- Non-Drip Design: The dispensing valve cuts off soap completely after pumping, preventing drips and mess.
- Versatile Compatibility: Suitable for various liquid soaps, dish soaps, shampoos, body lotions, and hand sanitizers (ensure liquid is not too thick).
- Space-Saving Wall Mount: Designed to be mounted on a wall, saving countertop space.
- Energy Efficient: Operates on 4 AA-size batteries (not included) with a long battery life of up to one year.
- Large Capacity: 600ml (21 fl. oz) reservoir reduces the frequency of refilling.
- Circuit Protect Design: Engineered to protect internal circuitry.
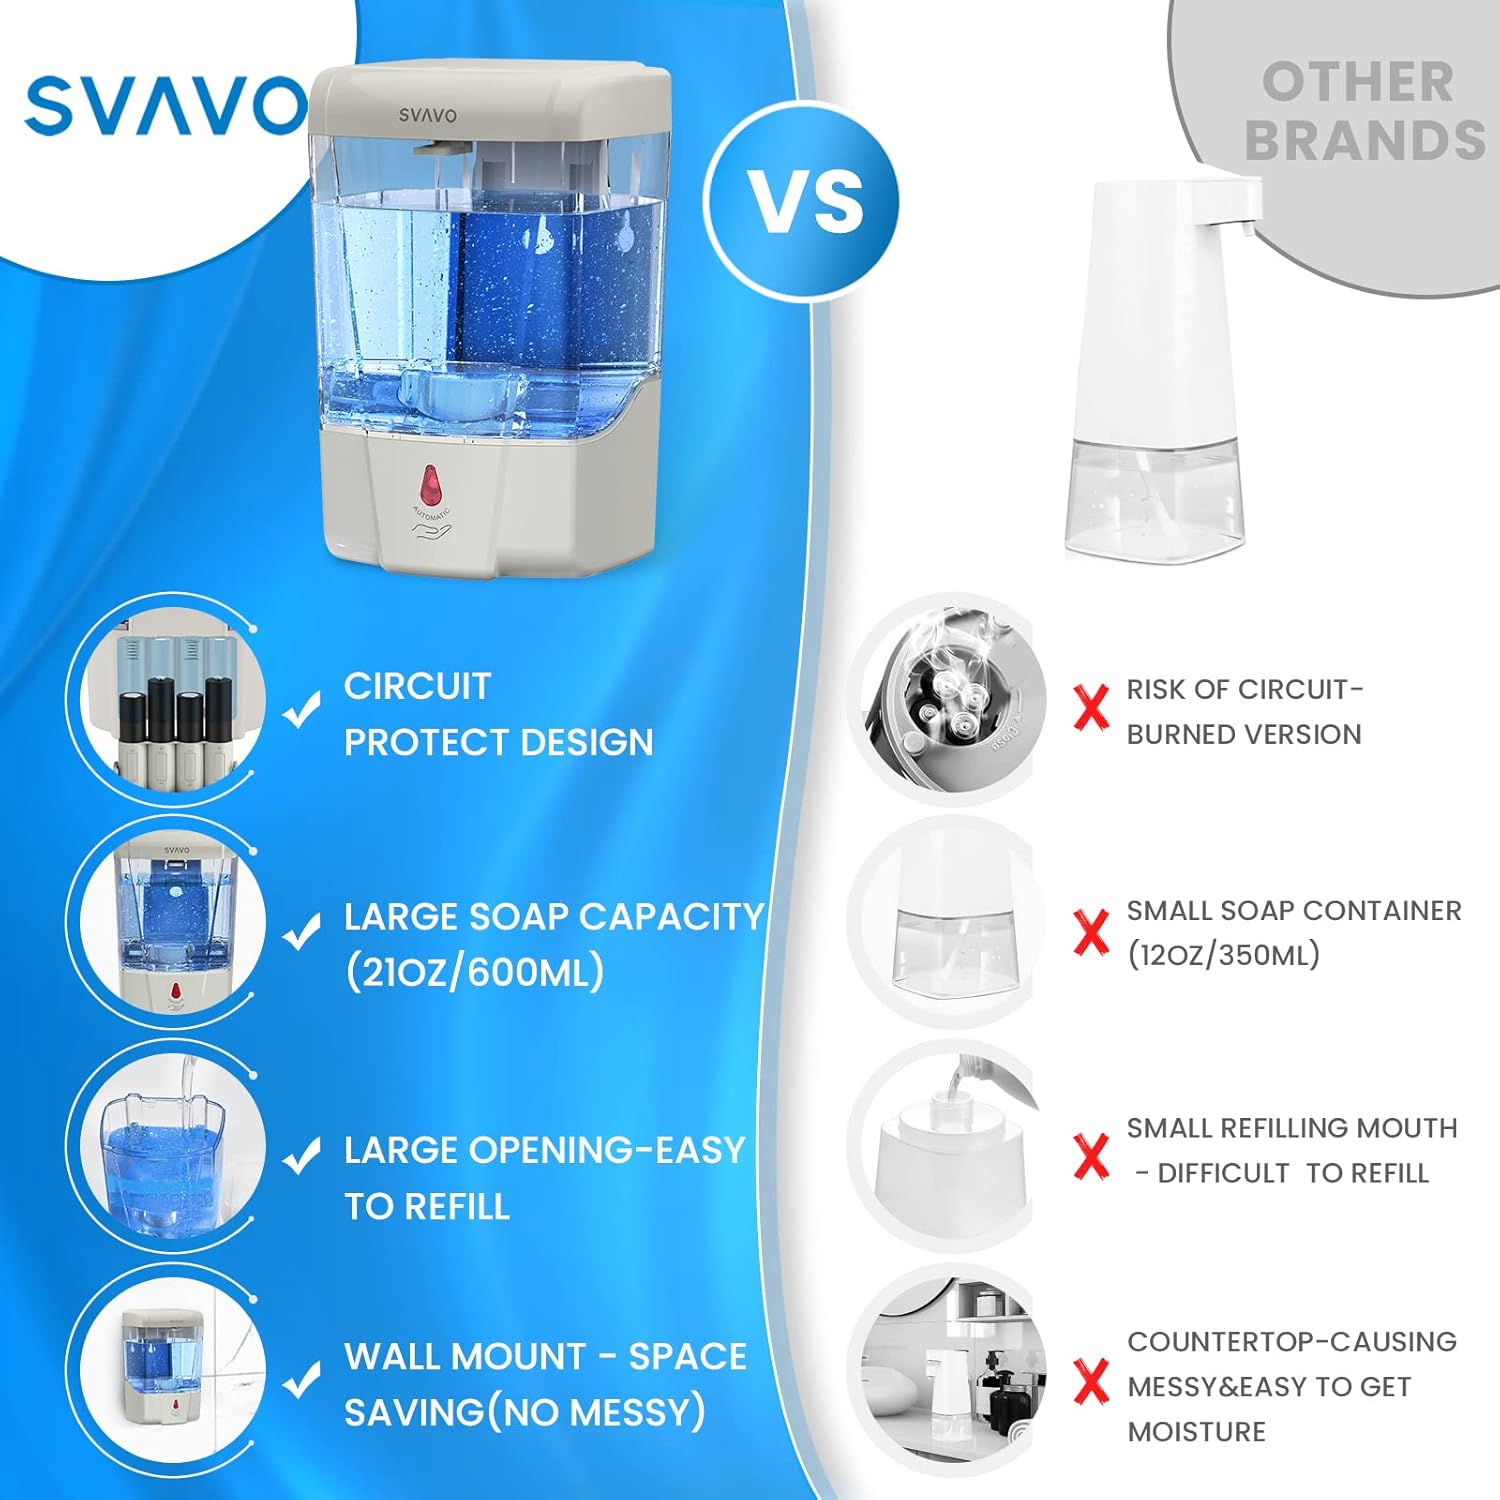
Image 4.1: Key features of the SVAVO dispenser, including circuit protection and large capacity.

Image 4.2: Detailed view of the dispenser's design.
5. Setup and Installation
5.1. Battery Installation
- Open the battery compartment cover, typically located at the back or top of the dispenser.
- Insert 4 new AA-size batteries according to the polarity indicators (+/-) inside the compartment.
- Close the battery compartment cover securely.
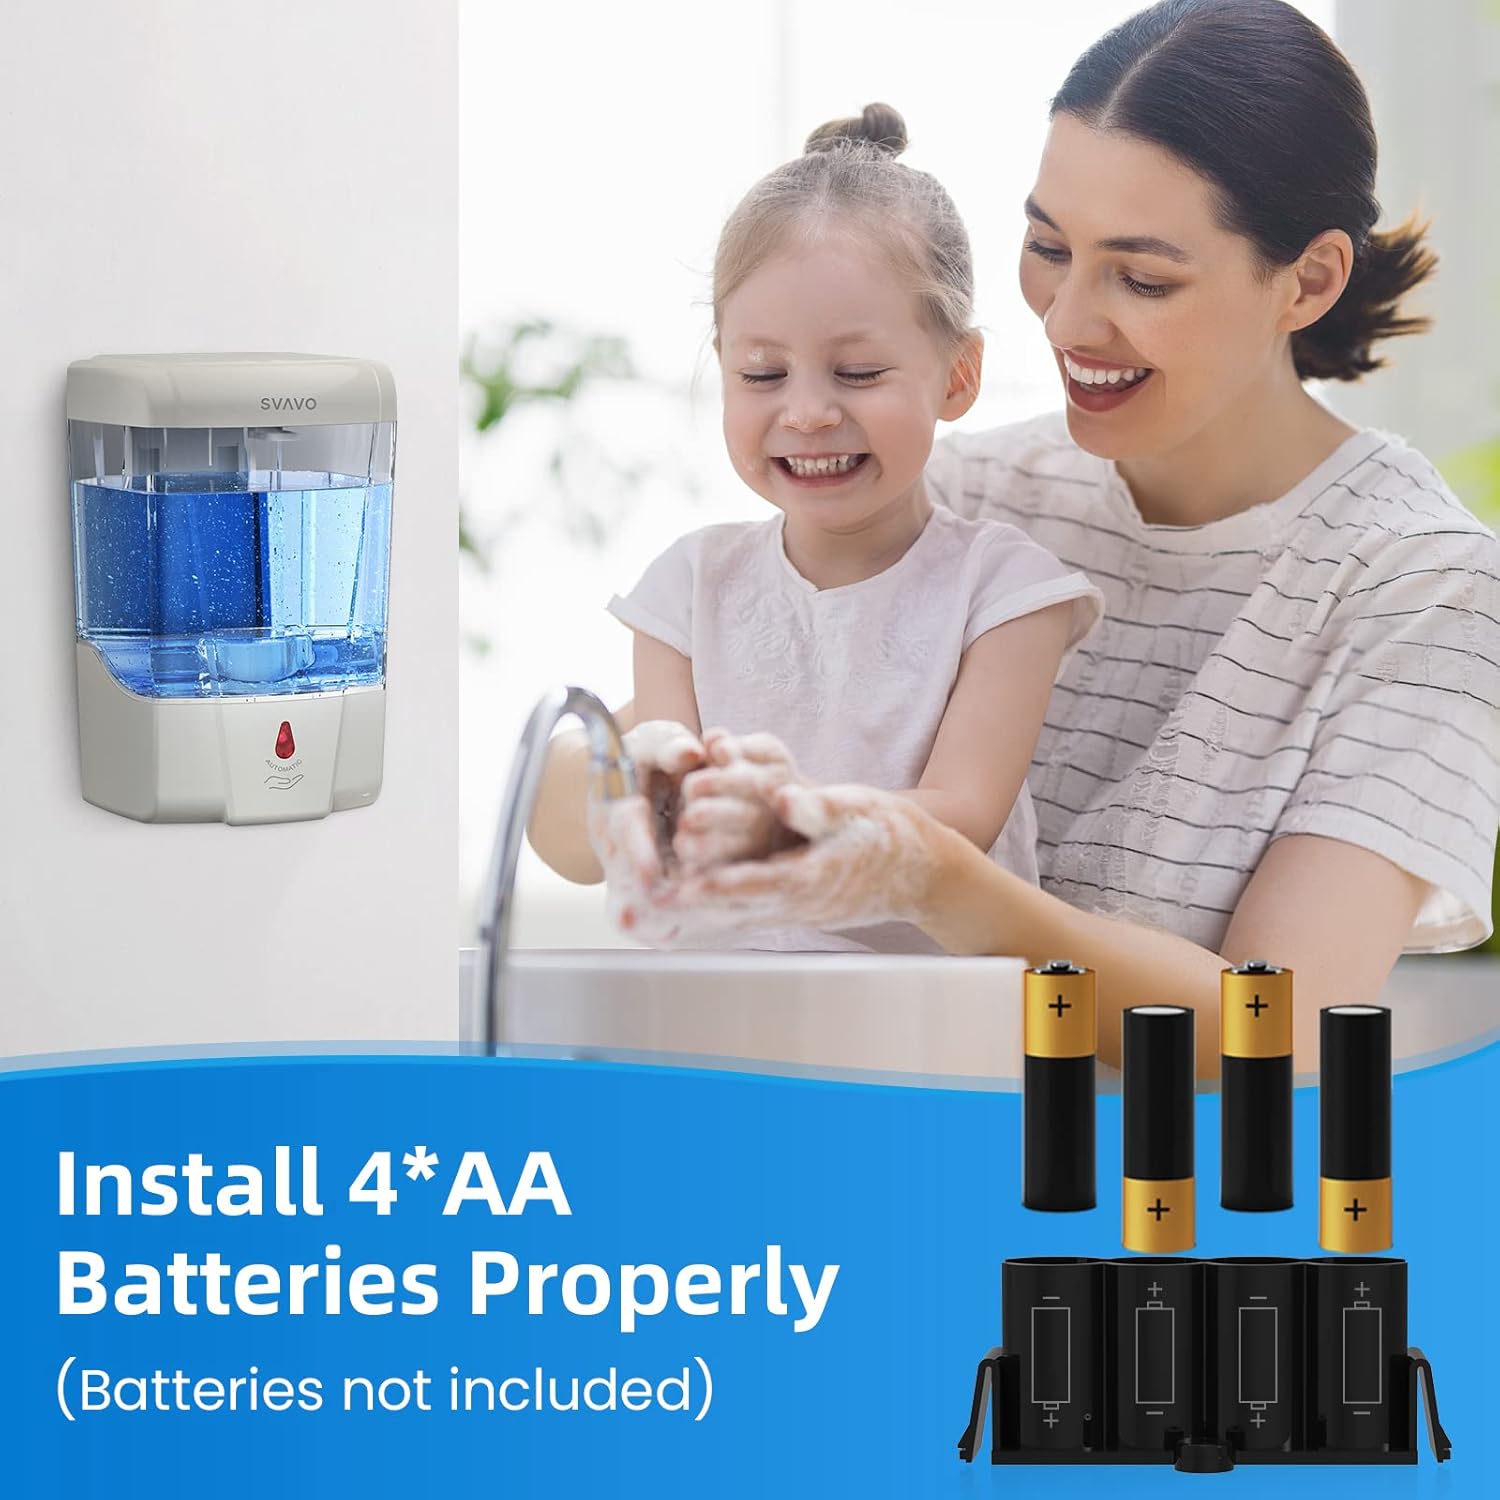
Image 5.1: Proper installation of 4 AA batteries.
5.2. Wall Mounting
- Choose a suitable location on a wall, ensuring the installation height is between 8-12 inches (20-30 cm) above the counter or sink to allow for proper sensor activation and hand placement.
- Mark the positions for the mounting screws using the dispenser's mounting holes as a template.
- Drill holes at the marked positions. Insert wall anchors if necessary.
- Align the dispenser with the drilled holes and secure it to the wall using the provided screws.

Image 5.2: Wall mounting instructions with recommended height and dimensions.
5.3. Filling the Dispenser
- Open the top lid of the dispenser.
- Carefully pour liquid soap, shampoo, body wash, dish soap, or makeup remover into the reservoir. Do not overfill.
- Close the top lid securely.

Image 5.3: The dispenser's large, clear container for easy refilling.

Image 5.4: The wide opening at the top facilitates easy refilling.

Image 5.5: The top lid mechanism for accessing the reservoir.
6. Operating Instructions
6.1. Power On/Off
The dispenser features an On/Off button, typically located near the sensor or on the top. Press the button to turn the unit on or off. A light indicator may confirm the status.
6.2. Dispensing Soap
- Ensure the dispenser is powered on.
- Place your hand approximately 2-3 inches (5-7 cm) below the dispensing nozzle. The infrared sensor will detect your hand.
- The dispenser will automatically release a pre-measured amount of liquid (approximately 1ml).
- Remove your hand once soap is dispensed. The non-drip valve will prevent excess dripping.

Image 6.1: Using the touchless dispenser for hygienic handwashing.

Image 6.2: Detail of the sensor and dispensing area.
6.3. First Use / Priming
When using for the first time or after refilling, it may be necessary to activate the sensor several times until the liquid starts to dispense consistently. This primes the pump mechanism.
7. Maintenance and Care
7.1. Cleaning the Exterior
Wipe the exterior of the dispenser with a soft, damp cloth. Do not use abrasive cleaners, solvents, or immerse the unit in water.
7.2. Refilling
When the liquid level in the transparent reservoir is low, refill it as described in Section 5.3. Regular refilling prevents the pump from running dry.
7.3. Battery Replacement
When the dispenser's performance decreases (e.g., slower dispensing, indicator light flashing), it is time to replace the batteries. Follow the steps in Section 5.1.
7.4. Preventing Clogs
If using thicker liquids, dilute them slightly with water to ensure smooth dispensing. Periodically, you may run warm water through the dispenser (after emptying soap) to clear any potential clogs in the nozzle.
8. Troubleshooting
| Problem | Possible Cause | Solution |
|---|---|---|
| Dispenser does not turn on or dispense. | Batteries are dead or incorrectly installed. Dispenser is turned off. | Replace batteries with new ones, ensuring correct polarity. Turn the dispenser on using the power button. |
| No soap dispensed, but motor runs. | Reservoir is empty. Pump is not primed. Liquid is too thick or clogged. | Refill the reservoir. Activate the sensor several times to prime the pump. Dilute thick liquids or clean the nozzle. |
| Soap leaks from the dispenser. | Lid not closed properly. Liquid is too thin. Internal seal issue. | Ensure the top lid is securely closed. Use a slightly thicker liquid soap. If leaking persists, contact customer support. |
| Sensor is not responding. | Sensor is dirty or obstructed. Insufficient light. | Clean the sensor window with a soft cloth. Ensure adequate lighting in the area. |
9. Specifications
- Model: V-410
- Brand: SVAVO
- Color: Gray
- Material: Plastic
- Liquid Volume: 600 Milliliters (21 fl. oz)
- Product Dimensions: 4.3"L x 3.9"W x 6.5"H (110mm L x 100mm W x 165mm H)
- Item Weight: 1.1 pounds
- Power Source: 4 x AA Batteries (not included)
- UPC: 711745909168
10. Warranty and Customer Support
SVAVO provides lifetime technical support for this product. If you encounter any issues with your touchless soap dispenser, please do not hesitate to contact us via the Amazon email system. We are committed to assisting you until you are satisfied.
For further assistance, please refer to the contact information provided with your purchase or visit the official SVAVO store on Amazon.