1. Introduction
This manual provides comprehensive instructions for the installation, operation, and maintenance of your UpStart Components D7824706Q Refrigerator Ice Maker Replacement. This unit is designed to be compatible with specific Amana refrigerator models, including DRB1901CW (PDRB1901CW0), and replaces W10190978 icemakers. Please read this manual thoroughly before attempting installation or operation to ensure proper function and safety.
2. Safety Information
WARNING: Risk of Electric Shock and Injury.
- Always disconnect power to the refrigerator before attempting any installation, repair, or maintenance. Failure to do so can result in serious injury or death.
- Wear appropriate personal protective equipment, such as gloves, during installation to prevent cuts or scrapes.
- Ensure all electrical connections are secure and correctly made to prevent electrical hazards.
- If you are unsure about any step, consult a qualified appliance technician.
- This replacement part is not an OEM product. Ensure compatibility with your specific refrigerator model before installation.
3. Package Contents
Carefully unpack the box and verify that all the following components are included:
- 1x D7824706Q Refrigerator Ice Maker Unit
- 2x Wiring Harnesses (various lengths for compatibility)
- 1x Mounting Bracket
- 1x Mounting Screw
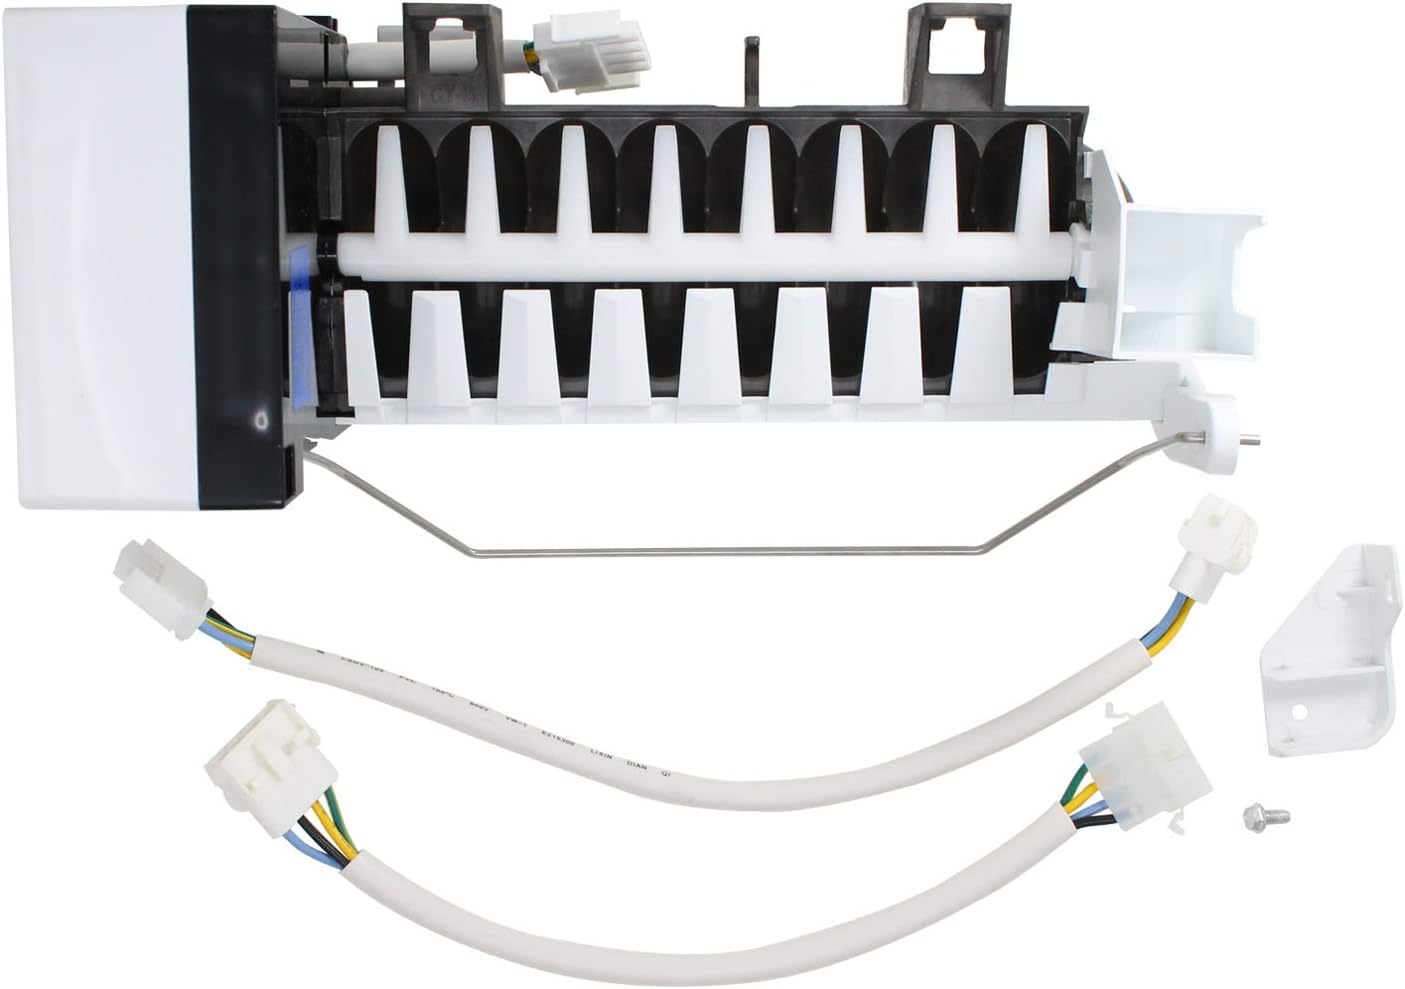
Image 3.1: Complete package contents including the ice maker unit, wiring harnesses, mounting bracket, and screw.

Image 3.2: Front view of the D7824706Q Refrigerator Ice Maker unit, showing the ice mold and ejector mechanism.

Image 3.3: Rear view of the D7824706Q Refrigerator Ice Maker unit, showing the electrical connections and motor housing.

Image 3.4: Close-up of the included wiring harnesses, mounting bracket, and screw, essential for installation.
4. Setup & Installation
Follow these steps carefully to install your new ice maker. Refer to your refrigerator's original service manual for specific panel removal instructions if needed.
4.1. Preparation
- Disconnect Power: Unplug the refrigerator from the wall outlet or turn off the circuit breaker supplying power to the refrigerator. This is a critical safety step.
- Access Ice Maker Compartment: Open the freezer door and locate the existing ice maker. You may need to remove the ice bucket and any shelves or panels obstructing access.
- Verify Compatibility: Before proceeding, visually compare the new UpStart Components ice maker with your old unit and the provided wiring harnesses to ensure they match.
4.2. Removing the Old Ice Maker
- Disconnect Wiring: Carefully disconnect the electrical wiring harness from the old ice maker. There may be a locking tab that needs to be pressed.
- Remove Mounting Screws: Locate and remove the screws that secure the old ice maker to the freezer wall or ceiling. Keep these screws if they are in good condition, as you may reuse them.
- Remove Old Unit: Gently slide or pull the old ice maker out of its mounting position. Be careful not to damage any surrounding components.
4.3. Installing the New Ice Maker
- Attach Mounting Bracket (if necessary): If your refrigerator requires a specific mounting bracket not integrated into the new ice maker, attach the provided bracket to the new unit using the included screw.
- Position New Ice Maker: Carefully slide the new D7824706Q ice maker into the mounting position in the freezer. Ensure it aligns correctly with the water fill tube.
- Secure Ice Maker: Use the original mounting screws (or new ones if provided and compatible) to firmly secure the new ice maker to the freezer wall or ceiling. Do not overtighten.
- Connect Wiring Harness: Select the appropriate wiring harness from the package that matches your refrigerator's connector. Plug one end into the new ice maker and the other end into the refrigerator's electrical receptacle. Ensure a secure connection.
- Replace Panels/Shelves: Reinstall any shelves or panels that were removed to access the ice maker.
4.4. Final Steps
- Restore Power: Plug the refrigerator back into the wall outlet or turn on the circuit breaker.
- Initial Fill Cycle: The ice maker will typically perform an initial fill cycle within a few minutes of power restoration. Listen for the water valve to open and water to flow into the ice maker.
- First Ice Production: It may take several hours for the first batch of ice to be produced and dropped into the ice bucket. Discard the first few batches of ice to ensure cleanliness.
5. Operating Instructions
Once installed, the D7824706Q ice maker operates automatically. Ensure the freezer temperature is set correctly (typically between 0°F and 5°F or -18°C and -15°C) for optimal ice production.
- Ice Level Arm: The ice maker features a shut-off arm. When the ice bucket is full, the arm will rise and stop ice production. As ice is used, the arm will lower, and production will resume.
- Water Supply: Ensure your refrigerator's water supply line is connected and the water valve is open. A clogged or closed water line will prevent ice production.
- Initial Ice: The first 24 hours of operation may result in smaller or irregularly shaped ice cubes. This is normal as the system stabilizes.
6. Maintenance
Regular maintenance helps ensure the longevity and efficient operation of your ice maker.
- Cleaning the Ice Bucket: Periodically remove and wash the ice bucket with mild soap and warm water. Rinse thoroughly and dry completely before returning it to the freezer.
- Cleaning the Ice Maker: If mineral deposits or debris accumulate on the ice maker, disconnect power to the refrigerator and gently wipe the ice mold and ejector mechanism with a damp cloth. Do not use abrasive cleaners or sharp objects.
- Water Filter: If your refrigerator has a water filter, ensure it is replaced according to the manufacturer's recommendations to maintain water quality and prevent clogs in the ice maker's water line.
- Check Water Line: Occasionally inspect the water supply line for kinks, leaks, or blockages.
7. Troubleshooting
If your ice maker is not functioning as expected, refer to the following common issues and solutions:
| Problem | Possible Cause | Solution |
|---|---|---|
| Ice maker not producing ice. | Refrigerator not plugged in or power off. Water supply valve closed or kinked line. Freezer temperature too high. Ice level arm in 'off' position. Clogged water filter. | Ensure refrigerator has power. Open water supply valve, straighten line. Set freezer to 0-5°F (-18 to -15°C). Lower the ice level arm. Replace water filter. |
| Ice cubes are small or hollow. | Low water pressure. Clogged water filter. Freezer temperature too high. | Check household water pressure. Replace water filter. Lower freezer temperature. |
| Ice maker is leaking. | Loose water line connection. Cracked water fill tube. Ice maker not level. | Tighten water line connections. Inspect and replace fill tube if damaged. Ensure ice maker is securely mounted and level. |
| Ice maker is noisy. | Normal operation sounds. Loose mounting screws. | Some operational sounds are normal. If excessive, check mounting screws for tightness. |
If these troubleshooting steps do not resolve the issue, please contact UpStart Components customer support.
8. Specifications
- Part Number: AP-D7824706Q-DL95
- Item Model Number: AP-D7824706Q-DL95
- Manufacturer: UpStart Components
- Compatibility: Replaces D7824706Q, W10190978 Icemaker. Compatible with Amana DRB1901CW (PDRB1901CW0) and other models listed in product description.
- Date First Available: March 18, 2020
9. Warranty & Support
This UpStart Components replacement part is covered by a warranty offered solely by UpStart Components. For specific warranty terms, duration, and to initiate a warranty claim, please refer to the documentation included with your purchase or visit the official UpStart Components website.
For technical assistance, troubleshooting beyond this manual, or to inquire about replacement parts, please contact UpStart Components customer support through their official channels.